
Vue.js Web 開發中的有用工具
已發表: 2022-03-10在處理新項目時,根據應用程序的使用方式,有一些必要的功能。 例如,如果您要存儲特定於用戶的數據,則需要處理身份驗證,這將需要設置需要驗證的表單。 身份驗證和表單驗證等事情很常見; 有可能適合您的用例的解決方案。
為了正確利用您的開發時間,最好使用可用的東西,而不是發明您的。
作為一名新開發人員,您可能不了解 Vue 生態系統為您提供的所有內容。 本文將對此有所幫助; 它將涵蓋某些有用的工具,這些工具將幫助您構建更好的 Vue 應用程序。
注意:這些庫有替代品,本文絕不會將這幾個放在其他庫之上。 他們只是我合作過的人。
本教程面向剛開始學習 Vue 或已經具備 Vue 基礎知識的初學者。 本教程中使用的所有代碼片段都可以在我的 GitHub 上找到。
Vue通知
在用戶交互過程中,通常需要向用戶顯示成功消息、錯誤消息或隨機信息。 在本節中,我們將了解如何使用vue-notification向用戶顯示消息和警告。 這個包提供了一個帶有漂亮動畫/過渡的界面,用於在您的應用程序中向您的用戶顯示錯誤、一般信息和成功消息,並且不需要大量配置即可啟動和運行。
安裝
您可以根據項目的包管理器使用 Yarn 或 NPM 在項目中安裝vue-notification
紗
yarn add vue-notificationnpm
npm install --save vue-notification安裝完成後,接下來就是將其添加到應用程序的入口點main.js文件中。
main.js
//several lines of existing code in the file import Notifications from 'vue-notification' Vue.use(Notifications)此時,我們只需要在App.vue文件中添加通知組件,就可以在我們的應用中顯示通知。 我們將這個組件添加到App.vue文件的原因是為了避免在我們的應用程序中重複,因為無論用戶在我們的應用程序中的哪個頁面上, App.vue中的組件(例如頁眉和頁腳組件)總是能得到的。 這需要在我們需要向用戶顯示通知的每個文件中註冊通知組件。
應用程序.vue
<template> <div> <div> <router-link to="/">Home</router-link> | <router-link to="/about">Notifications</router-link> </div> <notifications group="demo"/> <router-view /> </div> </template> 在這裡,我們添加了這個組件的一個實例,它接受一個group屬性,該屬性將用於對我們擁有的不同類型的通知進行分組。 這是因為通知組件接受許多指示組件行為方式的道具,我們將研究其中的一些。
-
group
此道具用於指定您的應用中可能擁有的不同類型的通知。 例如,您可能決定使用不同的樣式和行為,具體取決於通知應該服務的目的、表單驗證、API 響應等。 -
type
這個道具接受一個值,作為我們應用程序中每種通知類型的“類名”,示例可以包括success、error和warn。 如果我們使用其中任何一種作為通知類型,我們可以通過使用此類格式vue-notification + '.' + type輕鬆設置組件的樣式。vue-notification + '.' + type,即.vue-notification.warnforwarn等等。 -
duration
這個道具指定notification組件在消失之前應該出現多長時間。 它接受一個數字作為以ms為單位的值,如果您希望它保留在用戶的屏幕上直到他們點擊它,它也接受一個負數 (-1)。 -
position
此道具用於設置您希望通知出現在應用程序中的位置。 一些可用的選項是top left、top right、中top center、bottom right、bottom left和bottom center。
我們可以在App.vue中將這些道具添加到我們的組件中,所以它現在看起來像這樣;
<template> <div> <div> <router-link to="/">Home</router-link> | <router-link to="/about">Notifications</router-link> </div> <notifications :group="group" :type="type" :duration="duration" :position="position" /> <router-view /> </div> </template> <script> export default { data() { return { duration: -1, group: "demo", position: "top center", type: "info", }; }, }; </script> <style> .vue-notification.info { border-left: 0; background-color: orange; } .vue-notification.success { border-left: 0; background-color: limegreen; } .vue-notification.error { border-left: 0; background-color: red; } </style> 我們還為我們將在應用程序中使用的不同通知類型添加樣式。 請注意,除了group之外,我們可以在想要顯示通知時即時傳遞每個剩餘的道具,並且它仍然會相應地工作。 要在任何 Vue 文件中顯示通知,您可以執行以下操作。
vueFile.vue
this.$notify({ group: "demo", type: "error", text: "This is an error notification", }); 在這裡,我們在demo的group通知下創建type error的通知。 屬性text接受您希望通知包含的消息,在這種情況下,消息是“這是一個錯誤通知”。 這就是通知在您的應用程序中的樣子。
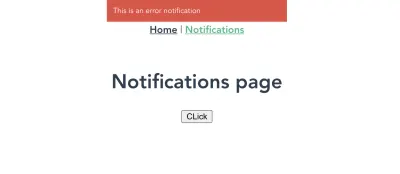
vue-notification in action:在瀏覽器中顯示錯誤通知。 (大預覽)您可以在官方文檔頁面上找到其他可用的道具和其他配置通知的方法。
維利達
Web 上最常用的元素之一是表單元素( input[type='text'] 、 input[type='email'] 、 input[type='password']等),並且總是有一個需要驗證用戶輸入以確保他們發送正確的數據和/或在輸入字段中使用正確的格式。 使用 Vuelidate,您可以向 Vue.js 應用程序中的表單添加驗證,從而節省時間並從放入此包中的時間中受益。 我聽說 Vuelidate 已經有一段時間了,但我有點不願意看它,因為我認為它太複雜了,這意味著我要從頭開始為我工作的應用程序中的大多數表單字段編寫驗證。
當我最終查看文檔時,我發現入門並不難,我可以立即驗證我的表單字段並繼續下一步。
安裝
您可以使用以下任何包管理器安裝 Vuelidate。
紗
yarn add vuelidatenpm
npm install vuelidate --save安裝後,接下來就是將它添加到main.js文件中的應用程序配置中,以便您可以在 vue 文件中使用它。
import Vuelidate from 'vuelidate' Vue.use(Vuelidate)假設您的應用中有一個看起來像這樣的表單;
vuelidate.vue
<template> <form @submit.prevent="login" class="form"> <div class="input__container"> <label for="fullName" class="input__label">Full Name</label> <input type="text" name="fullName" v-model="form.fullName" class="input__field" /> </div> <div class="input__container"> <label for="email" class="input__label">Email</label> <input type="email" name="email" v-model="form.email" class="input__field" /> </div> <div class="input__container"> <label for="email" class="input__label">Age</label> <input type="number" name="age" v-model="form.age" class="input__field" /> </div> <div class="input__container"> <label for="password" class="input__label">Password</label> <input type="password" name="password" v-model="form.password" class="input__field" /> </div> <input type="submit" value="LOGIN" class="input__button" /> <p class="confirmation__text" v-if="submitted">Form clicked</p> </form> </template> <script> export default { data() { return { submitted: false, form: { email: null, fullName: null, age: null, password: null, }, }; }, methods: { login() { this.submitted = true; }, }, }; </script> 現在要驗證這種類型的表單,您首先需要確定每個表單字段需要哪種類型的驗證。 例如,您可以決定需要fullName的最小長度為10 ,最小年齡為18 。
Vuelidate 帶有內置的驗證器,我們只需要導入它即可使用。 我們還可以選擇基於特定格式驗證密碼字段,例如Password should contain at least a lower case letter, an upper case letter, and a special character 。 我們可以編寫自己的小驗證器來執行此操作,並將其插入 Vuelidate 的插件列表中。
讓我們一步一步來。
使用內置驗證器
<script> import { required, minLength, minValue, email, } from "vuelidate/lib/validators"; export default { validations: { form: { email: { email, required, }, fullName: { minLength: minLength(10), required, }, age: { required, minValue: minValue(18), }, }, }, }; </script> 在這裡,我們導入了一些我們需要正確驗證表單的驗證器。 我們還添加了一個validations屬性,我們在其中為要驗證的每個表單字段定義驗證規則。
此時,如果您檢查應用程序的 devTools,您應該會看到如下所示的內容;

vuelidate計算屬性(大預覽) $v計算屬性包含許多用於確認表單有效性的方法,但我們只關注其中的幾個:
-
$invalid
檢查表單是否通過所有驗證。 -
email
檢查該值是否為有效的電子郵件地址。 -
minValue
檢查age的值是否通過了minValue檢查。 -
minLength
驗證fullName的長度。 -
required
確保提供所有必填字段。
如果您輸入的age值小於驗證中設置的最小年齡並檢查$v.form.age.minValue ,它將設置為false ,這意味著輸入字段中的值未通過minValue驗證檢查.
使用自定義驗證器
我們還需要驗證我們的密碼字段並確保它包含所需的格式,但 Vuelidate 沒有我們可以用來實現此目的的內置驗證器。 我們可以編寫自己的自定義驗證器,使用 RegEx 執行此操作。 這個自定義驗證器看起來像這樣;
<script> import { required, minLength, minValue, email, } from "vuelidate/lib/validators"; export default { validations: { form: { //existing validator rules password: { required, validPassword(password) { let regExp = /^(?=.*[0-9])(?=.*[!@#$%^&*])(?=.*[AZ]+)[a-zA-Z0-9!@#$%^&*]{6,}$/; return regExp.test(password); }, }, }, }, }; </script>在這裡,我們創建了一個自定義驗證器,它使用正則表達式來檢查密碼是否包含以下內容;

- 至少有一個大寫字母;
- 至少一個小寫字母;
- 至少一個特殊字符;
- 至少一個數字;
- 最小長度必須為 6。
如果您嘗試輸入任何不符合上述任何要求的密碼,則validPassword將設置為false 。
現在我們確定我們的驗證工作正常,我們必須顯示適當的錯誤消息,以便用戶知道他們為什麼不能繼續。 這看起來像這樣:
<template> <form @submit.prevent="login" class="form"> <div class="input__container"> <label for="fullName" class="input__label">Full Name</label> <input type="text" name="fullName" v-model="form.fullName" class="input__field" /> <p class="error__text" v-if="!$v.form.fullName.required"> This field is required </p> </div> <div class="input__container"> <label for="email" class="input__label">Email</label> <input type="email" name="email" v-model="form.email" class="input__field" /> <p class="error__text" v-if="!$v.form.email.required"> This field is required </p> <p class="error__text" v-if="!$v.form.email.email"> This email is invalid </p> </div> <div class="input__container"> <label for="email" class="input__label">Age</label> <input type="number" name="age" v-model="form.age" class="input__field" /> <p class="error__text" v-if="!$v.form.age.required"> This field is required </p> </div> <div class="input__container"> <label for="password" class="input__label">Password</label> <input type="password" name="password" v-model="form.password" class="input__field" /> <p class="error__text" v-if="!$v.form.password.required"> This field is required </p> <p class="error__text" v-else-if="!$v.form.password.validPassword"> Password should contain at least a lower case letter, an upper case letter, a number and a special character </p> </div> <input type="submit" value="LOGIN" class="input__button" /> </form> </template>在這裡,我們添加一個段落,該段落顯示一個文本,告訴用戶一個字段是必需的,電子郵件的輸入值無效或密碼不包含所需的字符。 如果我們在您的瀏覽器中查看此內容,您會看到錯誤已經出現在每個輸入字段下。
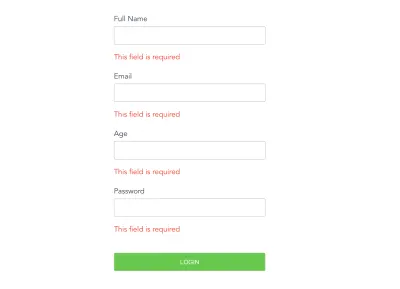
這對用戶體驗不利,因為用戶尚未與表單交互,因此至少在用戶嘗試提交表單之前,錯誤文本不應該是可見的。 為了解決這個問題,我們將submitted添加到顯示錯誤文本所需的條件,並在用戶單擊提交按鈕時將submitted的值切換為true 。
<template> <form @submit.prevent="login" class="form"> <div class="input__container"> <label for="fullName" class="input__label">Full Name</label> <input type="text" name="fullName" v-model="form.fullName" class="input__field" /> <p class="error__text" v-if="submitted && !$v.form.fullName.required"> This field is required </p> </div> <div class="input__container"> <label for="email" class="input__label">Email</label> <input type="email" name="email" v-model="form.email" class="input__field" /> <p class="error__text" v-if="submitted && !$v.form.email.required"> This field is required </p> <p class="error__text" v-if="submitted && !$v.form.email.email"> This email is invalid </p> </div> <div class="input__container"> <label for="email" class="input__label">Age</label> <input type="number" name="age" v-model="form.age" class="input__field" /> <p class="error__text" v-if="submitted && !$v.form.age.required"> This field is required </p> </div> <div class="input__container"> <label for="password" class="input__label">Password</label> <input type="password" name="password" v-model="form.password" class="input__field" /> <p class="error__text" v-if="submitted && !$v.form.password.required"> This field is required </p> <p class="error__text" v-else-if="submitted && !$v.form.password.validPassword" > Password should contain at least a lower case letter, an upper case letter, a number and a special character </p> </div> <input type="submit" value="LOGIN" class="input__button" /> </form> </template>現在錯誤文本在用戶點擊提交按鈕之前不會出現,這對用戶來說要好得多。 如果表單中輸入的值不滿足驗證,則會出現每個驗證錯誤。
最後,我們只想在表單上的所有驗證都通過時處理用戶的輸入,我們可以做到這一點的一種方法是使用$v計算屬性中存在的form上的$invalid屬性。 讓我們來看看如何做到這一點:
methods: { login() { this.submitted = true; let invalidForm = this.$v.form.$invalid; //check that every field in this form has been entered correctly. if (!invalidForm) { // process the form data } }, }, 在這裡,我們正在檢查以確保表格已完全填寫並正確填寫。 如果返回false ,則表示表單有效,我們可以處理表單中的數據,但如果返回true ,則表示表單仍然無效,用戶仍然需要處理表單中的一些錯誤。 我們還可以根據您的偏好使用此屬性來禁用或設置提交按鈕的樣式。
Vuex-持久狀態
在開發過程中,有些情況下您會在 Vuex 商店中存儲用戶信息和令牌等數據。 但是,如果您的用戶嘗試從瀏覽器刷新您的應用程序或從瀏覽器的 URL 選項卡輸入新路由並且您的應用程序的當前狀態隨之丟失,您的 Vuex 存儲數據將不會保留。 如果路由受到導航保護的保護,這會導致用戶被重定向到登錄頁面,這對於您的應用來說是異常行為。 這可以通過vuex-persistedstate修復,讓我們看看如何。
安裝
您可以使用以下兩種方法中的任何一種來安裝此插件:
紗
yarn add vuex-persistedstatenpm
npm install --save vuex-persistedstate安裝過程完成後,下一步是配置此插件,以便在您的 Vuex 商店中使用。
import Vue from 'vue' import Vuex from 'vuex' import createPersistedState from "vuex-persistedstate"; Vue.use(Vuex) export default new Vuex.Store({ state: {}, mutations: {}, actions: {}, modules: {}, plugins: [createPersistedState()] }) 此時,我們所有的 Vuex Store 都將存儲在 localStorage 中(默認情況下),但vuex-persistedstate帶有使用sessionStorage或cookies的選項。
import Vue from 'vue' import Vuex from 'vuex' import createPersistedState from "vuex-persistedstate"; Vue.use(Vuex) export default new Vuex.Store({ state: {}, mutations: {}, actions: {}, modules: {}, // changes storage to sessionStorage plugins: [createPersistedState({ storage: window.sessionStorage }); ] })為了確認我們的商店在刷新或關閉瀏覽器選項卡後仍然存在,讓我們將我們的商店更新為如下所示:
import Vue from 'vue' import Vuex from 'vuex' import createPersistedState from "vuex-persistedstate"; Vue.use(Vuex) export default new Vuex.Store({ state: { user: null }, mutations: { SET_USER(state, user) { state.user = user } }, actions: { getUser({ commit }, userInfo) { commit('SET_USER', userInfo) } }, plugins: [createPersistedState()] }) 在這裡,我們添加了一個user狀態,它將存儲上一節中創建的表單中的用戶數據。 我們還添加了一個SET_USER突變,用於修改user狀態。 最後,我們添加一個getUser操作,該操作將接收用戶對象並將其傳遞給SET_USER突變屬性。 接下來是在成功驗證我們的表單後發送此操作。 這看起來像這樣:
methods: { login() { this.submitted = true; let invalidForm = this.$v.form.$invalid; let form = this.form; //check that every field in this form has been entered correctly. if (!invalidForm) { // process the form data this.$store.dispatch("getUser", form); } }, }, 現在,如果您正確填寫表單、提交並打開瀏覽器 devTools 的應用程序選項卡中的localStorage部分,您應該會看到如下所示的vuex屬性:
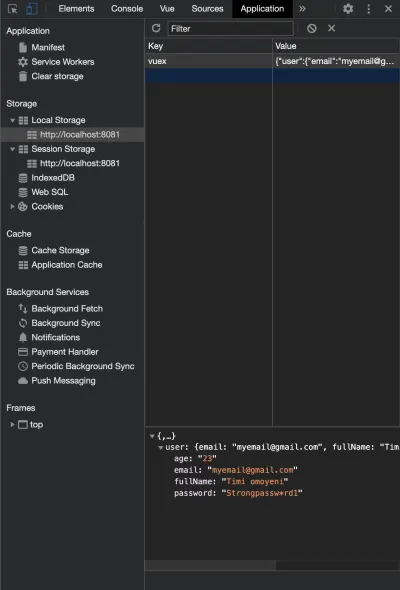
此時,如果您刷新瀏覽器或在新選項卡中打開您的應用程序,您的user狀態仍會在這些選項卡/會話(在 localStorage 上)中持續存在。
結論
有很多庫在 Vuejs Web 開發中非常有用,有時很難選擇要使用的庫或在哪裡找到它們。 以下鏈接包含您可以在 Vue.js 應用程序中使用的庫。
- vuejsexamples.com。
- madewithvuejs.com。
在搜索“庫”時,通常有不止一個庫會執行您在應用程序中嘗試實現的相同操作,重要的是確保您選擇的選項適合您並由它的創建者,所以它不會導致您的應用程序中斷。
更多資源
- “Vue.js 通知”,官方文檔,GitHub
- “Vuelidate”,官方網站
- “使用 Vuelidate 在一小時內完成表單驗證”,CSS-Tricks 的 Sarah Drasner
- “
vuex-persistedstate”,紗線