使用 Google Cloud Platform 構建無服務器前端應用程序
已發表: 2022-03-10最近,應用程序的開發範式已經開始從手動部署、擴展和更新應用程序中使用的資源轉變為依賴第三方雲服務提供商來完成這些資源的大部分管理。
作為希望在盡可能快的時間內構建適合市場的應用程序的開發人員或組織,您的主要關注點可能是向用戶提供核心應用程序服務,而您花費較少的時間進行配置、部署和壓力測試你的申請。 如果這是您的用例,那麼以無服務器方式處理應用程序的業務邏輯可能是您的最佳選擇。 但是怎麼做?
本文對希望在其應用程序中構建某些功能的前端工程師或希望使用部署到 Google Cloud Platform 的無服務器應用程序從現有後端服務中提取和處理某些功能的後端工程師很有幫助。
注意:要從此處介紹的內容中受益,您需要有使用 React 的經驗。 無需具備無服務器應用程序的經驗。
在開始之前,讓我們了解什麼是無服務器應用程序,以及在前端工程師的上下文中構建應用程序時如何使用無服務器架構。
無服務器應用程序
無服務器應用程序是將應用程序分解為微小的可重用事件驅動功能,由公共雲中的第三方雲服務提供商代表應用程序作者託管和管理。 這些由某些事件觸發並按需執行。 雖然serverless詞後面的“ less ”後綴表示沒有服務器,但這並不是 100% 的情況。 這些應用程序仍然在服務器和其他硬件資源上運行,但在這種情況下,這些資源不是由開發人員提供,而是由第三方雲服務提供商提供。 所以它們對應用程序作者來說是無服務器的,但仍然在服務器上運行並且可以通過公共互聯網訪問。
無服務器應用程序的一個示例用例是向訪問您的登錄頁面並訂閱接收產品發布電子郵件的潛在用戶發送電子郵件。 在這個階段,您可能沒有運行後端服務,並且不想犧牲創建、部署和管理服務所需的時間和資源,這一切都是因為您需要發送電子郵件。 在這裡,您可以編寫一個使用電子郵件客戶端的文件並部署到任何支持無服務器應用程序的雲提供商,並在您將此無服務器應用程序連接到您的登錄頁面時讓他們代表您管理此應用程序。
雖然有很多原因可以讓您考慮利用無服務器應用程序或所謂的功能即服務 (FAAS),但對於您的前端應用程序,您應該考慮以下一些非常顯著的原因:
- 應用程序自動縮放
無服務器應用程序是水平擴展的,這種“橫向擴展”是由雲提供商根據調用量自動完成的,因此開發人員不必在應用程序負載過重時手動添加或刪除資源。 - 成本效益
作為事件驅動的無服務器應用程序僅在需要時運行,這反映在費用上,因為它們是根據調用的時間數計費的。 - 靈活性
無服務器應用程序被構建為高度可重用,這意味著它們不綁定到單個項目或應用程序。 可以將特定功能提取到無服務器應用程序中,跨多個項目或應用程序部署和使用。 無服務器應用程序也可以用應用程序作者的首選語言編寫,儘管一些雲提供商只支持少量的語言。
在使用無服務器應用程序時,每個開發人員在公共雲中都有大量的雲提供商可供使用。 在本文的上下文中,我們將重點介紹 Google Cloud Platform 上的無服務器應用程序——它們是如何創建、管理、部署的,以及它們如何與 Google Cloud 上的其他產品集成。 為此,我們將向這個現有的 React 應用程序添加新功能,同時完成以下過程:
- 在雲端存儲和檢索用戶數據;
- 在 Google Cloud 上創建和管理 cron 作業;
- 將 Cloud Functions 部署到 Google Cloud。
注意: Serverless 應用程序不僅僅綁定到 React,只要你喜歡的前端框架或庫可以發出HTTP請求,它就可以使用 serverless 應用程序。
谷歌云函數
Google Cloud 允許開發人員使用 Cloud Functions 創建無服務器應用程序並使用 Functions Framework 運行它們。 正如它們所稱,雲函數是部署到 Google Cloud 的可重用事件驅動函數,用於偵聽六個可用事件觸發器中的特定觸發器,然後執行它被寫入執行的操作。
短暫的雲函數(默認執行超時為 60 秒,最長為 9 分鐘)可以使用 JavaScript、Python、Golang 和 Java 編寫並使用它們的運行時執行。 在 JavaScript 中,它們只能使用一些可用的 Node 運行時版本來執行,並且使用純 JavaScript 以 CommonJS 模塊的形式編寫,因為它們被導出為要在 Google Cloud 上運行的主要功能。
雲函數的一個示例是下面的一個示例,它是用於處理用戶數據的函數的空樣板。
// index.js exports.firestoreFunction = function (req, res) { return res.status(200).send({ data: `Hello ${req.query.name}` }); } 上面我們有一個導出函數的模塊。 執行時,它接收類似於HTTP路由的請求和響應參數。
注意:當發出請求時,雲函數會匹配每個HTTP協議。 當期望請求參數中的數據時,這是值得注意的,因為在發出執行雲功能的請求時附加的數據將出現在POST請求的請求正文中,而GET請求的查詢正文中。
雲功能可以在開發過程中在本地執行,方法是將@google-cloud/functions-framework包安裝在寫入功能所在的同一文件夾中,或者通過運行npm i -g @google-cloud/functions-framework進行全局安裝以將其用於多個功能命令行中npm i -g @google-cloud/functions-framework 。 安裝後,應將其添加到package.json腳本中,導出模塊的名稱類似於以下:
"scripts": { "start": "functions-framework --target=firestoreFunction --port=8000", } 上面我們在package.json文件中的腳本中有一個命令,它運行 functions-framework 並將firestoreFunction指定為要在端口8000上本地運行的目標函數。
我們可以通過使用 curl 向 localhost 上的端口8000發出GET請求來測試此函數的端點。 將以下命令粘貼到終端中將執行此操作並返迴響應。
curl https://localhost:8000?name="Smashing Magazine Author" 上面的命令使用GET HTTP方法發出請求,並以200狀態代碼和包含在查詢中添加的名稱的對像數據進行響應。
部署雲功能
在可用的部署方法中,從本地計算機部署雲功能的一種快速方法是在安裝雲 Sdk 後使用它。 在使用您在 Google Cloud 上的項目對 gcloud sdk 進行身份驗證後,從終端運行以下命令,會將本地創建的函數部署到 Cloud Function 服務。
gcloud functions deploy "demo-function" --runtime nodejs10 --trigger-http --entry-point=demo --timeout=60 --set-env-vars=[name="Developer"] --allow-unauthenticated使用下面解釋的標誌,上面的命令將 HTTP 觸發的函數部署到名為“ demo-function ”的谷歌云。
- 姓名
這是部署雲功能時為其指定的名稱,並且是必需的。 -
region
這是要部署雲功能的區域。 默認情況下,它部署到us-central1。 -
trigger-http
這將選擇 HTTP 作為函數的觸發器類型。 -
allow-unauthenticated
這允許使用其生成的端點通過 Internet 在 Google Cloud 外部調用該函數,而無需檢查調用者是否經過身份驗證。 -
source
從終端到包含要部署的功能的文件的本地路徑。 -
entry-point
這是要從編寫函數的文件中部署的特定導出模塊。 -
runtime
這是此已接受運行時列表中用於函數的語言運行時。 -
timeout
這是函數在超時之前可以運行的最長時間。 默認為 60 秒,最長可設置為 9 分鐘。
注意:使函數允許未經身份驗證的請求意味著具有函數端點的任何人也可以在沒有您授予的情況下發出請求。 為了緩解這種情況,我們可以通過環境變量或通過在每個請求上請求授權標頭來確保端點保持私有。
現在我們的演示功能已經部署並且我們有了端點,我們可以測試這個功能,就好像它正在使用全局安裝的自動加農炮在真實世界的應用程序中使用一樣。 從打開的終端運行autocannon -d=5 -c=300 CLOUD_FUNCTION_URL將在 5 秒內生成 300 個對雲函數的並發請求。 這足以啟動雲功能並生成一些我們可以在功能儀表板上探索的指標。
注意:部署後會在終端中打印出函數的端點。 如果不是這種情況,請從終端運行gcloud function describe FUNCTION_NAME以獲取有關已部署函數的詳細信息,包括端點。
使用儀表板上的指標選項卡,我們可以看到最後一個請求的可視化表示,包括進行了多少次調用、它們持續了多長時間、函數的內存佔用以及為處理髮出的請求而旋轉了多少實例。
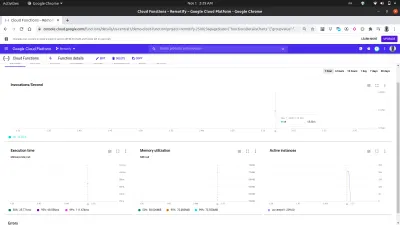
仔細查看上圖中的 Active Instances 圖表可以看出 Cloud Functions 的水平擴展能力,我們可以看到在幾秒鐘內啟動了 209 個實例來處理使用 autocannon 發出的請求。
雲函數日誌
部署到 Google 雲的每個函數都有一個日誌,每次執行此函數時,都會在該日誌中創建一個新條目。 從函數儀表板上的日誌選項卡中,我們可以看到來自云函數的所有日誌條目的列表。
下面是我們部署demo-function中的日誌條目,這些日誌條目是由於我們使用autocannon發出的請求而創建的。
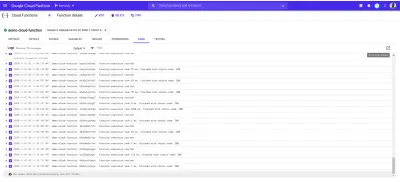
上面的每個日誌條目都準確地顯示了一個函數的執行時間、執行時間以及它以什麼狀態碼結束。 如果函數導致任何錯誤,錯誤的詳細信息(包括錯誤發生的行)將顯示在此處的日誌中。
Google Cloud 上的 Logs Explorer 可用於查看有關來自云功能的日誌的更全面的詳細信息。
具有前端應用程序的雲功能
雲功能對前端工程師來說非常有用和強大。 沒有管理後端應用程序知識的前端工程師可以將功能提取到雲功能中,部署到 Google Cloud 並通過其端點向雲功能發出HTTP請求,並在前端應用程序中使用。
為了展示如何在前端應用程序中使用雲功能,我們將為這個 React 應用程序添加更多功能。 該應用程序已經在身份驗證和主頁設置之間建立了基本路由。 我們將擴展它以使用 React Context API 來管理我們的應用程序狀態,因為創建的雲函數的使用將在應用程序 reducer 中完成。
首先,我們使用createContext API 創建應用程序的上下文,並創建一個 reducer 來處理應用程序中的操作。
// state/index.js import { createContext } from “react”;export const UserReducer = (action, state) => { switch (action.type) { case “CREATE-USER”: break; 案例“上傳用戶圖像”:中斷; 案例“FETCH-DATA”:中斷案例“LOGOUT”:中斷; 默認值:console.log(
${action.type} is not recognized) } };導出 const userState = { 用戶:空,isLoggedIn :假 };
導出 const UserContext = createContext(userState);
上面,我們首先創建了一個包含 switch 語句的UserReducer函數,允許它根據分派到其中的操作類型執行操作。 switch 語句有四種情況,這些是我們將要處理的操作。 目前他們還沒有做任何事情,但是當我們開始與我們的雲功能集成時,我們將逐步實現要在其中執行的操作。
我們還使用 React createContext API 創建和導出了應用程序的上下文,並為其提供了userState對象的默認值,其中包含當前的用戶值,該值將在身份驗證後從 null 更新為用戶的數據,還有一個isLoggedIn布爾值來判斷是否用戶是否登錄。
現在我們可以繼續使用我們的上下文,但在我們這樣做之前,我們需要使用附加到UserContext的 Provider 包裝整個應用程序樹,以便子組件能夠訂閱我們的上下文的值更改。
// index.js import React from "react"; import ReactDOM from "react-dom"; import "./index.css"; import App from "./app"; import { UserContext, userState } from "./state/"; ReactDOM.render( <React.StrictMode> <UserContext.Provider value={userState}> <App /> </UserContext.Provider> </React.StrictMode>, document.getElementById("root") ); serviceWorker.unregister(); 我們在根組件中使用UserContext提供程序包裝我們的輸入應用程序,並在 value 屬性中傳遞我們之前創建的userState默認值。
現在我們已經完全設置了應用程序狀態,我們可以開始使用 Google Cloud Firestore 通過雲功能創建用戶數據模型。
處理應用程序數據
此應用程序中的用戶數據由唯一 ID、電子郵件、密碼和圖像的 URL 組成。 使用雲功能,這些數據將使用 Google Cloud Platform 上提供的 Cloud Firestore 服務存儲在雲端。
Google Cloud Firestore是一個靈活的 NoSQL 數據庫,它是從 Firebase 實時數據庫中分離出來的,具有新的增強功能,可以提供更豐富、更快速的查詢以及離線數據支持。 Firestore 服務中的數據被組織成集合和文檔,類似於 MongoDB 等其他 NoSQL 數據庫。
可以通過 Google Cloud Console 直觀地訪問 Firestore。 要啟動它,請打開左側導航窗格並向下滾動到 Database 部分,然後單擊 Firestore。 這將為具有現有數據的用戶顯示集合列表,或者在沒有現有集合時提示用戶創建新集合。 我們將創建一個用戶集合以供我們的應用程序使用。
與 Google Cloud Platform 上的其他服務類似,Cloud Firestore 也有一個 JavaScript 客戶端庫,用於在節點環境中使用(如果在瀏覽器中使用會拋出錯誤)。 為了即興發揮,我們使用@google-cloud/firestore包在雲功能中使用 Cloud Firestore。
將 Cloud Firestore 與雲功能一起使用
首先,我們將創建的第一個函數從demo-function重命名為firestoreFunction ,然後將其擴展以連接 Firestore 並將數據保存到用戶的集合中。
require("dotenv").config(); const { Firestore } = require("@google-cloud/firestore"); const { SecretManagerServiceClient } = require("@google-cloud/secret-manager"); const client = new SecretManagerServiceClient(); exports.firestoreFunction = function (req, res) { return { const { email, password, type } = req.body; const firestore = new Firestore(); const document = firestore.collection("users"); console.log(document) // prints details of the collection to the function logs if (!type) { res.status(422).send("An action type was not specified"); } switch (type) { case "CREATE-USER": break case "LOGIN-USER": break; default: res.status(422).send(`${type} is not a valid function action`) } }; 為了處理更多涉及 fire-store 的操作,我們添加了一個帶有兩種情況的 switch 語句來處理我們應用程序的身份驗證需求。 我們的 switch 語句評估一個type表達式,當我們從我們的應用程序向此函數發出請求時,我們添加到請求正文中,並且每當我們的請求正文中不存在此type數據時,該請求被標識為錯誤請求和400狀態代碼與指示丟失type的消息一起作為響應發送。
我們使用 Cloud Firestore 客戶端庫中的應用程序默認憑據 (ADC) 庫與 Firestore 建立連接。 在下一行,我們在另一個變量中調用集合方法並傳入我們集合的名稱。 我們將使用它來進一步對包含的文檔的集合執行其他操作。
注意: Google Cloud 上服務的客戶端庫使用初始化構造函數時傳入的創建的服務帳戶密鑰連接到各自的服務。 當服務帳戶密鑰不存在時,它默認使用應用程序默認憑據,然後使用分配給雲功能的IAM角色進行連接。
使用 Gcloud SDK 編輯本地部署的函數的源代碼後,我們可以從終端重新運行之前的命令來更新和重新部署雲函數。
現在已經建立了連接,我們可以實現CREATE-USER案例以使用請求正文中的數據創建新用戶。
require("dotenv").config(); const { Firestore } = require("@google-cloud/firestore"); const path = require("path"); const { v4 : uuid } = require("uuid") const cors = require("cors")({ origin: true }); const client = new SecretManagerServiceClient(); exports.firestoreFunction = function (req, res) { return cors(req, res, () => { const { email, password, type } = req.body; const firestore = new Firestore(); const document = firestore.collection("users"); if (!type) { res.status(422).send("An action type was not specified"); } switch (type) { case "CREATE-USER": if (!email || !password) { res.status(422).send("email and password fields missing"); } const id = uuid() return bcrypt.genSalt(10, (err, salt) => { bcrypt.hash(password, salt, (err, hash) => { document.doc(id) .set({ id : id email: email, password: hash, img_uri : null }) .then((response) => res.status(200).send(response)) .catch((e) => res.status(501).send({ error : e }) ); }); }); case "LOGIN": break; default: res.status(400).send(`${type} is not a valid function action`) } }); }; 我們使用 uuid 包生成了一個 UUID,將其作為要保存的文檔的 ID,方法是將其傳遞給文檔的set方法以及用戶的 ID。 默認情況下,每個插入的文檔都會生成一個隨機 ID,但在這種情況下,我們將在處理圖像上傳時更新文檔,而 UUID 將用於獲取要更新的特定文檔。 我們不是以純文本形式存儲用戶密碼,而是首先使用 bcryptjs 對其進行加鹽,然後將結果哈希存儲為用戶密碼。
將firestoreFunction雲函數集成到應用程序中,我們從用戶減速器中的CREATE_USER案例中使用它。
單擊Create Account按鈕後,將向具有CREATE_USER類型的 reducer 發送一個操作,以向firestoreFunction函數的端點發出一個包含鍵入的電子郵件和密碼的POST請求。
import { createContext } from "react"; import { navigate } from "@reach/router"; import Axios from "axios"; export const userState = { user : null, isLoggedIn: false, }; export const UserReducer = (state, action) => { switch (action.type) { case "CREATE_USER": const FIRESTORE_FUNCTION = process.env.REACT_APP_FIRESTORE_FUNCTION; const { userEmail, userPassword } = action; const data = { type: "CREATE-USER", email: userEmail, password: userPassword, }; Axios.post(`${FIRESTORE_FUNCTION}`, data) .then((res) => { navigate("/home"); return { ...state, isLoggedIn: true }; }) .catch((e) => console.log(`couldnt create user. error : ${e}`)); break; case "LOGIN-USER": break; case "UPLOAD-USER-IMAGE": break; case "FETCH-DATA" : break case "LOGOUT": navigate("/login"); return { ...state, isLoggedIn: false }; default: break; } }; export const UserContext = createContext(userState); 上面,我們使用 Axios 向firestoreFunction發出請求,在解決此請求後,我們將用戶初始狀態從null設置為從請求返回的數據,最後我們將用戶作為經過身份驗證的用戶路由到主頁.

至此,一個新用戶就可以成功創建賬號並成功路由到首頁了。 此過程演示了我們如何使用 Firestore 從雲功能執行基本的數據創建。
處理文件存儲
大多數時候,在應用程序中存儲和檢索用戶文件是應用程序中非常需要的功能。 在連接到 node.js 後端的應用程序中,Multer 經常用作中間件來處理上傳文件進來的 multipart/form-data。但是在沒有 node.js 後端的情況下,我們可以使用在線文件存儲服務,例如 Google Cloud Storage,用於存儲靜態應用程序資產。
Google Cloud Storage 是一種全球可用的文件存儲服務,用於將任意數量的數據作為應用程序的對象存儲到存儲桶中。 它足夠靈活,可以處理小型和大型應用程序的靜態資產存儲。
要在應用程序中使用雲存儲服務,我們可以使用可用的存儲 API 端點或使用官方節點存儲客戶端庫。 但是,Node Storage 客戶端庫在瀏覽器窗口中不起作用,因此我們可以在我們將使用該庫的地方使用雲函數。
這方面的一個例子是下面的雲函數,它將文件連接並上傳到創建的雲存儲桶。
const cors = require("cors")({ origin: true }); const { Storage } = require("@google-cloud/storage"); const StorageClient = new Storage(); exports.Uploader = (req, res) => { const { file } = req.body; StorageClient.bucket("TEST_BUCKET") .file(file.name) .then((response) => { console.log(response); res.status(200).send(response) }) .catch((e) => res.status(422).send({error : e})); }); };從上面的雲函數中,我們正在執行以下兩個主要操作:
首先,我們在
Storage constructor中創建與 Cloud Storage 的連接,它使用 Google Cloud 上的應用程序默認憑據 (ADC) 功能向 Cloud Storage 進行身份驗證。其次,我們通過調用
.file方法並傳入文件名,將請求正文中包含的文件上傳到TEST_BUCKET。 由於這是一個異步操作,我們使用一個 Promise 來了解該操作何時已解決,並返回一個200響應,從而結束調用的生命週期。
現在,我們可以擴展上面的Uploader Cloud Function 來處理用戶頭像的上傳。 雲函數將接收用戶的個人資料圖像,將其存儲在我們應用程序的雲存儲桶中,然後更新 Firestore 服務中用戶集合中用戶的img_uri數據。
require("dotenv").config(); const { Firestore } = require("@google-cloud/firestore"); const cors = require("cors")({ origin: true }); const { Storage } = require("@google-cloud/storage"); const StorageClient = new Storage(); const BucketName = process.env.STORAGE_BUCKET exports.Uploader = (req, res) => { return Cors(req, res, () => { const { file , userId } = req.body; const firestore = new Firestore(); const document = firestore.collection("users"); StorageClient.bucket(BucketName) .file(file.name) .on("finish", () => { StorageClient.bucket(BucketName) .file(file.name) .makePublic() .then(() => { const img_uri = `https://storage.googleapis.com/${Bucket}/${file.path}`; document .doc(userId) .update({ img_uri, }) .then((updateResult) => res.status(200).send(updateResult)) .catch((e) => res.status(500).send(e)); }) .catch((e) => console.log(e)); }); }); };現在我們擴展了上面的上傳功能來執行以下額外的操作:
- 首先,它通過初始化 Firestore 構造函數與 Firestore 服務建立新連接以獲取我們的
users集合,並使用應用程序默認憑據 (ADC) 向 Cloud Storage 進行身份驗證。 - 上傳在請求正文中添加的文件後,我們通過調用上傳文件的
makePublic方法將其公開,以便通過公共 URL 訪問。 根據云存儲的默認訪問控制,如果不公開文件,則無法通過 Internet 訪問文件,並且能夠在應用程序加載時執行此操作。
注意:公開文件意味著使用您的應用程序的任何人都可以復製文件鏈接並不受限制地訪問該文件。 防止這種情況發生的一種方法是使用簽名 URL 授予對存儲桶中文件的臨時訪問權限,而不是將其完全公開。
- 接下來,我們更新用戶的現有數據以包含上傳文件的 URL。 我們使用 Firestore 的
WHERE查詢找到特定用戶的數據,並使用請求正文中包含的userId,然後我們將img_uri字段設置為包含新更新圖像的 URL。
上面的Upload云功能可以在任何在 Firestore 服務中註冊用戶的應用程序中使用。 向端點發出POST請求所需的一切,將用戶的 IS 和圖像放入請求正文中。
應用程序中的一個示例是UPLOAD-FILE案例,它向函數發出POST請求,並將從請求返回的圖像鏈接置於應用程序狀態。
# index.js import Axios from 'axios' const UPLOAD_FUNCTION = process.env.REACT_APP_UPLOAD_FUNCTION export const UserReducer = (state, action) => { switch (action.type) { case "CREATE-USER" : # .....CREATE-USER-LOGIC .... case "UPLOAD-FILE": const { file, id } = action return Axios.post(UPLOAD_FUNCTION, { file, id }, { headers: { "Content-Type": "image/png", }, }) .then((response) => {}) .catch((e) => console.log(e)); default : return console.log(`${action.type} case not recognized`) } } 從上面的 switch 案例中,我們使用 Axios 向UPLOAD_FUNCTION發出POST請求,傳入要包含在請求正文中的添加文件,並且我們還在請求標頭中添加了圖像Content-Type 。
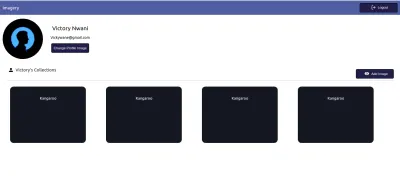
上傳成功後,雲函數返回的響應包含用戶的數據文檔,該數據文檔已更新為包含上傳到谷歌云存儲的圖像的有效 url。 然後我們可以更新用戶的狀態以包含新數據,這也將更新配置文件組件中用戶的配置文件圖像src元素。
處理 Cron 作業
重複的自動化任務,例如向用戶發送電子郵件或在特定時間執行內部操作,大多數時候是應用程序的一個包含功能。 在常規的 node.js 應用程序中,可以使用 node-cron 或 node-schedule 將此類任務作為 cron 作業處理。 在使用 Google Cloud Platform 構建無服務器應用程序時,Cloud Scheduler 還旨在執行 cron 操作。
注意:儘管 Cloud Scheduler 在創建將來執行的作業方面與 Unix cron 實用程序的工作方式類似,但重要的是要注意 Cloud Scheduler 不會像 cron 實用程序那樣執行命令。 相反,它使用指定的目標執行操作。
顧名思義,Cloud Scheduler 允許用戶安排在未來某個時間執行的操作。 每個操作都稱為一個作業,可以從 Cloud Console 的調度程序部分直觀地創建、更新甚至銷毀作業。 除了名稱和描述字段外,Cloud Scheduler 上的作業還包括以下內容:
- 頻率
這用於安排 Cron 作業的執行。 計劃使用 unix-cron 格式指定,該格式最初在 Linux 環境中的 cron 表上創建後台作業時使用。 unix-cron 格式由一個包含五個值的字符串組成,每個值代表一個時間點。 下面我們可以看到五個字符串中的每一個以及它們所代表的值。
- - - - - - - - - - - - - - - - minute ( - 59 ) | - - - - - - - - - - - - - hour ( 0 - 23 ) | | - - - - - - - - - - - - day of month ( 1 - 31 ) | | | - - - - - - - - - month ( 1 - 12 ) | | | | - - - - - -- day of week ( 0 - 6 ) | | | | | | | | | | | | | | | | | | | | | | | | | * * * * *嘗試為作業生成頻率時間值時,Crontab 生成器工具會派上用場。 如果您發現很難將時間值放在一起,Crontab 生成器有一個可視下拉列表,您可以在其中選擇構成時間表的值,然後復制生成的值並用作頻率。
- 時區
執行 cron 作業的時區。 由於時區之間的時間差異,不同指定時區執行的cron作業會有不同的執行時間。 - 目標
這是執行指定作業時使用的內容。 目標可以是HTTP類型,其中作業在指定時間向 URL 或 Pub/Sub 主題發出請求,作業可以將消息發佈到或從中提取消息,最後是 App Engine 應用程序。
Cloud Scheduler 與 HTTP 觸發的 Cloud Functions 完美結合。 當創建 Cloud Scheduler 中的作業並將其目標設置為 HTTP 時,該作業可用於執行雲功能。 所需要做的就是指定雲函數的端點,指定請求的 HTTP 動詞,然後在顯示的正文字段中添加需要傳遞給函數的任何數據。 如以下示例所示:
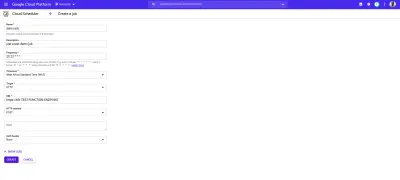
上圖中的 cron 作業將在每天上午 9 點運行,向雲函數的示例端點發出POST請求。
一個更現實的 cron 作業用例是使用諸如 Mailgun 之類的外部郵件服務以給定的時間間隔向用戶發送預定的電子郵件。 為了看到這一點,我們將創建一個新的雲函數,它使用 nodemailer JavaScript 包將 HTML 電子郵件發送到指定的電子郵件地址以連接到 Mailgun:
# index.js require("dotenv").config(); const nodemailer = require("nodemailer"); exports.Emailer = (req, res) => { let sender = process.env.SENDER; const { reciever, type } = req.body var transport = nodemailer.createTransport({ host: process.env.HOST, port: process.env.PORT, secure: false, auth: { user: process.env.SMTP_USERNAME, pass: process.env.SMTP_PASSWORD, }, }); if (!reciever) { res.status(400).send({ error: `Empty email address` }); } transport.verify(function (error, success) { if (error) { res .status(401) .send({ error: `failed to connect with stmp. check credentials` }); } }); switch (type) { case "statistics": return transport.sendMail( { from: sender, to: reciever, subject: "Your usage satistics of demo app", html: { path: "./welcome.html" }, }, (error, info) => { if (error) { res.status(401).send({ error : error }); } transport.close(); res.status(200).send({data : info}); } ); default: res.status(500).send({ error: "An available email template type has not been matched.", }); } };Using the cloud function above we can send an email to any user's email address specified as the receiver value in the request body. It performs the sending of emails through the following steps:
- It creates an SMTP transport for sending messages by passing the
host,userandpasswhich stands for password, all displayed on the user's Mailgun dashboard when a new account is created. - Next, it verifies if the SMTP transport has the credentials needed in order to establish a connection. If there's an error in establishing the connection, it ends the function's invocation and sends back a
401 unauthenticatedstatus code. - Next, it calls the
sendMailmethod to send the email containing the HTML file as the email's body to the receiver's email address specified in thetofield.
Note : We use a switch statement in the cloud function above to make it more reusable for sending several emails for different recipients. This way we can send different emails based on the type field included in the request body when calling this cloud function.
Now that there is a function that can send an email to a user; we are left with creating the cron job to invoke this cloud function. This time, the cron jobs are created dynamically each time a new user is created using the official Google cloud client library for the Cloud Scheduler from the initial firestoreFunction .
We expand the CREATE-USER case to create the job which sends the email to the created user at a one-day interval.
require("dotenv").config();cloc const { Firestore } = require("@google-cloud/firestore"); const scheduler = require("@google-cloud/scheduler") const cors = require("cors")({ origin: true }); const EMAILER = proccess.env.EMAILER_ENDPOINT const parent = ScheduleClient.locationPath( process.env.PROJECT_ID, process.env.LOCATION_ID ); exports.firestoreFunction = function (req, res) { return cors(req, res, () => { const { email, password, type } = req.body; const firestore = new Firestore(); const document = firestore.collection("users"); const client = new Scheduler.CloudSchedulerClient() if (!type) { res.status(422).send({ error : "An action type was not specified"}); } switch (type) { case "CREATE-USER":const job = { httpTarget: { uri: process.env.EMAIL_FUNCTION_ENDPOINT, httpMethod: "POST", body: { email: email, }, }, schedule: "*/30 */6 */5 10 4", timezone: "Africa/Lagos", }if (!email || !password) { res.status(422).send("email and password fields missing"); } return bcrypt.genSalt(10, (err, salt) => { bcrypt.hash(password, salt, (err, hash) => { document .add({ email: email, password: hash, }) .then((response) => {client.createJob({ parent : parent, job : job }).then(() => res.status(200).send(response)) .catch(e => console.log(`unable to create job : ${e}`) )}) .catch((e) => res.status(501).send(`error inserting data : ${e}`) ); }); }); default: res.status(422).send(`${type} is not a valid function action`) } }); };
From the snippet above, we can see the following:
- A connection to the Cloud Scheduler from the Scheduler constructor using the Application Default Credentials (ADC) is made.
- We create an object consisting of the following details which make up the cron job to be created:
-
uri
The endpoint of our email cloud function in which a request would be made to. -
body
This is the data containing the email address of the user to be included when the request is made. -
schedule
The unix cron format representing the time when this cron job is to be performed.
-
- After the promise from inserting the user's data document is resolved, we create the cron job by calling the
createJobmethod and passing in the job object and the parent. - The function's execution is ended with a
200status code after the promise from thecreateJoboperation has been resolved.
After the job is created, we'll see it listed on the scheduler page.
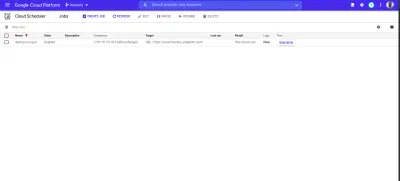
From the image above we can see the time scheduled for this job to be executed. We can decide to manually run this job or wait for it to be executed at the scheduled time.
結論
Within this article, we have had a good look into serverless applications and the benefits of using them. We also had an extensive look at how developers can manage their serverless applications on the Google Cloud using Cloud Functions so you now know how the Google Cloud is supporting the use of serverless applications.
Within the next years to come, we will certainly see a large number of developers adapt to the use of serverless applications when building applications. If you are using cloud functions in a production environment, it is recommended that you read this article from a Google Cloud advocate on “6 Strategies For Scaling Your Serverless Applications”.
The source code of the created cloud functions are available within this Github repository and also the used front-end application within this Github repository. The front-end application has been deployed using Netlify and can be tested live here.
參考
- 谷歌云
- 雲函數
- 雲源存儲庫
- Cloud Scheduler overview
- 雲防火牆
- “6 Strategies For Scaling Your Serverless Applications,” Preston Holmes
