
使用 CSS3 和 Vanilla JavaScript 的 HTML5 SVG 填充動畫
已發表: 2022-03-10SVG 代表S calable Vector G raphics,它是一種標準的基於 XML 的矢量圖形標記語言。 它允許您通過確定 2D 平面中的一組點來繪製路徑、曲線和形狀。 此外,您可以在這些路徑上添加 twitch 屬性(例如筆觸、顏色、粗細、填充等)以生成動畫。
自 2017 年 4 月起,CSS Level 3 Fill and Stroke Module 允許從外部樣式表設置 SVG 顏色和填充模式,而不是在每個元素上設置屬性。 在本教程中,我們將使用簡單的普通十六進制顏色,但填充和描邊屬性也接受圖案、漸變和圖像作為值。
注意:訪問 Awwwards 網站時,動畫筆記顯示只能在瀏覽器寬度設置為 1024px 或更大的情況下查看。
- 演示:筆記顯示項目
- 回購:注意顯示回購
文件結構
讓我們從在終端中創建文件開始:
mkdir note-display cd note-display touch index.html styles.css scripts.jsHTML
這是鏈接css和js文件的初始模板:
<html lang="en"> <head> <meta charset="UTF-8"> <title>Note Display</title> <link rel="stylesheet" href="./styles.css"> </head> <body> <script src="./scripts.js"></script> </body> </html> 每個 note 元素由一個列表項組成: li包含circle 、 note值和它的label 。
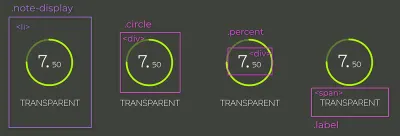
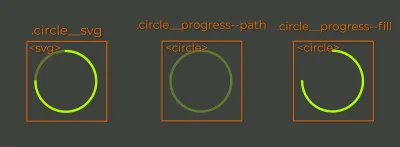
.circle 、 .percent和.label 。 (大預覽) .circle_svg是一個 SVG 元素,包含兩個 <circle> 元素。 第一個是要填充的路徑,第二個是動畫填充。
note分為整數和小數,因此可以對它們應用不同的字體大小。 label是一個簡單的<span> 。 因此,將所有這些放在一起看起來像這樣:
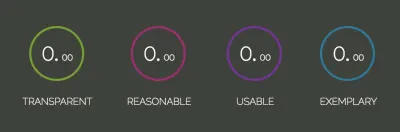
<li class="note-display"> <div class="circle"> <svg width="84" height="84" class="circle__svg"> <circle cx="41" cy="41" r="38" class="circle__progress circle__progress--path"></circle> <circle cx="41" cy="41" r="38" class="circle__progress circle__progress--fill"></circle> </svg> <div class="percent"> <span class="percent__int">0.</span> <span class="percent__dec">00</span> </div> </div> <span class="label">Transparent</span> </li> cx和cy屬性定義圓的 x 軸和 y 軸中心點。 r屬性定義了它的半徑。
您可能已經註意到類名稱中的下劃線/破折號模式。 那就是 BEM,代表block 、 element和modifier 。 這是一種方法,可以讓你的元素命名更有條理、更有條理和語義化。
推薦閱讀: BEM 的解釋以及為什麼需要它
為了完成模板結構,讓我們將四個列表項包裝在一個無序列表元素中:
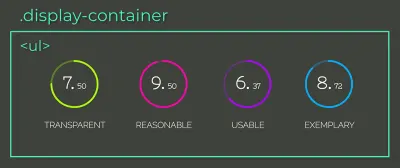
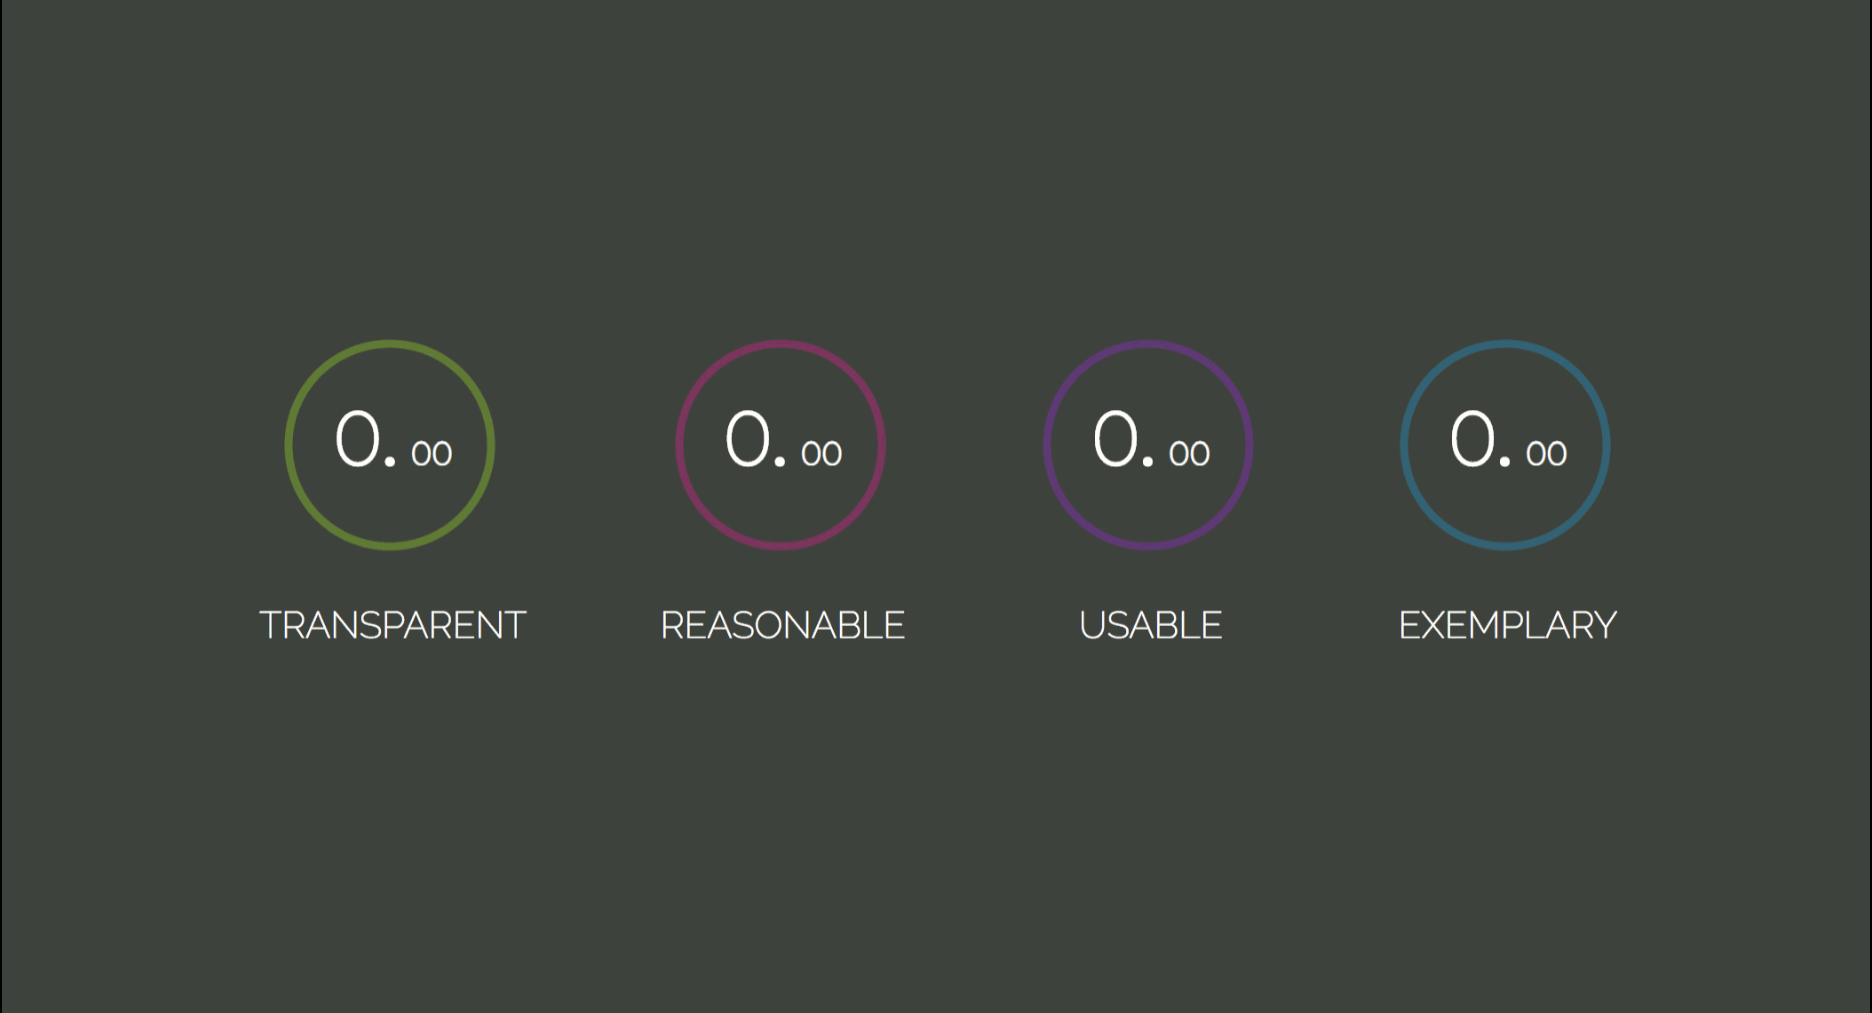
li孩子(大預覽) <ul class="display-container"> <li class="note-display"> <div class="circle"> <svg width="84" height="84" class="circle__svg"> <circle cx="41" cy="41" r="38" class="circle__progress circle__progress--path"></circle> <circle cx="41" cy="41" r="38" class="circle__progress circle__progress--fill"></circle> </svg> <div class="percent"> <span class="percent__int">0.</span> <span class="percent__dec">00</span> </div> </div> <span class="label">Transparent</span> </li> <li class="note-display"> <div class="circle"> <svg width="84" height="84" class="circle__svg"> <circle cx="41" cy="41" r="38" class="circle__progress circle__progress--path"></circle> <circle cx="41" cy="41" r="38" class="circle__progress circle__progress--fill"></circle> </svg> <div class="percent"> <span class="percent__int">0.</span> <span class="percent__dec">00</span> </div> </div> <span class="label">Reasonable</span> </li> <li class="note-display"> <div class="circle"> <svg width="84" height="84" class="circle__svg"> <circle cx="41" cy="41" r="38" class="circle__progress circle__progress--path"></circle> <circle cx="41" cy="41" r="38" class="circle__progress circle__progress--fill"></circle> </svg> <div class="percent"> <span class="percent__int">0.</span> <span class="percent__dec">00</span> </div> </div> <span class="label">Usable</span> </li> <li class="note-display"> <div class="circle"> <svg width="84" height="84" class="circle__svg"> <circle cx="41" cy="41" r="38" class="circle__progress circle__progress--path"></circle> <circle cx="41" cy="41" r="38" class="circle__progress circle__progress--fill"></circle> </svg> <div class="percent"> <span class="percent__int">0.</span> <span class="percent__dec">00</span> </div> </div> <span class="label">Exemplary</span> </li> </ul> 您一定會問自己Transparent 、 Reasonable 、 Usable和Exemplary標籤的含義是什麼。 您對編程越熟悉,您就會意識到編寫代碼不僅是為了使應用程序正常運行,而且還要確保它是長期可維護和可擴展的。 這只有在您的代碼易於更改時才能實現。
“首字母縮略詞TRUE應該有助於確定您編寫的代碼是否能夠適應未來的變化。”所以,下一次,問問自己:
-
Transparent:代碼更改的後果是否清晰? -
Reasonable:成本效益值得嗎? -
Usable:我可以在意外情況下重複使用它嗎? -
Exemplary:它是否提供了高質量作為未來代碼的示例?
注意: Sandi Metz 的“Practical Object-Oriented Design in Ruby”解釋了TRUE以及其他原則以及如何通過設計模式實現這些原則。 如果您還沒有花時間學習設計模式,可以考慮將這本書添加到您的睡前閱讀中。
CSS
讓我們導入字體並對所有項目應用重置:
@import url('https://fonts.googleapis.com/css?family=Nixie+One|Raleway:200'); * { padding: 0; margin: 0; box-sizing: border-box; } box-sizing: border-box屬性將填充和邊框值包含在元素的總寬度和高度中,因此更容易計算其尺寸。
注意:有關box-sizing的直觀解釋,請閱讀“使用 CSS Box Sizing 讓您的生活更輕鬆”。
body { height: 100vh; color: #fff; display: flex; background: #3E423A; font-family: 'Nixie One', cursive; } .display-container { margin: auto; display: flex; } 通過組合規則display: flex在body和margin-auto在.display-container ,可以垂直和水平居中子元素。 .display-container元素也將是一個flex-container ; 這樣,它的子節點將沿主軸放置在同一行中。
.note-display列表項也將是一個flex-container 。 由於要居中的孩子很多,讓我們通過justify-content和align-items屬性來做。 所有flex-items都將沿cross軸和main居中。 如果您不確定它們是什麼,請查看“CSS Flexbox Fundamentals Visual Guide”中的對齊部分。
.note-display { display: flex; flex-direction: column; align-items: center; margin: 0 25px; } 讓我們通過設置規則stroke-width 、 stroke-opacity和stroke-linecap來為圓圈應用筆觸,這些規則共同設計了筆觸實時結束的樣式。 接下來,讓我們為每個圓圈添加顏色:
.circle__progress { fill: none; stroke-width: 3; stroke-opacity: 0.3; stroke-linecap: round; } .note-display:nth-child(1) .circle__progress { stroke: #AAFF00; } .note-display:nth-child(2) .circle__progress { stroke: #FF00AA; } .note-display:nth-child(3) .circle__progress { stroke: #AA00FF; } .note-display:nth-child(4) .circle__progress { stroke: #00AAFF; } 為了絕對定位percent元素,有必要知道絕對是什麼。 .circle元素應該是引用,所以讓我們添加position: relative到它。
注意:有關絕對定位的更深入、直觀的解釋,請閱讀“如何一勞永逸地理解 CSS 絕對定位”。
另一種居中元素的方法是結合top: 50% , left: 50%和transform: translate(-50%, -50%); 它將元素的中心定位在其父級的中心。
.circle { position: relative; } .percent { width: 100%; top: 50%; left: 50%; position: absolute; font-weight: bold; text-align: center; line-height: 28px; transform: translate(-50%, -50%); } .percent__int { font-size: 28px; } .percent__dec { font-size: 12px; } .label { font-family: 'Raleway', serif; font-size: 14px; text-transform: uppercase; margin-top: 15px; }現在,模板應該是這樣的:
填充過渡
圓形動畫可以在兩個圓形 SVG 屬性的幫助下創建: stroke-dasharray和stroke-dashoffset 。
“ stroke-dasharray定義了筆劃中的虛線間隙模式。”它最多可以採用四個值:
- 當它設置為唯一的整數(
stroke-dasharray: 10)時,破折號和間隙具有相同的大小; - 對於兩個值(
stroke-dasharray: 10 5),第一個應用於破折號,第二個應用於間隙; - 第三種和第四種形式(
stroke-dasharray: 10 5 2和stroke-dasharray: 10 5 2 3)將生成各種大小的破折號和間隙。
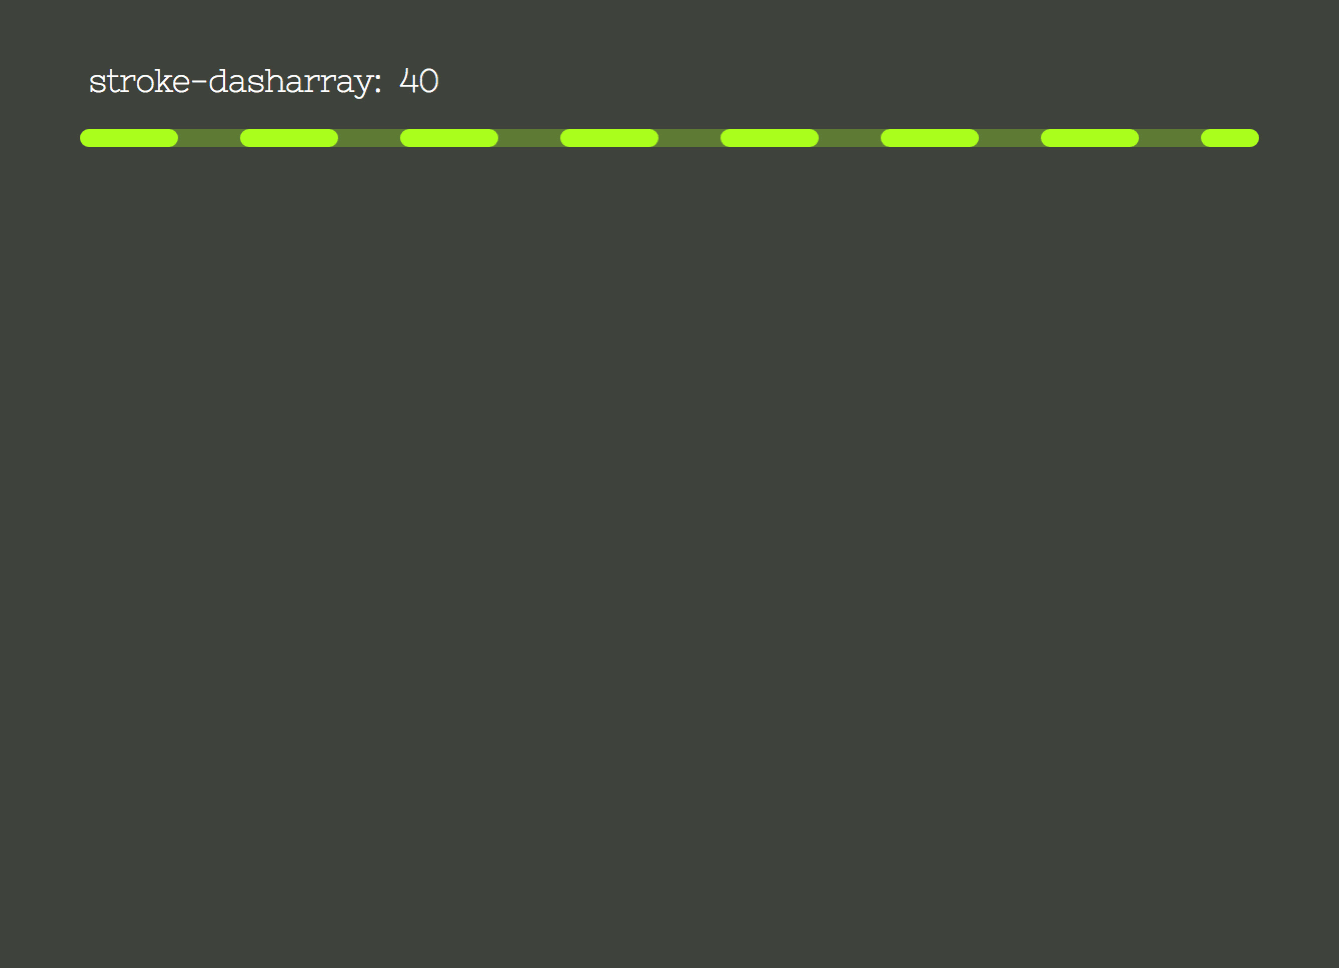
stroke-dasharray屬性值(大預覽) 左圖顯示屬性stroke-dasharray設置為 0 到 238px,即圓的周長。

第二個圖像表示stroke-dashoffset屬性,它偏移了 dash 數組的開頭。 它也被設置為從 0 到圓周長度。
stroke-dasharray和 為了產生填充效果,我們將stroke-dasharray設置為圓周長度,這樣它的所有長度都被一個大破折號填充而沒有間隙。 我們還將用相同的值抵消它,所以它被“隱藏”了。 然後stroke-dashoffset將更新為相應的音符值,根據過渡持續時間填充筆劃。
屬性更新將通過 CSS 變量在腳本中完成。 讓我們聲明變量並設置屬性:
.circle__progress--fill { --initialStroke: 0; --transitionDuration: 0; stroke-opacity: 1; stroke-dasharray: var(--initialStroke); stroke-dashoffset: var(--initialStroke); transition: stroke-dashoffset var(--transitionDuration) ease; } 為了設置初始值並更新變量,讓我們首先使用document.querySelectorAll選擇所有.note-display元素。 transitionDuration將設置為900毫秒。
然後,我們遍歷顯示數組,選擇它的.circle__progress.circle__progress--fill並提取 HTML 中設置的r屬性來計算周長。 有了它,我們可以設置初始的--dasharray和--dashoffset值。
動畫將在--dashoffset變量被 100 毫秒 setTimeout 更新時出現:
const displays = document.querySelectorAll('.note-display'); const transitionDuration = 900; displays.forEach(display => { let progress = display.querySelector('.circle__progress--fill'); let radius = progress.r.baseVal.value; let circumference = 2 * Math.PI * radius; progress.style.setProperty('--transitionDuration', `${transitionDuration}ms`); progress.style.setProperty('--initialStroke', circumference); setTimeout(() => progress.style.strokeDashoffset = 50, 100); }); 要從頂部開始轉換,必須旋轉.circle__svg元素:
.circle__svg { transform: rotate(-90deg); } 
現在,讓我們計算dashoffset值——相對於音符。 note 值將通過 data-* 屬性插入到每個li項目中。 *可以切換為適合您需要的任何名稱,然後可以通過元素的數據集在 JavaScript 中檢索它: element.dataset.* 。
注意:您可以在 MDN Web Docs 上閱讀有關 data-* 屬性的更多信息。
我們的屬性將被稱為“ data-note ”:
<ul class="display-container"> + <li class="note-display" data-note="7.50"> <div class="circle"> <svg width="84" height="84" class="circle__svg"> <circle cx="41" cy="41" r="38" class="circle__progress circle__progress--path"></circle> <circle cx="41" cy="41" r="38" class="circle__progress circle__progress--fill"></circle> </svg> <div class="percent"> <span class="percent__int">0.</span> <span class="percent__dec">00</span> </div> </div> <span class="label">Transparent</span> </li> + <li class="note-display" data-note="9.27"> <div class="circle"> <svg width="84" height="84" class="circle__svg"> <circle cx="41" cy="41" r="38" class="circle__progress circle__progress--path"></circle> <circle cx="41" cy="41" r="38" class="circle__progress circle__progress--fill"></circle> </svg> <div class="percent"> <span class="percent__int">0.</span> <span class="percent__dec">00</span> </div> </div> <span class="label">Reasonable</span> </li> + <li class="note-display" data-note="6.93"> <div class="circle"> <svg width="84" height="84" class="circle__svg"> <circle cx="41" cy="41" r="38" class="circle__progress circle__progress--path"></circle> <circle cx="41" cy="41" r="38" class="circle__progress circle__progress--fill"></circle> </svg> <div class="percent"> <span class="percent__int">0.</span> <span class="percent__dec">00</span> </div> </div> <span class="label">Usable</span> </li> + <li class="note-display" data-note="8.72"> <div class="circle"> <svg width="84" height="84" class="circle__svg"> <circle cx="41" cy="41" r="38" class="circle__progress circle__progress--path"></circle> <circle cx="41" cy="41" r="38" class="circle__progress circle__progress--fill"></circle> </svg> <div class="percent"> <span class="percent__int">0.</span> <span class="percent__dec">00</span> </div> </div> <span class="label">Exemplary</span> </li> </ul> parseFloat方法會將display.dataset.note返回的字符串轉換為浮點數。 offset表示未達到最高分數的百分比。 因此,對於7.50的音符,我們將有(10 - 7.50) / 10 = 0.25 ,這意味著circumference長度應偏移其值的25% :
let note = parseFloat(display.dataset.note); let offset = circumference * (10 - note) / 10; 更新scripts.js :
const displays = document.querySelectorAll('.note-display'); const transitionDuration = 900; displays.forEach(display => { let progress = display.querySelector('.circle__progress--fill'); let radius = progress.r.baseVal.value; let circumference = 2 * Math.PI * radius; + let note = parseFloat(display.dataset.note); + let offset = circumference * (10 - note) / 10; progress.style.setProperty('--initialStroke', circumference); progress.style.setProperty('--transitionDuration', `${transitionDuration}ms`); + setTimeout(() => progress.style.strokeDashoffset = offset, 100); }); 
在我們繼續之前,讓我們將 stoke 轉換提取到它自己的方法中:
const displays = document.querySelectorAll('.note-display'); const transitionDuration = 900; displays.forEach(display => { - let progress = display.querySelector('.circle__progress--fill'); - let radius = progress.r.baseVal.value; - let circumference = 2 * Math.PI * radius; let note = parseFloat(display.dataset.note); - let offset = circumference * (10 - note) / 10; - progress.style.setProperty('--initialStroke', circumference); - progress.style.setProperty('--transitionDuration', `${transitionDuration}ms`); - setTimeout(() => progress.style.strokeDashoffset = offset, 100); + strokeTransition(display, note); }); + function strokeTransition(display, note) { + let progress = display.querySelector('.circle__progress--fill'); + let radius = progress.r.baseVal.value; + let circumference = 2 * Math.PI * radius; + let offset = circumference * (10 - note) / 10; + progress.style.setProperty('--initialStroke', circumference); + progress.style.setProperty('--transitionDuration', `${transitionDuration}ms`); + setTimeout(() => progress.style.strokeDashoffset = offset, 100); + }注意值增加
仍然存在從0.00到要構建的音符值的音符過渡。 首先要做的是將整數和十進制值分開。 我們將使用字符串方法split() (它接受一個參數來確定字符串將被破壞的位置並返回一個包含兩個被破壞的字符串的數組)。 這些將被轉換為數字並作為參數傳遞給increaseNumber()函數,以及display元素和一個指示它是整數還是小數的標誌。
const displays = document.querySelectorAll('.note-display'); const transitionDuration = 900; displays.forEach(display => { let note = parseFloat(display.dataset.note); + let [int, dec] = display.dataset.note.split('.'); + [int, dec] = [Number(int), Number(dec)]; strokeTransition(display, note); + increaseNumber(display, int, 'int'); + increaseNumber(display, dec, 'dec'); }); 在increaseNumber()函數中,我們選擇.percent__int或.percent__dec元素,具體取決於className ,以及輸出是否應包含小數點的情況。 我們將transitionDuration設置為900ms 。 現在,例如,要對從 0 到 7 的數字進行動畫處理,持續時間必須除以音符900 / 7 = 128.57ms 。 結果表示每次增加迭代需要多長時間。 這意味著我們的setInterval將每128.57ms觸發一次。
設置這些變量後,讓我們定義setInterval 。 counter變量將作為文本附加到元素並在每次迭代時增加:
function increaseNumber(display, number, className) { let element = display.querySelector(`.percent__${className}`), decPoint = className === 'int' ? '.' : '', interval = transitionDuration / number, counter = 0; let increaseInterval = setInterval(() => { element.textContent = counter + decPoint; counter++; }, interval); } 
涼爽的! 它確實增加了價值,但它會永遠這樣做。 當notes達到我們想要的值時,我們需要清除setInterval 。 這是通過clearInterval函數完成的:
function increaseNumber(display, number, className) { let element = display.querySelector(`.percent__${className}`), decPoint = className === 'int' ? '.' : '', interval = transitionDuration / number, counter = 0; let increaseInterval = setInterval(() => { + if (counter === number) { window.clearInterval(increaseInterval); } element.textContent = counter + decPoint; counter++; }, interval); } 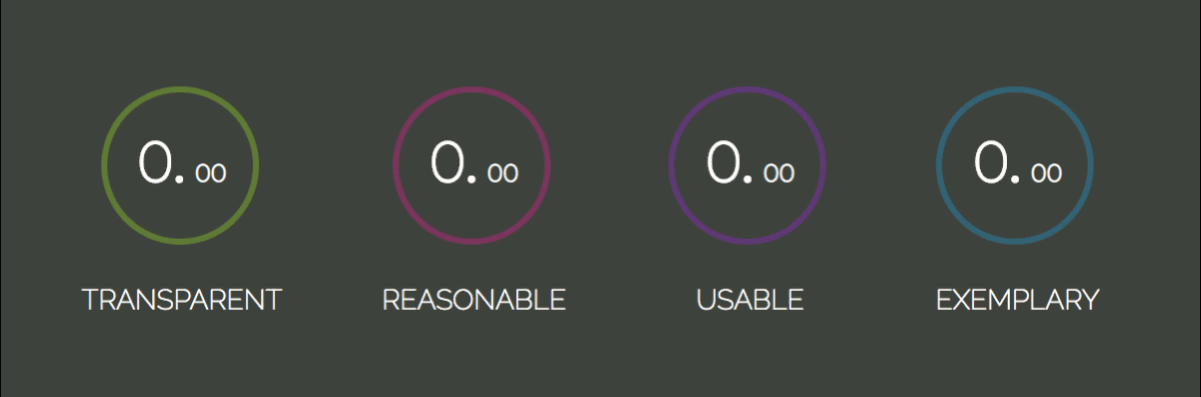
現在數字更新到音符值並使用clearInterval()函數清除。
這就是本教程的內容。 我希望你喜歡它!
如果您想構建一些更具交互性的東西,請查看我使用 Vanilla JavaScript 創建的記憶遊戲教程。 它涵蓋了基本的 HTML5、CSS3 和 JavaScript 概念,例如定位、透視、過渡、Flexbox、事件處理、超時和三元組。
快樂編碼!