無頭 WordPress:創建解耦 WordPress 的起起落落
已發表: 2022-03-10WordPress 從一開始就作為一個簡單的博客寫作工具走過了漫長的道路。 15 年後,它成為開發人員和非開發人員的首選 CMS。 WordPress 現在為網絡上前 1000 萬個站點中的大約 30% 提供支持。
自從 REST API 被捆綁在 WordPress 核心中以來,開發人員可以以一種解耦的方式進行試驗和使用,即使用 JavaScript 框架或庫編寫前端部分。 在 Infinum,我們曾經(現在仍然)以“經典”方式使用 WordPress:前端和後端都使用 PHP。 過了一段時間,我們想嘗試一下解耦方法。 在本文中,我將概述我們想要實現的目標以及在嘗試實現目標時遇到的問題。
有幾種類型的項目可以從這種方法中受益。 例如,簡單的展示網站或使用 WordPress 作為後端的網站是解耦方法的主要候選者。
近年來,值得慶幸的是,該行業開始更加關注性能。 然而,作為一個易於使用的包容性和多功能的軟件,WordPress 提供了大量的選項,這些選項不一定在每個項目中都使用。 因此,網站性能可能會受到影響。
推薦閱讀:如何使用熱圖來跟踪 WordPress 網站上的點擊次數
如果長時間的網站響應時間讓您徹夜難眠,那麼這就是您的指南。 我將介紹創建解耦 WordPress 的基礎知識和一些經驗教訓,包括:
- “解耦 WordPress”的含義
- 使用默認的 WordPress REST API
- 使用解耦 JSON 方法提高性能
- 安全問題
那麼,解耦的 WordPress 到底是什麼?
當談到WordPress的編程方式時,有一件事是肯定的:它不遵循許多開發人員熟悉的模型-視圖-控制器( MVC ) 設計模式。 由於它的歷史和作為一個叫做“b2”的舊博客平台的一個分支(更多細節在這裡),它主要是以程序方式編寫的(使用基於函數的代碼)。 WordPress 核心開發人員使用了一個鉤子系統,允許其他開發人員修改或擴展某些功能。
這是一個配備工作管理界面的一體化系統; 它管理數據庫連接,並公開了一堆有用的 API,用於處理用戶身份驗證、路由等。
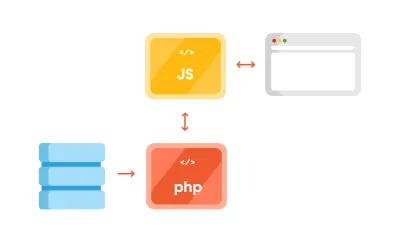
但是由於 REST API,您可以將 WordPress 後端分離為一種捆綁在一起的模型和控制器,用於處理數據操作和數據庫交互,並使用 REST API 控制器使用各種 API 端點與單獨的視圖層進行交互。 除了 MVC 分離之外,我們還可以(出於安全原因或提高速度)將 JS 應用程序放在單獨的服務器上,如下面的架構所示:

使用解耦方法的優勢
您可能想要使用這種方法的一件事是確保關注點分離。 前端和後端通過端點進行交互; 每個都可以在其單獨的服務器上,可以專門針對每個任務進行優化,即分別運行 PHP 應用程序和運行 Node.js 應用程序。
通過將前端與後端分離,將來可以更輕鬆地重新設計它,而無需更改 CMS。 此外,前端開發人員只需要關心如何處理後端提供給他們的數據。 這讓他們能夠發揮創造力並使用 ReactJS、Vue 或 Angular 等現代庫來交付高度動態的 Web 應用程序。 例如,使用上述庫時,構建漸進式 Web 應用程序會更容易。
另一個優勢體現在網站的安全性上。 通過後端利用網站變得更加困難,因為它在很大程度上對公眾隱藏。
推薦閱讀: WordPress 安全作為一個進程
使用解耦方法的缺點
首先,擁有一個解耦的 WordPress 意味著維護兩個獨立的實例:
- 用於後端的 WordPress;
- 一個單獨的前端應用程序,包括及時的安全更新。
其次,一些前端庫確實有更陡峭的學習曲線。 學習一門新語言需要花費大量時間(如果您只習慣於 HTML 和 CSS 進行模板化),或者需要將額外的 JavaScript 專家帶入該項目。
第三,通過分離前端,您將失去所見即所得編輯器的功能,並且 WordPress 中的“實時預覽”按鈕也不起作用。
使用 WordPress REST API
在我們深入研究代碼之前,還有一些關於 WordPress REST API 的內容。 WordPress 中 REST API 的全部功能於 2016 年 12 月 6 日發布 4.7 版。
WordPress REST API 允許您通過發送和接收 JSON 對象與您的 WordPress 安裝進行遠程交互。
設置項目
由於它與最新的 WordPress 安裝捆綁在一起,我們將致力於 27 歲主題。 我正在研究 Varying Vagrant Vagrants,並建立了一個帶有 URL https://dev.wordpress.test/的測試站點。 此 URL 將在整篇文章中使用。 我們還將從 wordpress.org Theme Review Teams 存儲庫中導入帖子,以便我們可以使用一些測試數據。 但首先,我們將熟悉使用默認端點,然後我們將創建自己的自定義端點。
訪問默認 REST 端點
如前所述,WordPress 帶有幾個內置端點,您可以通過/wp-json/路由來檢查它們:
https://dev.wordpress.test/wp-json/通過將此 URL 直接放在瀏覽器中,或將其添加到郵遞員應用程序中,您將從 WordPress REST API 中獲得如下所示的 JSON 響應:
{ "name": "Test dev site", "description": "Just another WordPress site", "url": "https://dev.wordpress.test", "home": "https://dev.wordpress.test", "gmt_offset": "0", "timezone_string": "", "namespaces": [ "oembed/1.0", "wp/v2" ], "authentication": [], "routes": { "/": { "namespace": "", "methods": [ "GET" ], "endpoints": [ { "methods": [ "GET" ], "args": { "context": { "required": false, "default": "view" } } } ], "_links": { "self": "https://dev.wordpress.test/wp-json/" } }, "/oembed/1.0": { "namespace": "oembed/1.0", "methods": [ "GET" ], "endpoints": [ { "methods": [ "GET" ], "args": { "namespace": { "required": false, "default": "oembed/1.0" }, "context": { "required": false, "default": "view" } } } ], "_links": { "self": "https://dev.wordpress.test/wp-json/oembed/1.0" } }, ... "wp/v2": { ... 因此,為了使用 REST 獲取我們網站中的所有帖子,我們需要訪問https://dev.wordpress.test/wp-json/wp/v2/posts 。 請注意, wp/v2/標記了保留的核心端點,如帖子、頁面、媒體、分類法、類別等。
那麼,我們如何添加自定義端點?
創建自定義 REST 端點
假設我們要向現有端點添加一個新端點或附加字段。 我們有幾種方法可以做到這一點。 首先,可以在創建自定義帖子類型時自動完成。 例如,我們想創建一個文檔端點。 讓我們創建一個小型測試插件。 在wp-content/plugins文件夾中創建一個test-documentation文件夾,並添加如下所示的documentation.php文件:
<?php /** * Test plugin * * @since 1.0.0 * @package test_plugin * * @wordpress-plugin * Plugin Name: Test Documentation Plugin * Plugin URI: * Description: The test plugin that adds rest functionality * Version: 1.0.0 * Author: Infinum <[email protected]> * Author URI: https://infinum.co/ * License: GPL-2.0+ * License URI: https://www.gnu.org/licenses/gpl-2.0.txt * Text Domain: test-plugin */ namespace Test_Plugin; // If this file is called directly, abort. if ( ! defined( 'WPINC' ) ) { die; } /** * Class that holds all the necessary functionality for the * documentation custom post type * * @since 1.0.0 */ class Documentation { /** * The custom post type slug * * @var string * * @since 1.0.0 */ const PLUGIN_NAME = 'documentation-plugin'; /** * The custom post type slug * * @var string * * @since 1.0.0 */ const POST_TYPE_SLUG = 'documentation'; /** * The custom taxonomy type slug * * @var string * * @since 1.0.0 */ const TAXONOMY_SLUG = 'documentation-category'; /** * Register custom post type * * @since 1.0.0 */ public function register_post_type() { $args = array( 'label' => esc_html( 'Documentation', 'test-plugin' ), 'public' => true, 'menu_position' => 47, 'menu_icon' => 'dashicons-book', 'supports' => array( 'title', 'editor', 'revisions', 'thumbnail' ), 'has_archive' => false, 'show_in_rest' => true, 'publicly_queryable' => false, ); register_post_type( self::POST_TYPE_SLUG, $args ); } /** * Register custom tag taxonomy * * @since 1.0.0 */ public function register_taxonomy() { $args = array( 'hierarchical' => false, 'label' => esc_html( 'Documentation tags', 'test-plugin' ), 'show_ui' => true, 'show_admin_column' => true, 'update_count_callback' => '_update_post_term_count', 'show_in_rest' => true, 'query_var' => true, ); register_taxonomy( self::TAXONOMY_SLUG, [ self::POST_TYPE_SLUG ], $args ); } } $documentation = new Documentation(); add_action( 'init', [ $documentation, 'register_post_type' ] ); add_action( 'init', [ $documentation, 'register_taxonomy' ] ); 通過註冊新的帖子類型和分類,並將show_in_rest參數設置為true ,WordPress 自動在/wp/v2/命名空間中創建了一個 REST 路由。 您現在可以使用https://dev.wordpress.test/wp-json/wp/v2/documentation和https://dev.wordpress.test/wp-json/wp/v2/documentation-category端點。 如果我們在新創建的文檔自定義帖子中添加一個帖子到https://dev.wordpress.test/?post_type=documentation ,它將給我們一個如下所示的響應:
[ { "id": 4, "date": "2018-06-11T19:48:51", "date_gmt": "2018-06-11T19:48:51", "guid": { "rendered": "https://dev.wordpress.test/?post_type=documentation&p=4" }, "modified": "2018-06-11T19:48:51", "modified_gmt": "2018-06-11T19:48:51", "slug": "test-documentation", "status": "publish", "type": "documentation", "link": "https://dev.wordpress.test/documentation/test-documentation/", "title": { "rendered": "Test documentation" }, "content": { "rendered": "這是一些文檔內容
\n", “受保護”:假 }, “特色媒體”:0, “模板”: ””, “文檔類別”:[ 2 ], “_鏈接”:{ “自己”: [ { “href”:“https://dev.wordpress.test/wp-json/wp/v2/documentation/4” } ], “收藏”: [ { “href”:“https://dev.wordpress.test/wp-json/wp/v2/documentation” } ], “關於”: [ { “href”:“https://dev.wordpress.test/wp-json/wp/v2/types/documentation” } ], “版本歷史”:[ { “href”:“https://dev.wordpress.test/wp-json/wp/v2/documentation/4/revisions” } ], “wp:附件”:[ { “href”:“https://dev.wordpress.test/wp-json/wp/v2/media?parent=4” } ], “wp:術語”:[ { “分類”:“文檔類別”, “可嵌入”:是的, “href”:“https://dev.wordpress.test/wp-json/wp/v2/documentation-category?post=4” } ], “居里”:[ { “名稱”:“wp”, "href": "https://api.w.org/{rel}", “模板化”:真 } ] } } ]
這是我們單頁應用程序的一個很好的起點。 我們可以添加自定義端點的另一種方法是掛鉤到rest_api_init鉤子並自己創建一個端點。 讓我們添加一個與我們註冊的路徑有點不同的custom-documentation路徑。 仍然在同一個插件中工作,我們可以添加:
/** * Create a custom endpoint * * @since 1.0.0 */ public function create_custom_documentation_endpoint() { register_rest_route( self::PLUGIN_NAME . '/v1', '/custom-documentation', array( 'methods' => 'GET', 'callback' => [ $this, 'get_custom_documentation' ], ) ); } /** * Create a callback for the custom documentation endpoint * * @return string JSON that indicates success/failure of the update, * or JSON that indicates an error occurred. * @since 1.0.0 */ public function get_custom_documentation() { /* Some permission checks can be added here. */ // Return only documentation name and tag name. $doc_args = array( 'post_type' => self::POST_TYPE_SLUG, 'post_status' => 'publish', 'perm' => 'readable' ); $query = new \WP_Query( $doc_args ); $response = []; $counter = 0; // The Loop if ( $query->have_posts() ) { while ( $query->have_posts() ) { $query->the_post(); $post_id = get_the_ID(); $post_tags = get_the_terms( $post_id, self::TAXONOMY_SLUG ); $response[ $counter ]['title'] = get_the_title(); foreach ( $post_tags as $tags_key => $tags_value ) { $response[ $counter ]['tags'][] = $tags_value->name; } $counter++; } } else { $response = esc_html__( 'There are no posts.', 'documentation-plugin' ); } /* Restore original Post Data */ wp_reset_postdata(); return rest_ensure_response( $response ); } 並將create_custom_documentation_endpoint()方法掛鉤到rest_api_init掛鉤,如下所示:
add_action( 'rest_api_init', [ $documentation, 'create_custom_documentation_endpoint' ] ); 這將在https://dev.wordpress.test/wp-json/documentation-plugin/v1/custom-documentation中添加一個自定義路由,回調返回該路由的響應。
[{ "title": "Another test documentation", "tags": ["Another tag"] }, { "title": "Test documentation", "tags": ["REST API", "test tag"] }]您可以使用 REST API 做很多其他事情(您可以在 REST API 手冊中找到更多詳細信息)。

在使用默認 REST API 時解決較長的響應時間
對於任何嘗試構建解耦 WordPress 站點的人來說,這並不是什麼新鮮事——REST API 很慢。
我和我的團隊首先在客戶端站點(未解耦)上遇到了奇怪的 WordPress 滯後 REST API,我們使用自定義端點獲取 Google 地圖上的位置列表,以及使用Advanced Custom Fields Pro創建的其他元信息插入。 事實證明,第一個字節 (TTFB) 的時間——用於指示 Web 服務器或其他網絡資源的響應能力——花費了超過 3 秒。
經過一番調查,我們意識到默認的 REST API 調用實際上非常慢,尤其是當我們用額外的插件“負擔”網站時。 所以,我們做了一個小測試。 我們安裝了幾個流行的插件並遇到了一些有趣的結果。 郵遞員應用程序為 41.9KB 的響應大小提供了 1.97 秒的加載時間。 Chrome 的加載時間為 1.25 秒(TTFB 為 1.25 秒,內容下載時間為 3.96 毫秒)。 只是為了檢索一個簡單的帖子列表。 沒有分類,沒有用戶數據,沒有額外的元字段。
為什麼會這樣?
事實證明,在默認 WordPress 上訪問 REST API 將加載整個 WordPress 核心來為端點提供服務,即使它沒有被使用。 此外,您添加的插件越多,情況就越糟糕。 默認的 REST 控制器WP_REST_Controller是一個非常大的類,它在構建一個簡單的網頁時做了很多不必要的事情。 它處理路由註冊、權限檢查、創建和刪除項目等。
此問題有兩種常見的解決方法:
- 攔截插件的加載,並在您需要提供簡單的 REST 響應時阻止它們全部加載;
- 僅加載最少的 WordPress 並將數據臨時存儲,然後我們使用自定義頁面從中獲取數據。
使用解耦 JSON 方法提高性能
當您使用簡單的演示站點時,您不需要 REST API 為您提供的所有功能。 當然,這就是良好的規劃至關重要的地方。 您真的不想在沒有 REST API 的情況下構建您的網站,然後說在幾年後您想連接到您的網站,或者可能創建一個需要使用 REST API 功能的移動應用程序。 你?
出於這個原因,我們利用了兩個 WordPress 功能,可以在提供簡單的 JSON 數據時為您提供幫助:
- 用於緩存的瞬態 API,
- 使用
SHORTINIT常量加載最少必要的 WordPress。
創建一個簡單的解耦頁面端點
讓我們創建一個小插件來演示我們正在談論的效果。 首先,在您的json-transient插件中添加一個wp-config-simple.php文件,如下所示:
<?php /** * Create simple wp configuration for the routes * * @since 1.0.0 * @package json-transient */ define( 'SHORTINIT', true ); $parse_uri = explode( 'wp-content', $_SERVER['SCRIPT_FILENAME'] ); require_once filter_var( $parse_uri[0] . 'wp-load.php', FILTER_SANITIZE_STRING ); define( 'SHORTINIT', true ); 將阻止加載大多數 WordPress 核心文件,如wp-settings.php文件所示。
我們可能仍然需要一些 WordPress 功能,因此我們可以手動請求該文件(如wp-load.php )。 由於wp-load.php位於 WordPress 安裝的根目錄中,我們將通過使用$_SERVER['SCRIPT_FILENAME']獲取文件路徑來獲取它,然後通過wp-content字符串分解該字符串。 這將返回一個包含兩個值的數組:
- 我們安裝的根目錄;
- 文件路徑的其餘部分(我們不感興趣)。
請記住,我們使用的是 WordPress 的默認安裝,而不是修改後的安裝,例如在 Bedrock 樣板中,它將 WordPress 拆分為不同的文件組織。
最後,為了安全,我們需要wp-load.php文件,並進行一些清理。
在我們的init.php文件中,我們將添加以下內容:
* Author URI: https://infinum.co/ * License: GPL-2.0+ * License URI: https://www.gnu.org/licenses/gpl-2.0.txt * Text Domain: json-transient */ namespace Json_Transient; // If this file is called directly, abort. if ( ! defined( 'WPINC' ) ) { die; } class Init { /** * Get the array of allowed types to do operations on. * * @return array * * @since 1.0.0 */ public function get_allowed_post_types() { return array( 'post', 'page' ); } /** * Check if post type is allowed to be save in transient. * * @param string $post_type Get post type. * @return boolean * * @since 1.0.0 */ public function is_post_type_allowed_to_save( $post_type = null ) { if( ! $post_type ) { return false; } $allowed_types = $this->get_allowed_post_types(); if ( in_array( $post_type, $allowed_types, true ) ) { return true; } return false; } /** * Get Page cache name for transient by post slug and type. * * @param string $post_slug Page Slug to save. * @param string $post_type Page Type to save. * @return string * * @since 1.0.0 */ public function get_page_cache_name_by_slug( $post_slug = null, $post_type = null ) { if( ! $post_slug || ! $post_type ) { return false; } $post_slug = str_replace( '__trashed', '', $post_slug ); return 'jt_data_' . $post_type . '_' . $post_slug; } /** * Get full post data by post slug and type. * * @param string $post_slug Page Slug to do Query by. * @param string $post_type Page Type to do Query by. * @return array * * @since 1.0.0 */ public function get_page_data_by_slug( $post_slug = null, $post_type = null ) { if( ! $post_slug || ! $post_type ) { return false; } $page_output = ''; $args = array( 'name' => $post_slug, 'post_type' => $post_type, 'posts_per_page' => 1, 'no_found_rows' => true ); $the_query = new \WP_Query( $args ); if ( $the_query->have_posts() ) { while ( $the_query->have_posts() ) { $the_query->the_post(); $page_output = $the_query->post; } wp_reset_postdata(); } return $page_output; } /** * Return Page in JSON format * * @param string $post_slug Page Slug. * @param string $post_type Page Type. * @return json * * @since 1.0.0 */ public function get_json_page( $post_slug = null, $post_type = null ) { if( ! $post_slug || ! $post_type ) { return false; } return wp_json_encode( $this->get_page_data_by_slug( $post_slug, $post_type ) ); } /** * Update Page to transient for caching on action hooks save_post. * * @param int $post_id Saved Post ID provided by action hook. * * @since 1.0.0 */ public function update_page_transient( $post_id ) { $post_status = get_post_status( $post_id ); $post = get_post( $post_id ); $post_slug = $post->post_name; $post_type = $post->post_type; $cache_name = $this->get_page_cache_name_by_slug( $post_slug, $post_type ); if( ! $cache_name ) { return false; } if( $post_status === 'auto-draft' || $post_status === 'inherit' ) { return false; } else if( $post_status === 'trash' ) { delete_transient( $cache_name ); } else { if( $this->is_post_type_allowed_to_save( $post_type ) ) { $cache = $this->get_json_page( $post_slug, $post_type ); set_transient( $cache_name, $cache, 0 ); } } } } $init = new Init(); add_action( 'save_post', [ $init, 'update_page_transient' ] );上面代碼中的輔助方法將使我們能夠做一些緩存:
-
get_allowed_post_types()
此方法讓帖子類型知道我們希望在我們的自定義“端點”中啟用顯示。 你可以擴展它,我們實際上使這個方法可過濾的插件,這樣你就可以使用過濾器來添加額外的項目。 -
is_post_type_allowed_to_save()
這個方法只是檢查我們試圖從中獲取數據的帖子類型是否在前一個方法指定的允許數組中。 -
get_page_cache_name_by_slug()
此方法將返回從中獲取數據的瞬態名稱。 -
get_page_data_by_slug()
該方法將通過其 slug 和 post 類型對 post 執行WP_Query並返回我們將使用get_json_page()方法與 JSON 轉換的 post 數組的內容。 -
update_page_transient()
這將在save_post鉤子上運行,並將用我們帖子的 JSON 數據覆蓋數據庫中的瞬態。 最後一種方法稱為“密鑰緩存方法”。
讓我們更深入地解釋瞬變。
瞬態 API
Transients API 用於在 WordPress 數據庫的選項表中存儲特定時間段的數據。 它是一個持久對象緩存,這意味著您正在存儲一些對象,例如,大而慢的查詢的結果或可以跨頁面加載持久的完整頁面。 它類似於常規的 WordPress 對象緩存,但與WP_Cache不同,瞬態將在頁面加載期間持久保存數據,其中WP_Cache (將數據存儲在內存中)只會在請求期間保存數據。
它是一個鍵值存儲,這意味著我們可以輕鬆快速地獲取所需的數據,類似於 Memcached 或 Redis 等in-memory caching systems事情。 不同之處在於您通常需要在服務器上單獨安裝它們(這在共享服務器上可能是一個問題),而瞬態是 WordPress 內置的。
正如其 Codex 頁面所指出的 - 瞬態本質上是通過緩存插件加速的。 因為它們可以將瞬態存儲在內存中而不是數據庫中。 一般規則是您不應該假設數據庫中始終存在瞬態 - 這就是為什麼在獲取它之前檢查它的存在是一個好習慣
$transient_name = get_transient( 'transient_name' ); if ( $transient_name === false ) { set_transient( 'transient_name', $transient_data, $transient_expiry ); }您可以在沒有過期的情況下使用它(就像我們正在做的那樣),這就是我們在保存後實現一種“緩存清除”的原因。 除了它們提供的所有強大功能之外,它們還可以容納多達 4GB 的數據,但我們不建議在單個數據庫字段中存儲任何大的數據。
推薦閱讀:當心:可能使您的網站不安全的 PHP 和 WordPress 函數
最終端點:測試和驗證
我們需要的最後一塊拼圖是“端點”。 我在這裡使用術語端點,即使它不是端點,因為我們直接調用特定文件來獲取我們的結果。 所以我們可以創建一個如下所示的test.php文件:
get_page_cache_name_by_slug( $post_slug, $post_type ) ); // Return error on false. if ( $cache === false ) { wp_send_json( 'Error, the page does not exist or it is not cached correctly. Please try rebuilding cache and try again!' ); } // Decode json for output. wp_send_json( json_decode( $cache ) ); 如果我們去https://dev.wordpress.test/wp-content/plugins/json-transient/test.php ,我們會看到這條消息:
錯誤,頁面 slug 或類型丟失!
因此,我們需要指定帖子類型和帖子 slug。 當我們現在去https://dev.wordpress.test/wp-content/plugins/json-transient/test.php?slug=hello-world&type=post我們會看到:
錯誤,頁面不存在或未正確緩存。 請嘗試重建緩存並重試!
等一下! 我們需要先重新保存我們的頁面和帖子。 因此,當您開始時,這很容易。 但是,如果您已經有 100 多個頁面或帖子,這可能是一項具有挑戰性的任務。 這就是為什麼我們實現了一種方法來清除 Decoupled JSON Content 插件中的瞬態,並批量重建它們。
但是請繼續並重新保存Hello World帖子,然後再次打開鏈接。 您現在應該擁有的是如下所示的內容:
{ "ID": 1, "post_author": "1", "post_date": "2018-06-26 18:28:57", "post_date_gmt": "2018-06-26 18:28:57", "post_content": "Welcome to WordPress. This is your first post. Edit or delete it, then start writing!", "post_title": "Hello world!", "post_excerpt": "", "post_status": "publish", "comment_status": "open", "ping_status": "open", "post_password": "", "post_name": "hello-world", "to_ping": "", "pinged": "", "post_modified": "2018-06-30 08:34:52", "post_modified_gmt": "2018-06-30 08:34:52", "post_content_filtered": "", "post_parent": 0, "guid": "http:\/\/dev.wordpress.test\/?p=1", "menu_order": 0, "post_type": "post", "post_mime_type": "", "comment_count": "1", "filter": "raw" }就是這樣。 我們製作的插件有一些額外的功能可供您使用,但簡而言之,這就是您從 WordPress 獲取 JSON 數據的方式,比使用 REST API 更快。
之前和之後:改進的響應時間
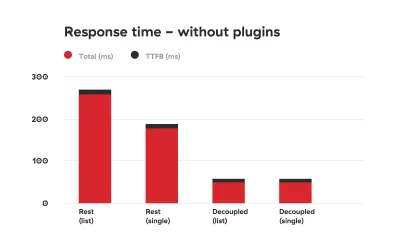
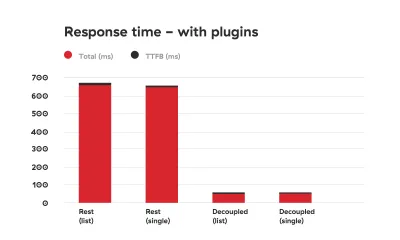
我們在 Chrome 中進行了測試,我們可以分別看到總響應時間和 TTFB。 我們連續測試了十次響應時間:首先沒有插件,然後添加了插件。 此外,我們測試了帖子列表和單個帖子的響應。
測試結果如下表所示:


如您所見,差異是巨大的。
安全問題
您需要仔細查看一些注意事項。 首先,我們手動加載 WordPress 核心文件,這在 WordPress 世界中是一個很大的禁忌。 為什麼? 好吧,除了手動獲取核心文件可能很棘手(特別是如果您使用非標準安裝,例如 Bedrock 時)這一事實之外,它可能會帶來一些安全問題。
如果您決定使用本文中描述的方法,請確保您知道如何加強服務器安全性。
首先,在test.php文件中添加 HTML 標頭:
header( 'Access-Control-Allow-Origin: your-front-end-app.url' ); header( 'Content-Type: application/json' );第一個標頭是一種繞過 CORS 安全措施的方法,以便只有您的前端應用程序可以在轉到指定文件時獲取內容。
其次,禁用應用程序的目錄遍歷。 您可以通過修改nginx設置來做到這一點,或者如果您在 Apache 服務器上,則將Options -Indexes添加到您的.htaccess文件中。
在響應中添加令牌檢查也是一個很好的措施,可以防止不必要的訪問。 我們實際上正在研究一種方法來修改我們的 Decoupled JSON 插件,以便我們可以默認包含這些安全措施。
前端應用發送的 Authorization 標頭檢查可能如下所示:
if ( ! isset( $_SERVER['HTTP_AUTHORIZATION'] ) ) { return; } $auth_header = $_SERVER['HTTP_AUTHORIZATION'];然後,您可以檢查是否提供了特定令牌(僅由前端和後端應用程序共享的秘密)並且正確。
結論
REST API 很棒,因為它可以用來創建成熟的應用程序——創建、檢索、更新和刪除數據。 使用它的缺點是它的速度。
顯然,創建應用程序與創建經典網站不同。 您可能不需要我們安裝的所有插件。 但是,如果您只需要數據用於演示目的,那麼在使用解耦站點時,緩存數據並將其提供在自定義文件中似乎是目前完美的解決方案。
您可能會認為創建自定義插件來加快網站響應時間有點過頭了,但我們生活在一個分秒必爭的世界。 每個人都知道,如果一個網站速度慢,用戶就會放棄它。 有許多研究證明了網站性能和轉化率之間的聯繫。 但如果你仍然需要說服力,谷歌會懲罰速度慢的網站。
本文介紹的方法解決了 WordPress REST API 遇到的速度問題,並且在處理解耦的 WordPress 項目時會給您額外的提升。 由於我們一直在努力從每個請求和響應中擠出最後一毫秒,因此我們計劃進一步優化插件。 同時,請分享您對加速解耦 WordPress 的想法!
