
漸進式 Web 應用程序的詳盡指南
已發表: 2022-03-10那是我爸爸的生日,我想為他訂一個巧克力蛋糕和一件襯衫。 我前往谷歌搜索巧克力蛋糕並點擊搜索結果中的第一個鏈接。 有幾秒鐘的空白屏幕; 我不明白髮生了什麼。 耐心地凝視了幾秒鐘後,我的手機屏幕上充滿了看起來很美味的蛋糕。 當我點擊其中一個查看其詳細信息時,我得到了一個醜陋的胖彈窗,要求我安裝一個 Android 應用程序,以便在訂購蛋糕時獲得如絲般順滑的體驗。
那令人失望。 我的良心不允許我點擊“安裝”按鈕。 我想做的只是點一個小蛋糕然後上路。
我單擊了彈出窗口最右側的十字圖標以盡快退出。 但隨後安裝彈出窗口位於屏幕底部,佔據了四分之一的空間。 對於易碎的 UI,向下滾動是一個挑戰。 我不知何故設法點了一個荷蘭蛋糕。
在這次可怕的經歷之後,我的下一個挑戰是為我爸爸訂購一件襯衫。 和以前一樣,我在 Google 上搜索襯衫。 我點擊了第一個鏈接,眨眼間,整個內容就在我面前。 滾動很流暢。 沒有安裝橫幅。 我感覺好像在瀏覽一個原生應用程序。 有一段時間,我糟糕的互聯網連接中斷了,但我仍然能夠看到內容,而不是恐龍遊戲。 即使我的互聯網很糟糕,我還是設法為我父親訂購了一件襯衫和牛仔褲。 最令人驚訝的是,我收到了有關我的訂單的通知。
我稱之為絲般順滑的體驗。 這些人做的事情是對的。 每個網站都應該為他們的用戶做這件事。 它被稱為漸進式網絡應用程序。
正如 Alex Russell 在他的一篇博文中所說:
“在網絡上時不時會發生強大的技術在沒有營銷部門或精美包裝的情況下出現。 他們在外圍徘徊和成長,成為一小群人的老帽子,而其他人幾乎看不見。 直到有人給他們起名字。”
Web 上如絲般流暢的體驗,有時被稱為漸進式 Web 應用程序
漸進式 Web 應用程序 (PWA) 更像是一種方法論,它涉及組合技術以製作強大的 Web 應用程序。 隨著用戶體驗的改善,人們將在網站上花費更多時間並看到更多廣告。 他們傾向於購買更多,並且通過通知更新,他們更有可能經常訪問。 《金融時報》在 2011 年放棄了其原生應用程序,並使用當時可用的最佳技術構建了一個 Web 應用程序。 現在,該產品已經成長為一個成熟的 PWA。
但是,為什麼,經過這麼長時間,當原生應用程序做得足夠好時,你會構建一個 Web 應用程序呢?
讓我們看看 Google IO 17 中共享的一些指標。
50 億台設備連接到網絡,使網絡成為計算史上最大的平台。 在移動網絡上,每月有 1140 萬獨立訪問者訪問排名前 1000 的網絡資產,400 萬訪問排名前 100 的應用程序。 移動網絡獲得的用戶數量大約是本地應用程序的四倍。 但在參與度方面,這個數字急劇下降。
用戶在原生應用上平均花費 188.6 分鐘,而在移動網絡上僅花費 9.3 分鐘。 本機應用程序利用操作系統的強大功能發送推送通知,為用戶提供重要更新。 與瀏覽器中的網站相比,它們提供了更好的用戶體驗和更快的啟動速度。 用戶無需在網絡瀏覽器中輸入 URL,只需點擊主屏幕上的應用程序圖標即可。
網絡上的大多數訪問者不太可能回來,因此開發人員想出了一種解決方法,向他們展示橫幅以安裝本機應用程序,以保持他們的深度參與。 但是,用戶將不得不經歷安裝本機應用程序二進製文件的繁瑣過程。 強迫用戶安裝應用程序很煩人,並進一步降低了他們首先安裝它的機會。 網絡的機會是顯而易見的。
推薦閱讀: Native 和 PWA:選擇,而不是挑戰者!
如果 Web 應用程序具有豐富的用戶體驗、推送通知、離線支持和即時加載,它們就可以征服世界。 這就是漸進式 Web 應用程序所做的。
PWA 提供了豐富的用戶體驗,因為它具有以下幾個優勢:
快速地
用戶界面不是片狀的。 滾動很流暢。 該應用程序可以快速響應用戶交互。可靠的
一個正常的網站迫使用戶等待,什麼也不做,而它正忙於訪問服務器。 與此同時,PWA 會從緩存中即時加載數據。 即使在 2G 連接上,PWA 也能無縫工作。 每個獲取資產或數據的網絡請求都通過服務工作者(稍後會詳細介紹),它首先驗證特定請求的響應是否已經在緩存中。 當用戶幾乎立即獲得真實內容時,即使在連接不佳的情況下,他們也會更加信任該應用程序並認為它更可靠。引人入勝
PWA 可以在用戶的主屏幕上獲得一席之地。 它通過提供全屏工作區來提供類似原生應用程序的體驗。 它利用推送通知來保持用戶的參與度。
既然我們知道了 PWA 帶來了什麼,那麼讓我們來詳細了解一下是什麼讓 PWA 比原生應用程序更具優勢。 PWA 是使用服務工作者、Web 應用程序清單、推送通知和用於緩存的 IndexedDB/本地數據結構等技術構建的。 讓我們詳細研究一下。
服務人員
Service Worker 是一個在後台運行的 JavaScript 文件,不會干擾用戶的交互。 對服務器的所有 GET 請求都通過 service worker。 它就像一個客戶端代理。 通過攔截網絡請求,它可以完全控制發送回客戶端的響應。 PWA 會立即加載,因為服務人員通過緩存中的數據響應來消除對網絡的依賴。
Service Worker 只能攔截其範圍內的網絡請求。 例如,根範圍的服務工作者可以攔截來自網頁的所有獲取請求。 服務工作者作為事件驅動系統運行。 它在不需要時進入休眠狀態,從而節省內存。 要在 Web 應用程序中使用服務工作者,我們首先必須使用 JavaScript 在頁面上註冊它。
(function main () { /* navigator is a WEB API that allows scripts to register themselves and carry out their activities. */ if ('serviceWorker' in navigator) { console.log('Service Worker is supported in your browser') /* register method takes in the path of service worker file and returns a promises, which returns the registration object */ navigator.serviceWorker.register('./service-worker.js').then (registration => { console.log('Service Worker is registered!') }) } else { console.log('Service Worker is not supported in your browser') } })() 我們首先檢查瀏覽器是否支持服務工作者。 要在 Web 應用程序中註冊服務工作者,我們將其 URL 作為參數提供給register函數,在navigator.serviceWorker中可用( navigator是一個 Web API,它允許腳本自己註冊並執行它們的活動)。 服務工作者只註冊一次。 註冊不會在每次頁面加載時發生。 僅當現有激活的 service worker 與較新的 service worker 之間存在字節差異或其 URL 已更改時,瀏覽器才會下載 service worker 文件 ( ./service-worker.js )。
上面的 service worker 將攔截所有來自根 ( / ) 的請求。 為了限制服務工作者的範圍,我們將傳遞一個可選參數,其中一個鍵作為範圍。
if ('serviceWorker' in navigator) { /* register method takes in an optional second parameter as an object. To restrict the scope of a service worker, the scope should be provided. scope: '/books' will intercept requests with '/books' in the url. */ navigator.serviceWorker.register('./service-worker.js', { scope: '/books' }).then(registration => { console.log('Service Worker for scope /books is registered', registration) }) } 上面的 service worker 將攔截 URL 中包含/books的請求。 例如,它不會攔截帶有/products的請求,但它可以很好地攔截帶有/books/products的請求。
如前所述,服務工作者作為事件驅動系統運行。 它監聽事件(安裝、激活、獲取、推送)並相應地調用相應的事件處理程序。 其中一些事件是服務工作者生命週期的一部分,服務工作者依次經歷這些事件以被激活。
安裝
一旦成功註冊服務工作者,就會觸發安裝事件。 這是進行初始化工作的好地方,例如設置緩存或在 IndexedDB 中創建對象存儲。 (一旦我們深入了解 IndexedDB 的詳細信息,您會更了解它。現在,我們只能說它是一個鍵值對結構。)
self.addEventListener('install', (event) => { let CACHE_NAME = 'xyz-cache' let urlsToCache = [ '/', '/styles/main.css', '/scripts/bundle.js' ] event.waitUntil( /* open method available on caches, takes in the name of cache as the first parameter. It returns a promise that resolves to the instance of cache All the URLS above can be added to cache using the addAll method. */ caches.open(CACHE_NAME) .then (cache => cache.addAll(urlsToCache)) ) }) 在這裡,我們緩存了一些文件,以便下一次加載是即時的。 self指的是服務工作者實例。 event.waitUntil讓 service worker 等到它裡面的所有代碼都完成執行。
激活
一旦安裝了 service worker,它還不能監聽 fetch 請求。 相反,觸發了一個activate事件。 如果在同一範圍內的網站上沒有活動的 Service Worker 正在運行,則安裝的 Service Worker 會立即被激活。 但是,如果一個網站已經有一個活躍的 service worker,那麼新 service worker 的激活會被延遲,直到舊 service worker 上的所有選項卡都關閉。 這是有道理的,因為舊的服務工作者可能正在使用現在在較新的服務工作者中修改的緩存實例。 因此,激活步驟是擺脫舊緩存的好地方。
self.addEventListener('activate', (event) => { let cacheWhitelist = ['products-v2'] // products-v2 is the name of the new cache event.waitUntil( caches.keys().then (cacheNames => { return Promise.all( cacheNames.map( cacheName => { /* Deleting all the caches except the ones that are in cacheWhitelist array */ if (cacheWhitelist.indexOf(cacheName) === -1) { return caches.delete(cacheName) } }) ) }) ) }) 在上面的代碼中,我們正在刪除舊的緩存。 如果緩存的名稱與cacheWhitelist不匹配,則將其刪除。 要跳過等待階段並立即激活服務工作者,我們使用skip.waiting() 。
self.addEventListener('activate', (event) => { self.skipWaiting() // The usual stuff })一旦服務工作者被激活,它就可以監聽獲取請求和推送事件。
獲取事件處理程序
每當網頁通過網絡觸發對資源的 fetch 請求時,都會調用來自 service worker 的 fetch 事件。 fetch 事件處理程序首先在緩存中查找請求的資源。 如果它存在於緩存中,則它返回帶有緩存資源的響應。 否則,它會向服務器發起 fetch 請求,當服務器用請求的資源發送迴響應時,它會將其放入緩存中以供後續請求。
/* Fetch event handler for responding to GET requests with the cached assets */ self.addEventListener('fetch', (event) => { event.respondWith( caches.open('products-v2') .then (cache => { /* Checking if the request is already present in the cache. If it is present, sending it directly to the client */ return cache.match(event.request).then (response => { if (response) { console.log('Cache hit! Fetching response from cache', event.request.url) return response } /* If the request is not present in the cache, we fetch it from the server and then put it in cache for subsequent requests. */ fetch(event.request).then (response => { cache.put(event.request, response.clone()) return response }) }) }) ) }) event.respondWith讓服務工作者向客戶端發送自定義響應。
離線優先現在是一回事。 對於任何非關鍵請求,我們必須從緩存中提供響應,而不是搭便車到服務器。 如果緩存中不存在任何資產,我們會從服務器獲取它,然後將其緩存以供後續請求使用。
服務工作者只在 HTTPS 網站上工作,因為他們有權操縱任何獲取請求的響應。 有惡意的人可能會篡改 HTTP 網站上請求的響應。 因此,必須在 HTTPS 上託管 PWA。 Service Worker 不會中斷 DOM 的正常運行。 他們無法直接與網頁通信。 要將任何消息發送到網頁,它會使用發布消息。
網絡推送通知
假設您正忙著在手機上玩遊戲,並彈出一條通知,告訴您您最喜歡的品牌有 30% 的折扣。 事不宜遲,您單擊通知並屏住呼吸。 獲取板球或足球比賽的實時更新或獲取重要的電子郵件和提醒作為通知對於吸引用戶使用產品來說是一件大事。 在 PWA 出現之前,此功能僅在本機應用程序中可用。 PWA 利用 Web 推送通知來與原生應用程序提供的開箱即用的強大功能競爭。 即使 PWA 未在任何瀏覽器選項卡中打開,即使瀏覽器未打開,用戶仍會收到 Web 推送通知。
Web 應用程序必須請求用戶的許可才能向他們發送推送通知。

一旦用戶通過單擊“允許”按鈕進行確認,瀏覽器就會生成一個唯一的訂閱令牌。 此令牌對於此設備是唯一的。 Chrome 生成的訂閱令牌格式如下:
{ "endpoint": "https://fcm.googleapis.com/fcm/send/c7Veb8VpyM0:APA91bGnMFx8GIxf__UVy6vJ-n9i728CUJSR1UHBPAKOCE_SrwgyP2N8jL4MBXf8NxIqW6NCCBg01u8c5fcY0kIZvxpDjSBA75sVz64OocQ-DisAWoW7PpTge3SwvQAx5zl_45aAXuvS", "expirationTime": null, "keys": { "p256dh": "BJsj63kz8RPZe8Lv1uu-6VSzT12RjxtWyWCzfa18RZ0-8sc5j80pmSF1YXAj0HnnrkyIimRgLo8ohhkzNA7lX4w", "auth": "TJXqKozSJxcWvtQasEUZpQ" } } 上面令牌中包含的endpoint對於每個訂閱都是唯一的。 在一個普通的網站上,成千上萬的用戶會同意接收推送通知,並且對於每個人來說,這個endpoint都是唯一的。 因此,在這個endpoint的幫助下,應用程序能夠在未來通過向他們發送推送通知來定位這些用戶。 expirationTime是訂閱對特定設備有效的時間量。 如果expirationTime為 20 天,則表示用戶的推送訂閱將在 20 天后過期,用戶將無法收到舊訂閱的推送通知。 在這種情況下,瀏覽器將為該設備生成一個新的訂閱令牌。 auth和p256dh密鑰用於加密。
現在,為了在未來向這成千上萬的用戶發送推送通知,我們首先必須保存他們各自的訂閱令牌。 向這些用戶發送推送通知是應用程序服務器(後端服務器,可能是 Node.js 腳本)的工作。 這聽起來就像使用請求負載中的通知數據向端點 URL 發出POST請求一樣簡單。 但是,應該注意的是,如果用戶在服務器觸發了針對他們的推送通知時不在線,那麼一旦他們重新上線,他們仍然應該收到該通知。 服務器必須處理這種情況,並向用戶發送數千個請求。 跟踪用戶連接的服務器聽起來很複雜。 因此,中間的東西將負責將 Web 推送通知從服務器路由到客戶端。 這稱為推送服務,每個瀏覽器都有自己的推送服務實現。 瀏覽器必須將以下信息告知推送服務才能發送任何通知:
- 活著的時間
這是消息應該排隊多長時間,以防它沒有傳遞給用戶。 一旦這個時間過去,消息將從隊列中刪除。 - 消息的緊迫性
這樣推送服務通過僅發送高優先級消息來節省用戶的電池電量。
推送服務將消息路由到客戶端。 因為客戶端必須接收推送,即使其各自的 Web 應用程序未在瀏覽器中打開,推送事件必須由在後台持續監控的東西進行監聽。 你猜對了:這是服務人員的工作。 Service Worker 監聽推送事件並向用戶顯示通知。
所以,現在我們知道瀏覽器、推送服務、Service Worker 和應用服務器協同工作以向用戶發送推送通知。 讓我們看看實現細節。
網絡推送客戶端
請求用戶的許可是一次性的事情。 如果用戶已經授予接收推送通知的權限,我們不應該再次詢問。 權限值保存在Notification.permission中。
/* Notification.permission can have one of these three values: default, granted or denied. */ if (Notification.permission === 'default') { /* The Notification.requestPermission() method shows a notification permission prompt to the user. It returns a promise that resolves to the value of permission*/ Notification.requestPermission().then (result => { if (result === 'denied') { console.log('Permission denied') return } if (result === 'granted') { console.log('Permission granted') /* This means the user has clicked the Allow button. We're to get the subscription token generated by the browser and store it in our database. The subscription token can be fetched using the getSubscription method available on pushManager of the serviceWorkerRegistration object. If subscription is not available, we subscribe using the subscribe method available on pushManager. The subscribe method takes in an object. */ serviceWorkerRegistration.pushManager.getSubscription() .then (subscription => { if (!subscription) { const applicationServerKey = ' ' serviceWorkerRegistration.pushManager.subscribe({ userVisibleOnly: true, // All push notifications from server should be displayed to the user applicationServerKey // VAPID Public key }) } else { saveSubscriptionInDB(subscription, userId) // A method to save subscription token in the database } }) } }) }/* Notification.permission can have one of these three values: default, granted or denied. */ if (Notification.permission === 'default') { /* The Notification.requestPermission() method shows a notification permission prompt to the user. It returns a promise that resolves to the value of permission*/ Notification.requestPermission().then (result => { if (result === 'denied') { console.log('Permission denied') return } if (result === 'granted') { console.log('Permission granted') /* This means the user has clicked the Allow button. We're to get the subscription token generated by the browser and store it in our database. The subscription token can be fetched using the getSubscription method available on pushManager of the serviceWorkerRegistration object. If subscription is not available, we subscribe using the subscribe method available on pushManager. The subscribe method takes in an object. */ serviceWorkerRegistration.pushManager.getSubscription() .then (subscription => { if (!subscription) { const applicationServerKey = ' ' serviceWorkerRegistration.pushManager.subscribe({ userVisibleOnly: true, // All push notifications from server should be displayed to the user applicationServerKey // VAPID Public key }) } else { saveSubscriptionInDB(subscription, userId) // A method to save subscription token in the database } }) } }) }
在上面的subscribe方法中,我們傳遞userVisibleOnly和applicationServerKey來生成訂閱令牌。 userVisibleOnly屬性應該始終為 true,因為它告訴瀏覽器服務器發送的任何推送通知都將顯示給客戶端。 為了理解applicationServerKey的目的,讓我們考慮一個場景。

如果有人掌握了您的數千個訂閱令牌,他們很可能會向這些訂閱中包含的端點發送通知。 端點無法鏈接到您的唯一身份。 為了為您的 Web 應用程序上生成的訂閱令牌提供唯一身份,我們使用了 VAPID 協議。 使用 VAPID,應用程序服務器在發送推送通知時自願向推送服務標識自己。 我們生成兩個密鑰,如下所示:
const webpush = require('web-push') const vapidKeys = webpush.generateVAPIDKeys() web-push 是一個 npm 模塊。 vapidKeys將有一個公鑰和一個私鑰。 上面使用的應用服務器密鑰是公鑰。
網絡推送服務器
Web 推送服務器(應用程序服務器)的工作很簡單。 它將通知有效負載發送到訂閱令牌。
const options = { TTL: 24*60*60, //TTL is the time to live, the time that the notification will be queued in the push service vapidDetails: { subject: '[email protected]', publicKey: ' ', privateKey: ' ' } } const data = { title: 'Update', body: 'Notification sent by the server' } webpush.sendNotification(subscription, data, options)const options = { TTL: 24*60*60, //TTL is the time to live, the time that the notification will be queued in the push service vapidDetails: { subject: '[email protected]', publicKey: ' ', privateKey: ' ' } } const data = { title: 'Update', body: 'Notification sent by the server' } webpush.sendNotification(subscription, data, options)const options = { TTL: 24*60*60, //TTL is the time to live, the time that the notification will be queued in the push service vapidDetails: { subject: '[email protected]', publicKey: ' ', privateKey: ' ' } } const data = { title: 'Update', body: 'Notification sent by the server' } webpush.sendNotification(subscription, data, options)
它使用 web 推送庫中的sendNotification方法。
服務人員
服務工作者向用戶顯示通知,如下所示:
self.addEventListener('push', (event) => { let options = { body: event.data.body, icon: 'images/example.png', } event.waitUntil( /* The showNotification method is available on the registration object of the service worker. The first parameter to showNotification method is the title of notification, and the second parameter is an object */ self.registration.showNotification(event.data.title, options) ) })到目前為止,我們已經看到了 Service Worker 如何利用緩存來存儲請求並使 PWA 快速可靠,並且我們已經看到了 Web 推送通知如何讓用戶保持參與。
為了在客戶端存儲大量數據以供離線支持,我們需要一個巨大的數據結構。 讓我們看看金融時報 PWA。 您必須親眼見證這種數據結構的強大功能。 在瀏覽器中加載 URL,然後關閉 Internet 連接。 重新加載頁面。 呸! 它還在工作嗎? 它是。 (就像我說的,離線是新的黑色。)數據不是來自電線。 它是從房子里送來的。 前往 Chrome 開發者工具的“應用程序”選項卡。 在“存儲”下,您會找到“IndexedDB”。
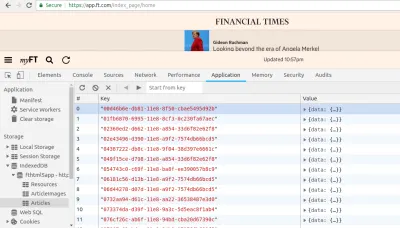
查看“Articles”對象存儲,並展開任何項目以親眼看看其中的魔力。 《金融時報》已存儲此數據以供離線支持。 這種可以讓我們存儲大量數據的數據結構稱為 IndexedDB。 IndexedDB 是一個基於 JavaScript 的面向對象的數據庫,用於存儲結構化數據。 我們可以在這個數據庫中為各種目的創建不同的對象存儲。 例如,正如我們在上圖中看到的那樣,“Resources”、“ArticleImages”和“Articles”被稱為對象存儲。 對象存儲中的每條記錄都用一個鍵唯一標識。 IndexedDB 甚至可以用於存儲文件和 blob。
讓我們嘗試通過創建一個用於存儲書籍的數據庫來理解 IndexedDB。
let openIdbRequest = window.indexedDB.open('booksdb', 1) 如果數據庫booksdb尚不存在,則上面的代碼將創建一個booksdb數據庫。 open 方法的第二個參數是數據庫的版本。 指定版本會處理將來可能發生的與架構相關的更改。 例如, booksdb現在只有一張表,但是當應用程序增長時,我們打算再添加兩張表。 為了確保我們的數據庫與更新的模式同步,我們將指定一個比前一個更高的版本。
調用open方法不會立即打開數據庫。 這是一個返回IDBOpenDBRequest對象的異步請求。 該對象具有成功和錯誤屬性; 我們必須為這些屬性編寫適當的處理程序來管理我們的連接狀態。
let dbInstance openIdbRequest.onsuccess = (event) => { dbInstance = event.target.result console.log('booksdb is opened successfully') } openIdbRequest.onerror = (event) => { console.log('There was an error in opening booksdb database') } openIdbRequest.onupgradeneeded = (event) => { let db = event.target.result let objectstore = db.createObjectStore('books', { keyPath: 'id' }) } 為了管理對象存儲的創建或修改(對象存儲類似於基於 SQL 的表——它們具有鍵值結構),在 openIdbRequest 對openIdbRequest上調用onupgradeneeded方法。 每當版本更改時,都會調用onupgradeneeded方法。 在上面的代碼片段中,我們創建了一個以唯一鍵作為 ID 的書籍對象存儲。
假設在部署這段代碼之後,我們必須再創建一個對象存儲,稱為users 。 所以,現在我們數據庫的版本將是2 。
let openIdbRequest = window.indexedDB.open('booksdb', 2) // New Version - 2 /* Success and error event handlers remain the same. The onupgradeneeded method gets called when the version of the database changes. */ openIdbRequest.onupgradeneeded = (event) => { let db = event.target.result if (!db.objectStoreNames.contains('books')) { let objectstore = db.createObjectStore('books', { keyPath: 'id' }) } let oldVersion = event.oldVersion let newVersion = event.newVersion /* The users tables should be added for version 2. If the existing version is 1, it will be upgraded to 2, and the users object store will be created. */ if (oldVersion === 1) { db.createObjectStore('users', { keyPath: 'id' }) } } 我們已經在打開請求的成功事件處理程序中緩存dbInstance 。 要在 IndexedDB 中檢索或添加數據,我們將使用dbInstance 。 讓我們在書籍對象存儲中添加一些書籍記錄。
let transaction = dbInstance.transaction('books') let objectstore = transaction.objectstore('books') let bookRecord = { id: '1', name: 'The Alchemist', author: 'Paulo Coelho' } let addBookRequest = objectstore.add(bookRecord) addBookRequest.onsuccess = (event) => { console.log('Book record added successfully') } addBookRequest.onerror = (event) => { console.log('There was an error in adding book record') } 我們使用transactions ,尤其是在對象存儲上寫入記錄時。 事務只是圍繞操作的包裝,以確保數據完整性。 如果事務中的任何操作失敗,則不會對數據庫執行任何操作。
讓我們用put方法修改一個書籍記錄:
let modifyBookRequest = objectstore.put(bookRecord) // put method takes in an object as the parameter modifyBookRequest.onsuccess = (event) => { console.log('Book record updated successfully') } 讓我們使用get方法檢索書籍記錄:
let transaction = dbInstance.transaction('books') let objectstore = transaction.objectstore('books') /* get method takes in the id of the record */ let getBookRequest = objectstore.get(1) getBookRequest.onsuccess = (event) => { /* event.target.result contains the matched record */ console.log('Book record', event.target.result) } getBookRequest.onerror = (event) => { console.log('Error while retrieving the book record.') }在主屏幕上添加圖標
既然 PWA 和本機應用程序之間幾乎沒有任何區別,那麼為 PWA 提供主要位置是有意義的。 如果您的網站滿足 PWA 的基本標準(託管在 HTTPS 上,與 service worker 集成並具有manifest.json )並且在用戶在網頁上花費了一些時間後,瀏覽器將在底部調用一個提示,詢問用戶將應用添加到他們的主屏幕,如下所示:

當用戶單擊“將 FT 添加到主屏幕”時,PWA 將踏上主屏幕以及應用程序抽屜。 當用戶在手機上搜索任何應用程序時,將列出與搜索查詢匹配的任何 PWA。 它們還將在系統設置中看到,這使用戶可以輕鬆管理它們。 從這個意義上說,PWA 的行為類似於原生應用程序。
PWA 使用manifest.json來提供此功能。 讓我們看看一個簡單的manifest.json文件。
{ "name": "Demo PWA", "short_name": "Demo", "start_url": "/?standalone", "background_color": "#9F0C3F", "theme_color": "#fff1e0", "display": "standalone", "icons": [{ "src": "/lib/img/icons/xxhdpi.png?v2", "sizes": "192x192" }] } short_name出現在用戶的主屏幕和系統設置中。 該name出現在 chrome 提示符和初始屏幕上。 啟動屏幕是用戶在應用程序準備啟動時看到的內容。 start_url是應用程序的主屏幕。 這是用戶點擊主屏幕上的圖標時所得到的。 background_color用於啟動畫面。 theme_color設置工具欄的顏色。 display模式的standalone值表示應用程序將在全屏模式下運行(隱藏瀏覽器的工具欄)。 當用戶安裝 PWA 時,其大小僅為千字節,而不是原生應用程序的兆字節。
服務工作者、網絡推送通知、IndexedDB 和主屏幕位置彌補了離線支持、可靠性和參與度。 應該注意的是,Service Worker 並不是在第一次加載時就開始工作的。 在緩存所有靜態資產和其他資源之前,第一次加載仍然很慢。 我們可以實施一些策略來優化第一次加載。
捆綁資產
所有資源,包括 HTML、樣式表、圖像和 JavaScript,都將從服務器獲取。 文件越多,獲取它們所需的 HTTPS 請求就越多。 我們可以使用 WebPack 之類的捆綁器來捆綁我們的靜態資產,從而減少對服務器的 HTTP 請求數量。 WebPack 通過使用諸如代碼拆分(即僅捆綁當前頁面加載所需的那些文件,而不是將所有文件捆綁在一起)和樹抖動(即刪除重複的依賴項或已導入但未在代碼中使用的依賴項)。
減少往返
網絡速度慢的主要原因之一是網絡延遲。 一個字節從 A 傳輸到 B 所需的時間因網絡連接而異。 例如,Wi-Fi 上的特定往返在 3G 連接上需要 50 毫秒和 500 毫秒,但在 2G 連接上需要 2500 毫秒。 這些請求是使用 HTTP 協議發送的,這意味著當一個特定的連接被用於一個請求時,它不能用於任何其他請求,直到前一個請求的響應被提供。 一個網站一次可以發出六個異步 HTTP 請求,因為一個網站可以使用六個連接來發出 HTTP 請求。 一個網站平均發出大約 100 個請求; 因此,最多有六個可用連接,用戶可能最終在單次往返中花費大約 833 毫秒。 (計算為833 毫秒 - 100 ⁄ 6 = 1666。我們必須將 1666 除以 2,因為我們正在計算往返所花費的時間。)使用 HTTP2,周轉時間大大減少。 HTTP2 不會阻塞連接頭,因此可以同時發送多個請求。
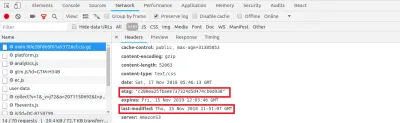
大多數 HTTP 響應都包含last-modified和etag標頭。 last-modified標頭是文件最後一次修改的日期, etag是基於文件內容的唯一值。 只有當文件的內容改變時才會改變。 如果緩存版本已經在本地可用,則這兩個標頭都可用於避免再次下載文件。 如果瀏覽器在本地有此文件的版本,它可以在請求中添加這兩個標頭中的任何一個,如下所示:
服務器可以檢查文件的內容是否發生了變化。 If the contents of the file have not changed, then it responds with a status code of 304 ( not modified ).
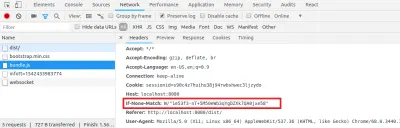
This indicates to the browser to use the locally available cached version of the file. By doing all of this, we've prevented the file from being downloaded.
Faster responses are in now place, but our job is not done yet. We still have to parse the HTML, load the style sheets and make the web page interactive. It makes sense to show some empty boxes with a loader to the user, instead of a blank screen. While the HTML document is getting parsed, when it comes across <script src='asset.js'></script> , it will make a synchronous HTTP request to the server to fetch asset.js , and the whole parsing process will be paused until the response comes back. Imagine having a dozen of synchronous static asset references. These could very well be managed just by making use of the async keyword in script references, like <script src='asset.js' async></script> . With the introduction of the async keyword here, the browser will make an asynchronous request to fetch asset.js without hindering the parsing of the HTML. If a script file is required at a later stage, we can defer the downloading of that file until the entire HTML has been parsed. A script file can be deferred by using the defer keyword, like <script src='asset.js' defer></script> .
結論
We've learned a lot of many new things that make for a cool web application. Here's a summary of all of the things we've explored in this article:
- Service workers make good use of the cache to speed up the loading of assets.
- Web push notifications work under the hood.
- We use IndexedDB to store a massive amount of data.
- Some of the optimizations for instant first load, like using HTTP2 and adding headers like
Etag,last-modifiedandIf-None-Match, prevent the downloading of valid cached assets.
就是這樣,伙計們!