如何在 WordPress 中为不同的类别设置独特的样式
已发表: 2017-09-20设计一直是 UI 最重要的方面之一。 一个好的用户界面会为您的网站带来更多的访问者,并最终为您带来更多的收入。
今天有数以百万计的实时网站,您必须使您的网站足够独特以与竞争对手区分开来。
WordPress有多受欢迎
您可以通过多种方式构建网站,但您为网站选择的平台可能是决定您可以进行多少定制的主要因素。 您可以选择许多平台,但 wordpress 是世界上最受欢迎的 CMS 之一,因为它的简单性和自定义能力。 WordPress 使用起来可能不像 Wix 或 Squarespace 那样简单,但它的定制能力使它如此受欢迎。
如此受欢迎的问题是什么?
WordPress 有一个庞大的社区(非常有帮助的社区),您可以找到解决您在 wordpress 旅程中可能遇到的任何问题的解决方案。 社区充满了信息和资源,主要资源之一是 wordpress 主题。 您可以在 wordpess.org 库中找到数以千计的免费主题,而且数量每天都在增长。
WordPress 如此受欢迎,但以不同的方式如此受欢迎存在一个问题,因为一个主题可以在不同的网站上多次使用,使用该特定主题的网站看起来有些相似。 因此,如果您只使用原样的主题,您的网站可能缺乏独特性。
为什么要以不同的方式设置类别的样式?
通常在博客或内容丰富的站点中,不同的主题被分为不同的类别。 这是访问者可以获取某个主题的所有信息的页面,这使您有机会以独特的方式呈现类别,从而为他们提供出色的体验。
因此,即使他们使用相同的主题,对每个类别进行不同的造型也可以让您比竞争对手更具优势。
差异可以简单到每个类别的不同颜色到不同的布局。
让我们看看如何做到这一点。
样式分类的方法
除了免费主题之外,您还可以从不同的市场购买高级主题。 通常,这些主题都加载了自定义功能,但即使如此,它们中的大多数也不会给您提供不同样式的选项。
因为一个主题可以从一个网站到另一个网站以不同的方式使用,所以主题作者不知道您将如何使用该主题。
因此,您应该知道如何对类别进行不同的样式设置,有两种方法可以做到这一点。
- 带模板
- 使用 CSS
现在让我们看看每一个都有不同的用例。
使用模板
如果您希望在布局中进行结构更改,则必须使用模板。 无论是侧边栏还是带有模板的全宽页面,您都可以控制页面的布局。
必须在儿童主题上工作
使用模板的一个先决条件是您必须使用子主题。 不是在主题中不起作用,而是修改主题的问题是您无法控制那里的文件,一旦更新主题,您的所有更改都将丢失。
您可以使用一些子主题就绪的高级主题,但如果您使用通常不包含任何子主题的免费主题,您必须创建一个。 准备好子主题后,您现在可以创建类别模板。
如何创建类别模板
WordPress 在遵循一定层次顺序的模板系统上工作。 您必须了解此模板层次结构才能创建类别模板。
类别的层次顺序是。
category-slug.php → category-id.php → category.php → archive.php → index.php
按照命令 wordpress 将查找category-slug.php ,其中slug表示类别名称,假设您有一个名为photoshop的类别,因此如果该文件不存在,它将首先搜索category-photoshop.php ,它将查找category-id.php即它将查找具有类别id的任何文件,例如category-3.php如果该文件不可用,它将查找category.php如果该文件也丢失,它将尝试使用archive.php文件作为模板如果未找到的那个很好,那么它将最终使用index.php作为其基本模板。
为了制作类别模板,您必须在主题中找到category.php文件,大多数主题都会有category.php文件,但如果您没有找到,则查找archive.php 。
注意:在某些框架中,您可能根本找不到这些文件,因为您需要遵循特定框架指南。
现在假设您正在处理子主题,请从父主题复制category.php或archive.php文件并将其粘贴到子主题的相同文件夹位置。
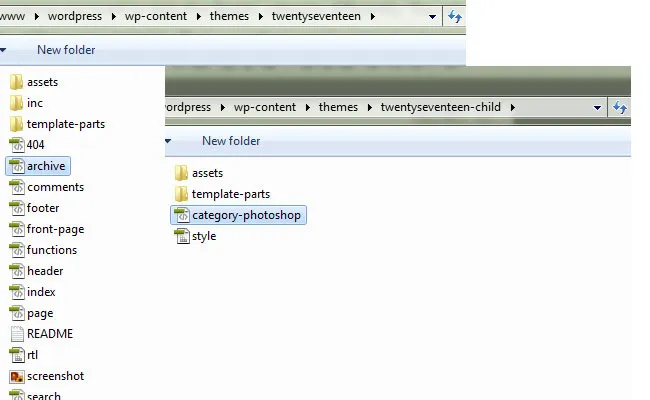
例如,如果您在父主题的根目录中找到所需的文件,则必须将其放在子主题的根目录中,如果它位于子文件夹中,则创建一个具有相同名称的子文件夹并将其粘贴到那里。
现在继续说您有一个名为photoshop的类别,将子主题中的新文件重命名为这个category-photoshop.php ,这就是 photoshop 类别将使用这个模板。
现在让我们通过一个例子来看看。
注意:我们将在此处使用 wordpress 27 主题作为示例,该过程适用于任何主题,但 html 结构因主题而异。
现在我们已经创建了一个类别模板,让我们进行一些自定义。
查看当前模板的外观。
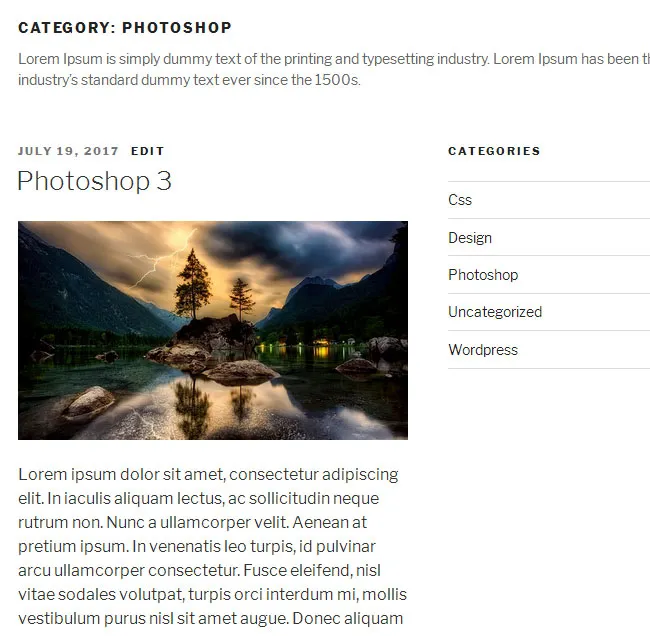
这就是我们正在努力实现的目标。
基本结构
211 主题有两列布局,但我们想要单列布局,我们将使此模板全宽,没有侧边栏。
在二十七主题中没有category.php文件,所以我们使用archive.php作为我们的基本模板并将其命名为category-photoshop.php 。
旧代码(archive.php)。
<?php
/**
 * The template for displaying archive pages
 *
 * @link https://codex.wordpress.org/Template_Hierarchy
 *
 * @package WordPress
 * @subpackage Twenty_Seventeen
 * @since 1.0
 * @version 1.0
 */

get_header(); ?>

<div class="wrap">

<?php if ( have_posts() ) : ?>
 <header class="page-header">
 <?php
 the_archive_title( '<h1 class="page-title">', '</h1>' );
 the_archive_description( '<div class="taxonomy-description">', '</div>' );
 ?>
 </header><!-- .page-header -->
 <?php endif; ?>

<div id="primary" class="content-area">
 <main id="main" class="site-main" role="main">

<?php
 if ( have_posts() ) : ?>
 <?php
 /* Start the Loop */
 while ( have_posts() ) : the_post();

/*
 * Include the Post-Format-specific template for the content.
 * If you want to override this in a child theme, then include a file
 * called content-___.php (where ___ is the Post Format name) and that will be used instead.
 */
 get_template_part( 'template-parts/post/content', get_post_format() );

endwhile;

the_posts_pagination( array(
 'prev_text' => twentyseventeen_get_svg( array( 'icon' => 'arrow-left' ) ) . '<span class="screen-reader-text">' . __( 'Previous page', 'twentyseventeen' ) . '</span>',
 'next_text' => '<span class="screen-reader-text">' . __( 'Next page', 'twentyseventeen' ) . '</span>' . twentyseventeen_get_svg( array( 'icon' => 'arrow-right' ) ),
 'before_page_number' => '<span class="meta-nav screen-reader-text">' . __( 'Page', 'twentyseventeen' ) . ' </span>',
 ) );

else :

get_template_part( 'template-parts/post/content', 'none' );

endif; ?>

</main><!-- #main -->
 </div><!-- #primary -->
 <?php get_sidebar(); ?>
</div><!-- .wrap -->

<?php get_footer();
新代码(category-photoshop.php)。
<?php
/**
 * The template for displaying photoshop pages
 *
 * @link https://codex.wordpress.org/Template_Hierarchy
 *
 * @package WordPress
 * @subpackage Twenty_Seventeen
 * @since 1.0
 * @version 1.0
 */

get_header(); ?>

<div class="wrap">

<?php if ( have_posts() ) : ?>
 <header class="page-header">
 <?php
 the_archive_title( '<h1 class="page-title">', '</h1>' );
 the_archive_description( '<div class="taxonomy-description">', '</div>' );
 ?>
 </header><!-- .page-header -->
 <?php endif; ?>

<div id="primary" class="content-area">
 <main id="main" class="site-main" role="main">

<?php
 if ( have_posts() ) : ?>
 <?php
 /* Start the Loop */
 while ( have_posts() ) : the_post();

/*
 * Include the Post-Format-specific template for the content.
 * If you want to override this in a child theme, then include a file
 * called content-___.php (where ___ is the Post Format name) and that will be used instead.
 */
 get_template_part( 'template-parts/post/content', get_post_format() );

endwhile;

the_posts_pagination( array(
 'prev_text' => twentyseventeen_get_svg( array( 'icon' => 'arrow-left' ) ) . '<span class="screen-reader-text">' . __( 'Previous page', 'twentyseventeen' ) . '</span>',
 'next_text' => '<span class="screen-reader-text">' . __( 'Next page', 'twentyseventeen' ) . '</span>' . twentyseventeen_get_svg( array( 'icon' => 'arrow-right' ) ),
 'before_page_number' => '<span class="meta-nav screen-reader-text">' . __( 'Page', 'twentyseventeen' ) . ' </span>',
 ) );

else :

get_template_part( 'template-parts/post/content', 'none' );

endif; ?>

</main><!-- #main -->
 </div><!-- #primary -->
</div><!-- .wrap -->

<?php get_footer();
在这里你可以看到我已经删除了<?php get_sidebar(); ?> <?php get_sidebar(); ?>因为这个模板没有边栏。
这将删除侧边栏但布局仍然不是全宽我们必须做一些 CSS 调整。 请记住,所有 CSS 调整都将针对子主题 CSS 文件而不是父主题进行。
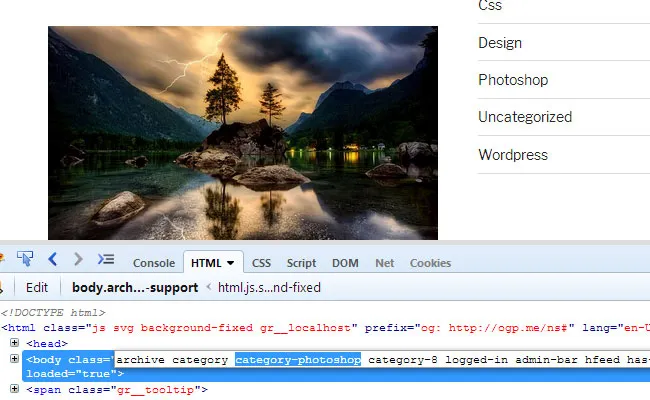
WordPress 为每个类别添加了一个唯一的类,其类别名称在正文中,例如这个category-photoshop ,您可以定位该类来设置页面样式。
CSS:
@media screen and (min-width: 48em) {
.category-photoshop #primary {
 float: none;
 width: 100%;
}
}
使用media query只是为了匹配父主题样式表。
添加类别描述
您可以通过在类别部分添加描述来显示每个类别的附加描述。 提供更多信息将帮助访问者更好地理解主题,但您可以通过为每个类别提供独特的外观来使此部分更有趣。
根据我们的设计,我们需要左侧的自定义图像和右侧的类别名称和描述。
<?php
/**
 * The template for displaying photoshop category
 *
 * @link https://codex.wordpress.org/Template_Hierarchy
 *
 * @package WordPress
 * @subpackage Twenty_Seventeen
 * @since 1.0
 * @version 1.0
 */

get_header(); ?>

<div class="wrap">

<?php if ( have_posts() ) : ?>
 <header class="page-header">
 <div class="header-category-img"><img src="<?php echo get_stylesheet_directory_uri(); ?>/assets/images/photoshop-banner.jpg" alt="Photoshop"></div>
 <div class="header-category-title">
 <h1 class="page-title"><?php single_term_title()?></h1>
 <?php
 the_archive_description( '<div class="taxonomy-description">', '</div>' );
 ?>
 </div>
 </header><!-- .page-header -->
 <?php endif; ?>

<div id="primary" class="content-area">
 <main id="main" class="site-main" role="main">

<?php
 if ( have_posts() ) : ?>
 <?php
 /* Start the Loop */
 while ( have_posts() ) : the_post();

/*
 * Include the Post-Format-specific template for the content.
 * If you want to override this in a child theme, then include a file
 * called content-___.php (where ___ is the Post Format name) and that will be used instead.
 */
 get_template_part( 'template-parts/post/content-photoshop', get_post_format() );

endwhile;

the_posts_pagination( array(
 'prev_text' => twentyseventeen_get_svg( array( 'icon' => 'arrow-left' ) ) . '<span class="screen-reader-text">' . __( 'Previous page', 'twentyseventeen' ) . '</span>',
 'next_text' => '<span class="screen-reader-text">' . __( 'Next page', 'twentyseventeen' ) . '</span>' . twentyseventeen_get_svg( array( 'icon' => 'arrow-right' ) ),
 'before_page_number' => '<span class="meta-nav screen-reader-text">' . __( 'Page', 'twentyseventeen' ) . ' </span>',
 ) );

else :

get_template_part( 'template-parts/post/content-photoshop', 'none' );

endif; ?>

</main><!-- #main -->
 </div><!-- #primary -->
</div><!-- .wrap -->

<?php get_footer();
CSS:

.page-header {
 border-bottom: 1px solid #ccc;
 box-sizing: border-box;
 margin-bottom: 1.5em;
 padding-bottom: 0.5em;
}
.header-category-title {
 float: left;
 padding-top: 15px;
 width: 85%;
}
.header-category-img {
 float: left;
 width: 15%;
}

您可以看到我在page-header部分做了很多更改,但最重要的是single_term_title()因为我只想显示像这个Photoshop这样的类别名称而不是Category:Photoshop 。
继续。
框视图
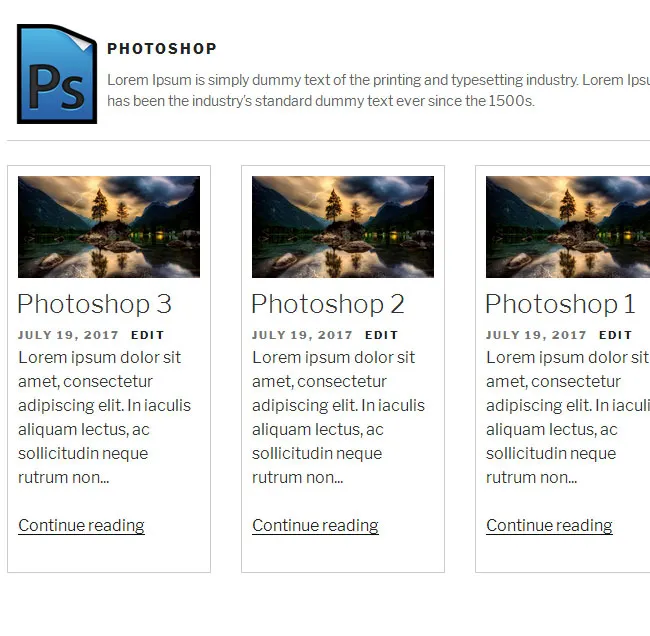
我们已经进行了基本的更改,例如制作一列布局并修改了类别描述部分现在让我们做一些更高级的事情,我们会将帖子列表从列表视图转换为每列 3 个项目的网格或框视图。
要进行此更改,我们必须修改get_template_part路径,因为内容是从此处的不同位置调用的,但在某些主题中,您可能会发现内容直接放置在基本模板中。
get_template_part( 'template-parts/post/content-photoshop', get_post_format() );
现在要修改该内容页面,您必须将文件从父主题复制到子主题并将其放置在相同的文件夹结构中,然后根据需要重命名。
在这里,我从父主题中复制了content.php文件并将其粘贴为子主题中的content-photoshop.php 。 它被重命名是因为这里所做的任何更改都只会影响这个模板。
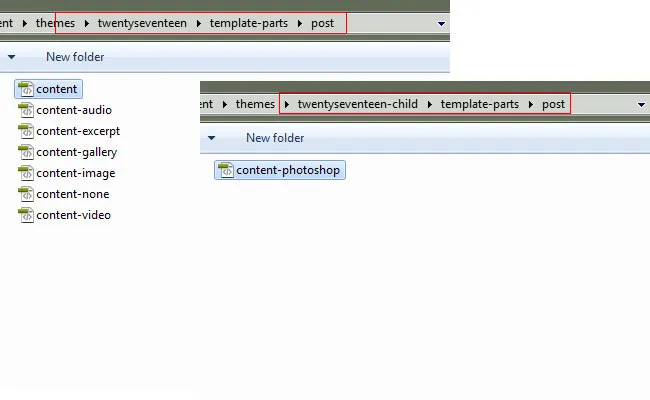
代码(内容-photoshop.php)。
<?php
/**
 * Template part for displaying photoshop posts
 *
 * @link https://codex.wordpress.org/Template_Hierarchy
 *
 * @package WordPress
 * @subpackage Twenty_Seventeen
 * @since 1.0
 * @version 1.2
 */

?>

<article id="post-<?php the_ID(); ?>" <?php post_class("one-third"); ?> >
 <?php
 if ( is_sticky() && is_home() ) :
 echo twentyseventeen_get_svg( array( 'icon' => 'thumb-tack' ) );
 endif;
 ?>
 <?php if ( '' !== get_the_post_thumbnail() && ! is_single() ) : ?>
 <div class="post-thumbnail">
 <a href="<?php the_permalink(); ?>">
 <?php the_post_thumbnail( 'twentyseventeen-featured-image' ); ?>
 </a>
 </div><!-- .post-thumbnail -->
 <?php endif; ?>
 <header class="entry-header1">
 <?php
 if ( is_single() ) {
 the_title( '<h1 class="entry-title">', '</h1>' );
 } elseif ( is_front_page() && is_home() ) {
 the_title( '<h3 class="entry-title"><a href="' . esc_url( get_permalink() ) . '" rel="bookmark">', '</a></h3>' );
 } else {
 the_title( '<h2 class="entry-title"><a href="' . esc_url( get_permalink() ) . '" rel="bookmark">', '</a></h2>' );
 }
 if ( 'post' === get_post_type() ) {
 echo '<div class="entry-meta">';
 if ( is_single() ) {
 twentyseventeen_posted_on();
 } else {
 echo twentyseventeen_time_link();
 twentyseventeen_edit_link();
 };
 echo '</div><!-- .entry-meta -->';
 };
 ?>
 </header><!-- .entry-header -->

<div class="entry-content">
 <?php
 /* translators: %s: Name of current post */
 if ( is_single() ) :
 the_content( sprintf(
 __( 'Continue reading<span class="screen-reader-text"> "%s"</span>', 'twentyseventeen' ),
 get_the_title()
 ) );

ks29so_link_pages( array(
 'before' => '<div class="page-links">' . __( 'Pages:', 'twentyseventeen' ),
 'after' => '</div>',
 'link_before' => '<span class="page-number">',
 'link_after' => '</span>',
 ) );
 else:

the_excerpt( sprintf(
 __( 'Continue reading<span class="screen-reader-text"> "%s"</span>', 'twentyseventeen' ),
 get_the_title()
 ) );

ks29so_link_pages( array(
 'before' => '<div class="page-links">' . __( 'Pages:', 'twentyseventeen' ),
 'after' => '</div>',
 'link_before' => '<span class="page-number">',
 'link_after' => '</span>',
 ) );
 endif;
 ?>
 </div><!-- .entry-content -->

<?php
 if ( is_single() ) {
 twentyseventeen_entry_footer();
 }
 ?>

</article><!-- #post-## -->
现在需要注意的一点是,我在文章部分添加了one-third的自定义类,并将内容类型更改为框视图的excerpt ,其他结构更改是不言自明的。
CSS:
.category-photoshop main{
 margin:0 -15px;
}
.one-third {
 box-sizing: border-box;
 float: left;
 padding: 0 15px;
 width: 33.333%;
}
.one-third .post-container {
 border: 1px solid #ccc;
 padding: 10px;
}
.one-third .post-thumbnail{
 margin-bottom:0;
}
.one-third h2{
 margin-bottom:0.2em;
}
现在这是布局的外观。

仅使用 CSS
如果您对 php 代码不满意,那么您可以仅使用 CSS 设置类别页面的样式,但这些更改将受到限制,您无法添加或修改代码,您只能设置现有元素的样式。
让我们通过一个例子来看看,即使有这些限制,您也可以使您的类别页面独一无二。
假设我们想以此为我们的 wordpress 类别设置样式。
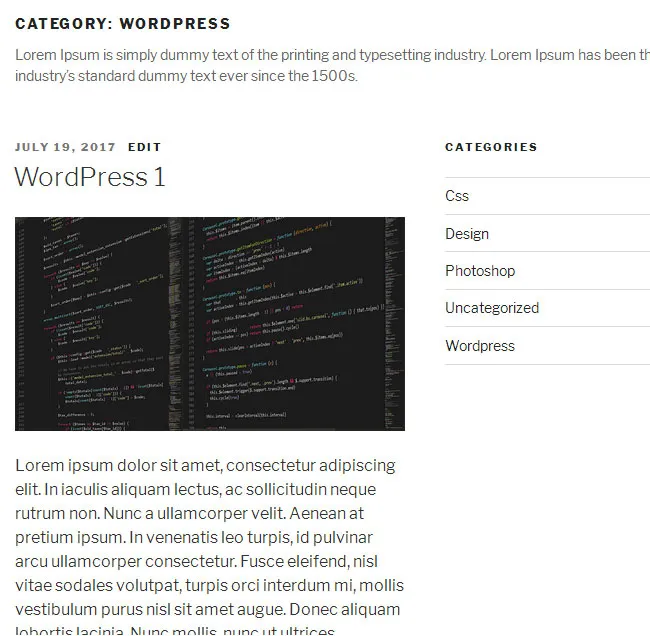
对此。
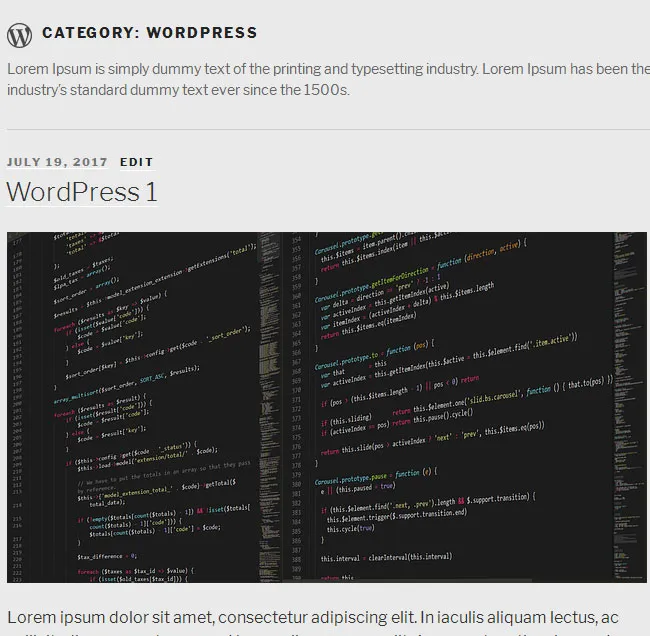
基本造型
通过定位 wordpress 提供的类,您可以使用 CSS 轻松更改背景颜色。
像这样的东西。
CSS:
.category-wordpress .site-content-contain {
 background-color:#eaeaea;
}
将图标添加到类别标题
您可以使用背景图像为每个类别添加唯一的图标,根据此处的要求,我们将仅在我们的 wordpress 类别中添加一个。
CSS:
.category-wordpress .page-header {
 border-bottom: 1px solid #ccc;
 margin-bottom: 1.5em;
 padding-bottom: 0.5em;
}
.category-wordpress .page-header h1{
 background:url("assets/images/wordpress-logo.png") no-repeat left center;
 padding-bottom:5px;
 padding-left:35px;
}
制作全宽页面
您可以通过 CSS 至少在视觉上将两列或多列页面转换为全宽页面。
CSS:
.category-wordpress:not(.error404) #primary{
 float: none;
 width: 100%;
}

.category-wordpress #secondary{
 display:none;
}
我知道这是一个 CSS hack,不建议作为最佳实践,但如果您对使用模板没有足够的信心,您可以通过这种方式实现您的设计目标。
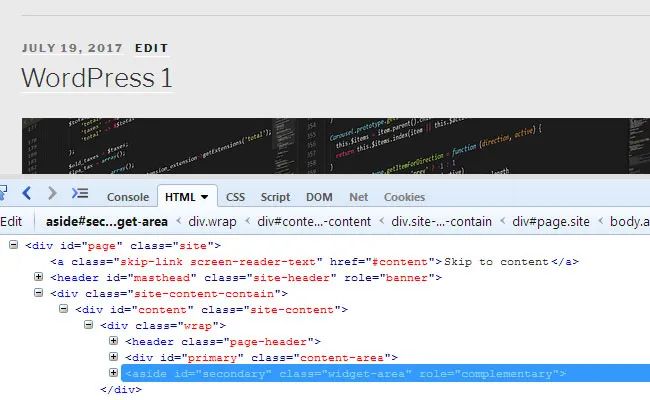
但是,如果您可以使用模板,则不建议将这种制作全宽页面的方法作为快捷方式,因为您所做的只是将其隐藏在浏览器中,而它仍保留在 DOM 中。
结论
如您所见,您可以做很多事情来设置不同类别的样式,上面提到的示例只是一个起点,但可能性取决于您使用模板和 CSS 的能力。 根据您的技能水平,您可以选择您想要设置类别样式的方式。
那么,您是否知道任何其他以不同方式为不同类别设置样式的方法,请在下面的评论部分告诉我们。
