
如何在虚拟现实中构建无尽的跑步游戏(第 3 部分)
已发表: 2022-03-10所以我们的旅程还在继续。 在我关于如何构建无尽奔跑 VR 游戏系列的最后一部分中,我将向您展示如何在两台设备之间同步游戏状态,这将使您离构建多人游戏更近一步。 我将专门介绍MirrorVR,它负责处理客户端到客户端通信中的中介服务器。
注意:此游戏可以在有或没有 VR 耳机的情况下进行。 您可以在 ergo-3.glitch.me 查看最终产品的演示。
要开始,您将需要以下内容。
- 互联网访问(特别是 glitch.com);
- 从本教程的第 2 部分完成的 Glitch 项目。 您可以通过导航到 https://glitch.com/edit/#!/ergo-2 并单击“Remix to edit”从第 2 部分完成的产品开始;
- 虚拟现实耳机(可选,推荐)。 (我使用 Google Cardboard,每张 15 美元。)
第 1 步:显示分数
游戏原样运行在最低限度,玩家面临挑战:避开障碍物。 但是,在对象碰撞之外,游戏不会向玩家提供有关游戏进度的反馈。 为了解决这个问题,您将在此步骤中实现分数显示。 分数将是放置在我们的虚拟现实世界中的大型文本对象,而不是粘在用户视野中的界面。
一般来说,在虚拟现实中,用户界面最好与世界融为一体,而不是粘在用户的头上。

首先将对象添加到index.html 。 添加一个text混合,它将被其他文本元素重用:
<a-assets> ... <a-mixin text=" font:exo2bold; anchor:center; align:center;"></a-mixin> ... </a-assets> 接下来,在播放器之前的平台上添加一个text元素:
<!-- Score --> <a-text value="" mixin="text" height="40" width="40" position="0 1.2 -3" opacity="0.75"></a-text> <!-- Player --> ... 这将文本实体添加到虚拟现实场景。 该文本当前不可见,因为它的值设置为空。 但是,您现在将使用 JavaScript 动态填充文本实体。 导航到assets/ergo.js 。 在collisions部分之后,添加一个score部分,并定义一些全局变量:
-
score:当前游戏得分。 -
countedTrees:得分中包含的所有树的 ID。 (这是因为碰撞测试可能会针对同一棵树多次触发。) -
scoreDisplay:对 DOM 对象的引用,对应于虚拟现实世界中的一个文本对象。
/********* * SCORE * *********/ var score; var countedTrees; var scoreDisplay; 接下来,定义一个设置函数来初始化我们的全局变量。 同样,定义一个teardown函数。
... var scoreDisplay; function setupScore() { score = 0; countedTrees = new Set(); scoreDisplay = document.getElementById('score'); } function teardownScore() { scoreDisplay.setAttribute('value', ''); } 在Game部分,更新gameOver 、 startGame和window.onload以包括得分设置和拆卸。
/******** * GAME * ********/ function gameOver() { ... teardownScore(); } function startGame() { ... setupScore(); addTreesRandomlyLoop(); } window.onload = function() { setupScore(); ... } 定义一个增加特定树分数的函数。 此函数将检查countedTrees以确保树没有被重复计算。
function addScoreForTree(tree_id) { if (countedTrees.has(tree_id)) return; score += 1; countedTrees.add(tree_id); }此外,添加一个实用程序以使用全局变量更新分数显示。
function updateScoreDisplay() { scoreDisplay.setAttribute('value', score); } 相应地更新碰撞测试,以便在障碍物经过玩家时调用此得分递增函数。 仍在assets/ergo.js中,导航到collisions部分。 添加以下检查和更新。
AFRAME.registerComponent('player', { tick: function() { document.querySelectorAll('.tree').forEach(function(tree) { ... if (position.z > POSITION_Z_LINE_END) { addScoreForTree(tree_id); updateScoreDisplay(); } }) } }) 最后,在游戏开始后立即更新分数显示。 导航到Game部分,并添加updateScoreDisplay(); 开始startGame :
function startGame() { ... setupScore(); updateScoreDisplay(); ... }确保assets/ergo.js和index.html匹配对应的源代码文件。 然后,导航到您的预览。 您应该看到以下内容:
乐谱显示到此结束。 接下来,我们将添加适当的开始和游戏结束菜单,以便玩家可以根据需要重玩游戏。
第 2 步:添加开始菜单
现在用户可以跟踪进度,您将添加收尾工作以完成游戏体验。 在此步骤中,您将添加一个开始菜单和一个游戏结束菜单,让用户开始和重新启动游戏。
让我们从玩家单击“开始”按钮开始游戏的开始菜单开始。 在此步骤的后半部分,您将添加一个Game Over菜单,并带有“Restart”按钮:

在编辑器中导航到index.html 。 然后,找到Mixins部分。 在这里,附加title mixin,它定义了特别大的文本的样式。 我们使用与以前相同的字体,将文本与中心对齐,并定义适合文本类型的大小。 (请注意, anchor是文本对象锚定到其位置的位置。)
<a-assets> ... <a-mixin text=" font:exo2bold; height:40; width:40; opacity:0.75; anchor:center; align:center;"></a-mixin> </a-assets>接下来,为二级标题添加第二个 mixin。 此文本略小,但在其他方面与标题相同。
<a-assets> ... <a-mixin text=" font:exo2bold; height:10; width:10; opacity:0.75; anchor:center; align:center;"></a-mixin> </a-assets>对于第三个也是最后一个 mixin,定义描述性文本的属性——甚至小于二级标题。
<a-assets> ... <a-mixin text=" font:exo2bold; height:5; width:5; opacity:0.75; anchor:center; align:center;"></a-mixin> </a-assets> 定义所有文本样式后,您现在将定义世界文本对象。 在“ Score ”部分下方添加一个新的“ Menus ”部分,其中“开始”菜单有一个空容器:
<!-- Score --> ... <!-- Menus --> <a-entity> <a-entity position="0 1.1 -3"> </a-entity> </a-entity>在开始菜单容器中,为所有非标题文本定义标题和容器:
... <a-entity ...> <a-entity position="0 1 0"> </a-entity> <a-text value="ERGO" mixin="title"></a-text> </a-entity> </a-entity>在非标题文本的容器中,添加玩游戏的说明:
<a-entity...> <a-text value="Turn left and right to move your player, and avoid the trees!" mixin="copy"></a-text> </a-entity>要完成“开始”菜单,请添加一个显示“开始”的按钮:
<a-entity...> ... <a-text value="Start" position="0 0.75 0" mixin="heading"></a-text> <a-box position="0 0.65 -0.05" width="1.5" height="0.6" depth="0.1"></a-box> </a-entity>仔细检查您的开始菜单 HTML 代码是否与以下内容匹配:
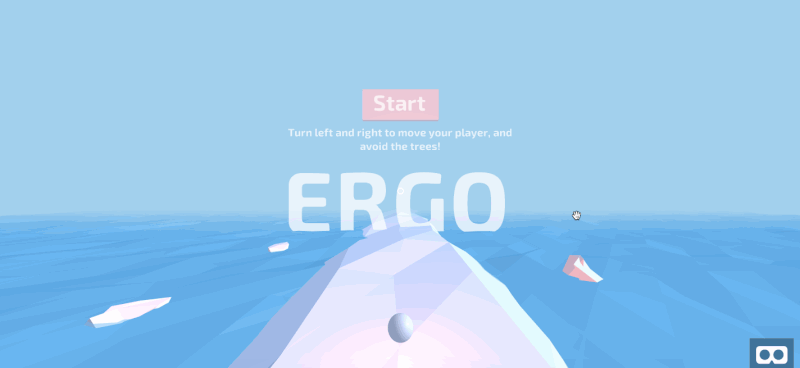
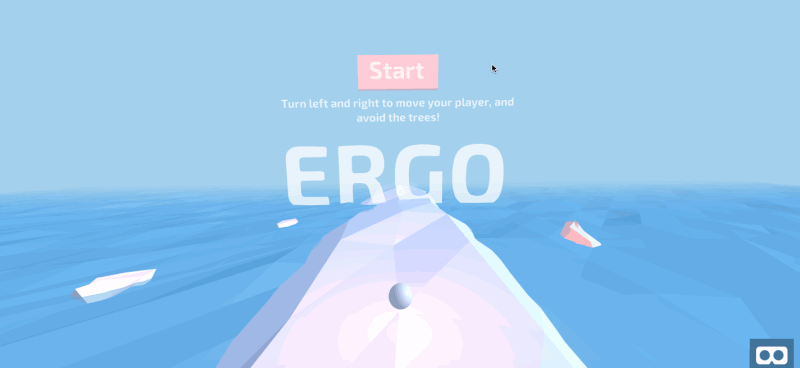
<!-- Menus --> <a-entity> <a-entity position="0 1.1 -3"> <a-entity position="0 1 0"> <a-text value="Turn left and right to move your player, and avoid the trees!" mixin="copy"></a-text> <a-text value="Start" position="0 0.75 0" mixin="heading"></a-text> <a-box position="0 0.65 -0.05" width="1.5" height="0.6" depth="0.1"></a-box> </a-entity> <a-text value="ERGO" mixin="title"></a-text> </a-entity> </a-entity>导航到您的预览,您将看到以下开始菜单:

仍然在Menus部分(直接在start菜单下方),使用相同的 mixin 添加game-over菜单:
<!-- Menus --> <a-entity> ... <a-entity position="0 1.1 -3"> <a-text value="?" mixin="heading" position="0 1.7 0"></a-text> <a-text value="Score" mixin="copy" position="0 1.2 0"></a-text> <a-entity> <a-text value="Restart" mixin="heading" position="0 0.7 0"></a-text> <a-box position="0 0.6 -0.05" width="2" height="0.6" depth="0.1"></a-box> </a-entity> <a-text value="Game Over" mixin="title"></a-text> </a-entity> </a-entity> 导航到您的 JavaScript 文件assets/ergo.js 。 在Game部分之前创建一个新的Menus部分。 此外,定义三个空函数: setupAllMenus 、 hideAllMenus和showGameOverMenu 。
/******** * MENU * ********/ function setupAllMenus() { } function hideAllMenus() { } function showGameOverMenu() { } /******** * GAME * ********/ 接下来,在三个地方更新Game部分。 在gameOver中,显示Game Over菜单:
function gameOver() { ... showGameOverMenu(); } ``` In `startGame`, hide all menus: ``` function startGame() { ... hideAllMenus(); } 接下来,在window.onload中,删除对startGame的直接调用,改为调用setupAllMenus 。 更新您的侦听器以匹配以下内容:

window.onload = function() { setupAllMenus(); setupScore(); setupTrees(); } 导航回Menu部分。 保存对各种 DOM 对象的引用:
/******** * MENU * ********/ var menuStart; var menuGameOver; var menuContainer; var isGameRunning = false; var startButton; var restartButton; function setupAllMenus() { menuStart = document.getElementById('start-menu'); menuGameOver = document.getElementById('game-over'); menuContainer = document.getElementById('menu-container'); startButton = document.getElementById('start-button'); restartButton = document.getElementById('restart-button'); } 接下来,将“开始”和“重启”按钮绑定到startGame :
function setupAllMenus() { ... startButton.addEventListener('click', startGame); restartButton.addEventListener('click', startGame); } 定义showStartMenu并从setupAllMenus调用它:
function setupAllMenus() { ... showStartMenu(); } function hideAllMenus() { } function showGameOverMenu() { } function showStartMenu() { } 要填充三个空函数,您将需要一些辅助函数。 定义以下两个函数,它们接受代表 A-Frame VR 实体的 DOM 元素并显示或隐藏它。 在showAllMenus上面定义两个函数:
... var restartButton; function hideEntity(el) { el.setAttribute('visible', false); } function showEntity(el) { el.setAttribute('visible', true); } function showAllMenus() { ... 首先填充hideAllMenus 。 您将从视线中移除对象,然后移除两个菜单的点击侦听器:
function hideAllMenus() { hideEntity(menuContainer); startButton.classList.remove('clickable'); restartButton.classList.remove('clickable'); } 其次,填充showGameOverMenu 。 在这里,恢复两个菜单的容器,以及Game Over菜单和“重启”按钮的点击监听器。 但是,删除“开始”按钮的点击侦听器,并隐藏“开始”菜单。
function showGameOverMenu() { showEntity(menuContainer); hideEntity(menuStart); showEntity(menuGameOver); startButton.classList.remove('clickable'); restartButton.classList.add('clickable'); } 第三,填充showStartMenu 。 在这里,反转showGameOverMenu影响的所有更改。
function showStartMenu() { showEntity(menuContainer); hideEntity(menuGameOver); showEntity(menuStart); startButton.classList.add('clickable'); restartButton.classList.remove('clickable'); }仔细检查您的代码是否与相应的源文件匹配。 然后,导航到您的预览,您将观察到以下行为:
“开始”和“游戏结束”菜单到此结束。
恭喜! 您现在拥有一个功能齐全的游戏,具有正确的开始和正确的结束。 但是,本教程还剩下一步:我们需要在不同的播放器设备之间同步游戏状态。 这将使我们更接近多人游戏。
第 3 步:使用 MirrorVR 同步游戏状态
在之前的教程中,您学习了如何通过套接字发送实时信息,以促进服务器和客户端之间的单向通信。 在这一步中,您将在该教程的成熟产品 MirrorVR 的基础上进行构建,该产品在客户端到客户端的通信中处理中介服务器。
注意:您可以在此处了解有关 MirrorVR 的更多信息。
导航到index.html 。 在这里,我们将加载 MirrorVR 并向相机添加一个组件,指示它应该在适用的情况下镜像移动设备的视图。 导入 socket.io 依赖和 MirrorVR 0.2.3。
<script src="https://cdnjs.cloudflare.com/ajax/libs/socket.io/2.1.1/socket.io.js"></script> <script src="https://cdn.jsdelivr.net/gh/alvinwan/[email protected]/dist/mirrorvr.min.js"></script> 接下来,向相机添加一个组件camera-listener :
<a-camera camera-listener ...>导航到assets/ergo.js 。 在这一步中,移动设备会发送命令,而桌面设备只会镜像移动设备。
为此,您需要一个实用程序来区分桌面设备和移动设备。 在文件末尾,在shuffle之后添加一个mobileCheck函数:
/** * Checks for mobile and tablet platforms. */ function mobileCheck() { var check = false; (function(a){if(/(android|bb\d+|meego).+mobile|avantgo|bada\/|blackberry|blazer|compal|elaine|fennec|hiptop|iemobile|ip(hone|od)|iris|kindle|lge |maemo|midp|mmp|mobile.+firefox|netfront|opera m(ob|in)i|palm( os)?|phone|p(ixi|re)\/|plucker|pocket|psp|series(4|6)0|symbian|treo|up\.(browser|link)|vodafone|wap|windows ce|xda|xiino|android|ipad|playbook|silk/i.test(a)||/1207|6310|6590|3gso|4thp|50[1-6]i|770s|802s|a wa|abac|ac(er|oo|s\-)|ai(ko|rn)|al(av|ca|co)|amoi|an(ex|ny|yw)|aptu|ar(ch|go)|as(te|us)|attw|au(di|\-m|r |s )|avan|be(ck|ll|nq)|bi(lb|rd)|bl(ac|az)|br(e|v)w|bumb|bw\-(n|u)|c55\/|capi|ccwa|cdm\-|cell|chtm|cldc|cmd\-|co(mp|nd)|craw|da(it|ll|ng)|dbte|dc\-s|devi|dica|dmob|do(c|p)o|ds(12|\-d)|el(49|ai)|em(l2|ul)|er(ic|k0)|esl8|ez([4-7]0|os|wa|ze)|fetc|fly(\-|_)|g1 u|g560|gene|gf\-5|g\-mo|go(\.w|od)|gr(ad|un)|haie|hcit|hd\-(m|p|t)|hei\-|hi(pt|ta)|hp( i|ip)|hs\-c|ht(c(\-| |_|a|g|p|s|t)|tp)|hu(aw|tc)|i\-(20|go|ma)|i230|iac( |\-|\/)|ibro|idea|ig01|ikom|im1k|inno|ipaq|iris|ja(t|v)a|jbro|jemu|jigs|kddi|keji|kgt( |\/)|klon|kpt |kwc\-|kyo(c|k)|le(no|xi)|lg( g|\/(k|l|u)|50|54|\-[aw])|libw|lynx|m1\-w|m3ga|m50\/|ma(te|ui|xo)|mc(01|21|ca)|m\-cr|me(rc|ri)|mi(o8|oa|ts)|mmef|mo(01|02|bi|de|do|t(\-| |o|v)|zz)|mt(50|p1|v )|mwbp|mywa|n10[0-2]|n20[2-3]|n30(0|2)|n50(0|2|5)|n7(0(0|1)|10)|ne((c|m)\-|on|tf|wf|wg|wt)|nok(6|i)|nzph|o2im|op(ti|wv)|oran|owg1|p800|pan(a|d|t)|pdxg|pg(13|\-([1-8]|c))|phil|pire|pl(ay|uc)|pn\-2|po(ck|rt|se)|prox|psio|pt\-g|qa\-a|qc(07|12|21|32|60|\-[2-7]|i\-)|qtek|r380|r600|raks|rim9|ro(ve|zo)|s55\/|sa(ge|ma|mm|ms|ny|va)|sc(01|h\-|oo|p\-)|sdk\/|se(c(\-|0|1)|47|mc|nd|ri)|sgh\-|shar|sie(\-|m)|sk\-0|sl(45|id)|sm(al|ar|b3|it|t5)|so(ft|ny)|sp(01|h\-|v\-|v )|sy(01|mb)|t2(18|50)|t6(00|10|18)|ta(gt|lk)|tcl\-|tdg\-|tel(i|m)|tim\-|t\-mo|to(pl|sh)|ts(70|m\-|m3|m5)|tx\-9|up(\.b|g1|si)|utst|v400|v750|veri|vi(rg|te)|vk(40|5[0-3]|\-v)|vm40|voda|vulc|vx(52|53|60|61|70|80|81|83|85|98)|w3c(\-| )|webc|whit|wi(g |nc|nw)|wmlb|wonu|x700|yas\-|your|zeto|zte\-/i.test(a.substr(0,4))) check = true;})(navigator.userAgent||navigator.vendor||window.opera); return check; }; 首先,我们将同步游戏开始。 在Game部分的startGame中,在末尾添加一个mirrorVR通知。
function startGame() { ... if (mobileCheck()) { mirrorVR.notify('startGame', {}) } }移动客户端现在发送有关游戏开始的通知。 您现在将实现桌面的响应。
在窗口加载监听器中,调用setupMirrorVR函数:
window.onload = function() { ... setupMirrorVR(); } 在Game部分上方为 MirrorVR 设置定义一个新部分:
/************ * MirrorVR * ************/ function setupMirrorVR() { mirrorVR.init(); }接下来,将关键字参数添加到 mirrorVR 的初始化函数。 具体来说,我们将定义游戏开始通知的处理程序。 我们将另外指定房间 ID; 这可确保加载您的应用程序的任何人都立即同步。
function setupMirrorVR() { mirrorVR.init({ roomId: 'ergo', state: { startGame: { onNotify: function(data) { hideAllMenus(); setupScore(); updateScoreDisplay(); } }, } }); } 对Game Over重复相同的同步过程。 在Game部分的gameOver中,添加对移动设备的检查并相应地发送通知:
function gameOver() { ... if (mobileCheck()) { mirrorVR.notify('gameOver', {}); } } 导航到MirrorVR部分并使用gameOver侦听器更新关键字参数:
function setupMirrorVR() { mirrorVR.init({ state: { startGame: {... }, gameOver: { onNotify: function(data) { gameOver(); } }, } }) } 接下来,重复相同的同步过程以添加树。 导航到Trees部分中的addTreesRandomly 。 跟踪哪些车道接收新树。 然后,直接在return指令之前,并相应地发送通知:
function addTreesRandomly(...) { ... var numberOfTreesAdded ... var position_indices = []; trees.forEach(function (tree) { if (...) { ... position_indices.push(tree.position_index); } }); if (mobileCheck()) { mirrorVR.notify('addTrees', position_indices); } return ... } 导航到MirrorVR部分,并使用新的树侦听器更新mirrorVR.init的关键字参数:
function setupMirrorVR() { mirrorVR.init({ state: { ... gameOver: {... }, addTrees: { onNotify: function(position_indices) { position_indices.forEach(addTreeTo) } }, } }) } 最后,我们同步游戏得分。 在Score部分的updateScoreDisplay中,在适用时发送通知:
function updateScoreDisplay() { ... if (mobileCheck()) { mirrorVR.notify('score', score); } } 最后一次更新mirrorVR初始化,监听分数变化:
function setupMirrorVR() { mirrorVR.init({ state: { addTrees: { }, score: { onNotify: function(data) { score = data; updateScoreDisplay(); } } } }); }仔细检查您的代码是否与此步骤的相应源代码文件匹配。 然后,导航到您的桌面预览。 此外,在您的移动设备上打开相同的 URL。 一旦您的移动设备加载网页,您的桌面应立即开始镜像移动设备的游戏。
这是一个演示。 请注意,桌面光标没有移动,表明移动设备正在控制桌面预览。
使用mirrorVR 结束您的增强项目。
第三步介绍了一些基本的游戏状态同步步骤; 为了使它更健壮,您可以添加更多的健全性检查和更多的同步点。
结论
在本教程中,您为无尽的跑步游戏添加了收尾工作,并实现了桌面客户端与移动客户端的实时同步,有效地将移动设备的屏幕镜像到桌面上。 在虚拟现实中构建无尽的跑步游戏系列到此结束。 除了 A-Frame VR 技术,您还学习了 3D 建模、客户端到客户端通信以及其他广泛适用的概念。
接下来的步骤可以包括:
- 更高级的建模
这意味着更逼真的 3D 模型,可能在第三方软件中创建并导入。 例如,(MagicaVoxel) 使创建体素艺术变得简单,(Blender) 是一个完整的 3D 建模解决方案。 - 更复杂
更复杂的游戏,例如即时战略游戏,可以利用第三方引擎来提高效率。 这可能意味着完全回避 A-Frame 和 webVR,而是发布已编译的 (Unity3d) 游戏。
其他途径包括多人游戏支持和更丰富的图形。 随着本教程系列的结束,您现在有了一个可以进一步探索的框架。