
面向物联网和创客的 SVG 网页组件(第 1 部分)
已发表: 2022-03-10物联网市场仍处于早期阶段,但正在蓄势待发。 我们正处于物联网历史的风口浪尖。 从 2015 年到 2020 年,市场在五年内翻了两番。对于 Web 开发人员来说,这种物联网增长意义重大。 对物联网网络技术的需求已经很大。
许多设备将在地理空间上分布,其所有者将希望进行远程控制和管理。 必须制作完整的网络堆栈才能创建远程操作通道。 此外,交互将一次与一个或多个物联网设备进行。 交互必须是物理世界的实时。
本次讨论使用 Vue.js 作为催化剂深入探讨了接口需求,并从许多替代品中说明了一种网页到设备通信的方法。
以下是本次讨论计划的一些目标:
- 创建一个单页 Web 应用 SPWA,托管 IoT 人机界面组(我们可以将这些称为“面板组”);
- 作为查询服务器的结果显示面板组标识符列表;
- 作为查询的结果显示选定组的面板;
- 确保面板显示延迟加载并快速变为动画;
- 确保面板与物联网设备同步。
物联网和网页的快速增长
用于可视化和远程控制硬件的图形呈现以及网页与实时物理过程的同步属于物联网未来固有的网页问题解决领域。
我们中的许多人都在开始寻找物联网表示技术,但是我们现在可以开始使用一些 Web 标准以及一些表示技术。 当我们一起探索这些标准和技术时,我们可以加入这个物联网浪潮。
需要仪表板和数据可视化。 此外,超越提供表单或显示列表或文本内容的网页的需求很高。 物联网仪表板需要是象形的、动画的。 动画必须与实时物理过程同步,以便为用户提供机器状态的真实视图。 机器状态(例如火焰是否燃烧)胜过应用程序状态,并为操作员提供关键信息,甚至可能是安全信息。
仪表板需要的不仅仅是数据的可视化。 我们必须记住,物联网的一部分是不仅具有传感器而且还具有控制接口的设备。 在硬件实现中,MCU 扩展了开关、阈值开关、参数设置等。 不过,网页可能会取代那些硬件控制组件。
没什么新鲜的。 硬件的计算机接口已经存在了很长时间,但是这些接口的网页使用的快速增长是我们目前经验的一部分。 WebRTC 和 Speech API 正处于 2012 年开始的开发路径上。WebSockets 的开发时间也差不多。
物联网在我们脑海中已经存在很长时间了。 自 1832 年以来,物联网一直是人类对话的一部分。但是,众所周知,物联网和无线是特斯拉在 1926 年左右设想的。福布斯 2018 年物联网状态告诉我们物联网当前的市场焦点。 Web 开发人员感兴趣的文章提到了仪表板:
“物联网早期采用者或倡导者优先考虑仪表板、报告、物联网用例,这些用例提供分析、高级可视化和数据挖掘不可或缺的数据流。”
物联网市场巨大。 这篇市场规模文章对将出现的设备数量进行了预测:2018 年:231.4 亿 ⇒ 2025 年:754.4 亿。 而且,它试图在上面加上一个财务数据:2014 年:2.99 万亿美元⇒ 2020 年:8.90 万亿美元。 对物联网技能的需求将是增长最快的:物联网需求。
当我们为控制和监视设备开发清晰的接口时,我们在开发接口时遇到了一个新问题。 所有数十亿台设备将由许多人(或组织)拥有。 此外,每个人都可以拥有任意数量的设备。 甚至可能会共享一些设备。
为机器控制而设计的现代界面通常具有特定于特定机器或几台机器安装的明确定义的布局。 例如,在智能家居中,高端系统将配备 LCD 面板,用于精心放置的设备。 但是,随着我们随着物联网网络版本的发展,将有任意数量的面板用于动态甚至移动设备流。
设备面板的管理变得类似于管理社交网站上的社交联系。
“我们的用户界面必须是动态的,以管理必须在任何时候为每个特定用户显示哪个高度动画的实时面板。”
仪表板是单页 Web 应用程序 SPWA。 而且,我们可以想象一个面板数据库。 因此,如果单个用户要访问其遍布全球的设备的多个面板和配置,则 SPWA 需要按需访问面板组件。 面板和它们的一些支持 JavaScript 将不得不延迟加载。
“我们的界面必须与网页框架配合使用,这些框架可以允许在不重新初始化其框架的情况下合并异步组件绑定。”
让我们使用 Vue.js、WebSockets、MQTT 和 SVG 迈向物联网市场。
推荐阅读:使用 Vue.js 构建交互式信息图
IoT Web 应用程序的高级架构
在设计物联网网页的界面时,总是有很多选择。 一种选择可能是将一页专用于一台设备。 该页面甚至可能在服务器端呈现。 服务器将负责查询设备以获取其传感器值,然后将这些值放入 HTML 字符串中的适当位置。
我们中的许多人都熟悉允许使用特殊标记编写 HTML 模板的工具,这些标记指示变量值的放置位置。 在这样的模板中看到{{temperature}}告诉我们和视图引擎获取从设备查询的温度并用它替换{{temperature}}符号。 所以,在等待服务器查询设备、设备响应、渲染页面、下发页面后,用户终于可以看到设备上报的温度了。
对于每个设备架构的此页面,用户可能希望向设备发送命令。 没问题,他可以填写 HTML 表单并提交。 服务器甚至可能有一个只针对设备的路由,或者更巧妙一点,一个针对设备类型和设备 ID 的路由。 然后,服务器会将表单数据转换为要发送到设备的消息,将其写入某个设备处理程序并等待确认。 然后,服务器最终可能会响应发布请求并告诉用户设备一切正常。
许多 CMS 以这种方式工作以更新博客条目等。 它似乎没有什么奇怪的。 似乎 HTML over HTTP 的设计总是用于获取已呈现的页面并发送表单数据以供 Web 服务器处理。 更重要的是,有数以千计的 CMS 可供选择。 因此,为了让我们的物联网系统正常运行,浏览这数千个 CMS 以查看哪一个适合这项工作似乎是合理的。 或者,我们可以先在 CMS 上应用一个过滤器。
我们必须考虑我们正在处理的实时性。 因此,虽然原始形式的 HTML 对于许多企业任务来说非常好,但它需要一点帮助才能成为物联网管理的交付机制。 因此,我们需要一个 CMS 或自定义 Web 服务器来帮助 HTML 完成这项 IoT 工作。 我们也可以只考虑服务器,因为我们假设 CMS 提供服务器功能。 我们只需要记住,服务器必须提供事件驱动的动画,因此页面不能 100% 完成静态打印。
以下是一些参数,可能会指导我们的设备链接网页的选择,它应该做的事情:
- 异步接收传感器数据和其他设备状态消息;
- 在客户端渲染页面的传感器数据(几乎是 1 的推论);
- 将命令异步发布到特定设备或设备组;
- 可选择通过服务器发送命令或绕过它。
- 安全维护设备与用户的所有权关系;
- 通过不干涉或超控来管理关键设备操作。
当考虑将一页用作选定设备的接口时,就会想到该列表。 当涉及到命令和数据时,我们希望能够与设备自由通信。
至于页面,我们只需要向 Web 服务器请求一次。 我们希望 Web 服务器(或相关应用程序)能够提供安全的通信路径。 而且,该路径不必通过服务器,或者它应该完全避开服务器,因为服务器可能具有更高优先级的任务,而不是处理来自传感器的数据的一页通信。
事实上,我们可以想象每秒一次来自传感器的数据,并且我们不会期望 Web 服务器本身为数千个单独的传感器流乘以数千个查看器提供恒定的秒更新。 当然,可以在负载平衡框架中对 Web 服务器进行分区或设置,但还有其他服务是针对传感器交付和将命令编组到硬件而定制的。
Web 服务器将需要传递一些数据包,以便页面可以与设备建立安全的通信通道。 我们必须小心在不提供对所通过消息类型的某种管理的通道上发送消息。 必须了解设备是否处于可以中断的模式,或者如果设备失控,可能需要用户采取行动。 因此,Web 服务器可以帮助客户端获取适当的资源,从而可以更多地了解设备。 消息传递可以通过 MQTT 服务器之类的东西来完成。 并且,当用户通过 Web 服务器访问他的面板时,可以启动一些用于准备 MQTT 服务器的服务。
由于具有实时要求的物理世界以及额外的安全考虑,我们的图表与原始图表有些不同。
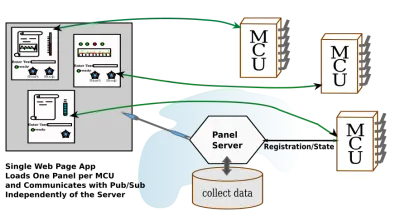
我们不能停在这里。 为每个设备设置一个页面,即使它具有响应性并且可以很好地处理通信,这也不是我们所要求的。 我们必须假设用户将登录到他的帐户并访问他的仪表板。 从那里,他会要求提供一些内容项目列表(最有可能是他正在从事的项目)。 列表中的每个项目都将引用许多资源。 当他通过单击或点击选择一个项目时,他将访问一组面板,每个面板都将包含有关特定资源或物联网设备的一些信息。
响应于作为用户界面动作的结果而生成的查询而交付的任意数量的面板可以是与现场设备交互的那些面板。 因此,一旦面板出现,它将显示实时活动并能够向设备发送命令。
如何在页面上看到面板是一个设计决定。 它们可能是浮动窗口,也可能是可滚动背景上的框。 无论如何呈现,面板将记录时间、温度、压力、风速或您能想象到的任何其他内容。 我们希望面板能够根据各种图形比例进行动画处理。 温度可以用温度计表示,速度可以用半圆形速度计表示,声音可以用流动波形表示,等等。
Web 服务器的任务是向正确的用户提供正确的面板,给面板数据库提供查询,并且设备必须在物理上可用。 更重要的是,鉴于会有许多不同类型的设备,每个设备的面板可能会有所不同。 因此,Web 服务器应该能够提供渲染面板所需的象形信息。 但是,仪表板的 HTML 页面不必加载所有可能的面板。 不知道会有多少。
以下是一些可能指导我们的仪表板页面选择的参数,它应该做的事情:
- 提供一种选择相关设备面板组的方法;
- 对一些设备使用同时设备通信机制;
- 当用户请求时激活设备面板;
- 为独特的面板设计加入延迟加载的图形;
- 针对每个面板使用安全令牌和参数;
- 与用户检查的所有设备保持同步。
我们可以开始看到游戏是如何变化的,但在仪表板设计的世界中,游戏在一段时间内一直在变化。 我们只需要将自己的范围缩小到一些最新且有用的页面开发工具,就可以让自己振作起来。
让我们从如何渲染面板开始。 这似乎已经是一项艰巨的工作了。 我们正在想象许多不同种类的面板。 但是,如果您曾经使用过音乐 DAW,您会看到他们如何使用图形使面板看起来像很久以前乐队使用的模拟设备。 DAW 中的所有面板都是由对声音进行操作的插件绘制的。 事实上,很多 DAW 的插件可能会使用 SVG 来渲染它们的界面。 因此,我们将自己限制在处理 SVG 接口上,而这反过来又可以是我们能想象到的任何图形。
为面板选择 SVG
当然,我喜欢 DAW 并会以它为例,但 SVG 是一种网页标准。 SVG 是 W3C 标准。 它用于将线条图传送到网页。 SVG 曾经是网页上的二等公民,必须存在于 iFrame 中。 但是,自 HTML5 以来,它一直是一等公民。 也许,当 SVG2 出现时,它就可以使用表单元素了。 目前,表单元素是 SVG 中的外来对象。 但是,这不应该阻止我们将 SVG 用作面板的基板。
SVG 可以绘制、存储以供显示,也可以延迟加载。 事实上,当我们探索组件系统时,我们将看到 SVG 可用于组件模板。 在本次讨论中,我们将使用 Vue.js 为面板制作组件。
画SVG并不难,因为有很多画线程序很容易搞定。 如果你花钱,你可以得到导出 SVG 的 Adobe Illustrator。 一段时间以来,Inkscape 一直是 SVG 创建的首选。 它是开源的,在 Linux 上运行良好,但也可以在 Mac 和 Windows 上运行。 然后,有几个网页 SVG 编辑程序是开源的,还有一些 SaaS 版本。
我一直在寻找一个基于 Web 的开源 SVG 编辑器。 环顾四周后,我发现了 SVG-Edit。 你可以将它包含在你自己的网页中,也许如果你正在制作一个基于 SVG 的博客或其他东西。
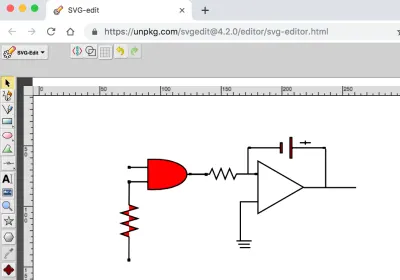
当您将作品保存到文件中时,SVG-Edit 会将其下载到您的浏览器中,您可以从下载目录中获取该文件。
我绘制的图片显示了一个控制积分器的与门。 这不是人们通常期望在 MCU 面板中看到的。 面板可能有一个按钮来提供与门输入之一,也许。 然后它可能有一个来自 ADC 的显示器,用于读取积分器的输出。 也许这将是时间轴上的折线图。 大多数面板都有图形,允许用户与 MCU 内部发生的事情相关联。 而且,如果我们的电路要在任何地方使用,它将在 MCU 内部。
尽管如此,我们的电子图可以用来讨论动画。 我们想要做的是查看 SVG,看看我们可以从哪里获得一些我们希望以某种方式更改的 DOM 标签。 然后,我们可以使用一点原生 JavaScript 和计时器来为 SVG 设置动画。 让与门以不同的颜色闪烁。
我们正在寻找的 SVG 在以下代码框中。 它对程序员来说看起来不是很友好,尽管用户会很高兴。 尽管如此,仍然有一些线索可以找到我们希望操作的 DOM 元素。 首先,大多数 SVG 绘图工具都有获取对象属性的方法,特别是id属性。 SVG-Edit 也有办法。 在编辑器中,选择 AND 门并观察工具栏。 您还将看到id和 CSS class的字段。
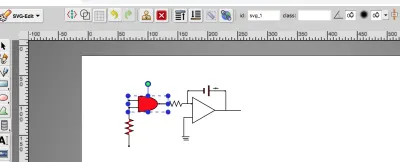
如果由于某种原因无法使用编辑工具,您可以在浏览器中打开 SVG 并检查 DOM。 无论如何,我们发现我们的门有id = “svg_1”。
<svg width="640" height="480" xmlns="https://www.w3.org/2000/svg" xmlns:svg="https://www.w3.org/2000/svg"> <g class="layer"> <title>Layer 1</title> <path d="m80.59881,87.020171l14.714795,0m-14.714793,-11.938687l14.714797,0.000004m-0.033867,-6.543869l0,24.758504c42.377882,2.221929 43.364812,-27.139117 0,-24.758504zm47.366321,12.333056l-15.303943,0m-48.188699,-6.489897l1.454753,0l0,1.454751l-1.454753,0l0,-1.454751zm-0.068425,11.869359l1.454753,0l0,1.454753l-1.454753,0l0,-1.454753zm63.545246,-6.089294l1.454751,0l0,1.454751l-1.454751,0l0,-1.454751z" fill="#FF0000" stroke="#000000"/> <path d="m48.58886,119.662231l18.234678,0l2.523043,-7.173309l4.128604,13.808613l4.587337,-13.987948l4.013933,13.808613l4.35797,-13.629278l4.35797,13.718944l2.408353,-6.72497l18.349357,0m-64.482612,-0.623112l1.515724,0l0,1.515728l-1.515724,0l0,-1.515728zm64.484275,-0.103111l1.515721,0l0,1.515728l-1.515721,0l0,-1.515728z" fill="#FF0000" stroke="#000000" stroke-dasharray="null" stroke-linecap="null" stroke-linejoin="null" transform="rotate(90.3367 80.0675 119.304)"/> <polygon cx="108.5" cy="79.5" edge="0" fill="#ffffff" orient="x" shape="regularPoly" sides="3" strokeWidth="null" strokecolor="#000000"/> <polygon cx="215.5" cy="192.5" edge="0" fill="#ffffff" orient="x" shape="regularPoly" sides="3" strokeWidth="null" strokecolor="none"/> <polygon cx="165.5" cy="164.5" edge="0" fill="#ffffff" orient="x" shape="regularPoly" sides="3" strokeWidth="null" strokecolor="none"/> <polygon cx="161.5" cy="138.5" edge="0" fill="#ffffff" orient="x" shape="regularPoly" sides="3" strokeWidth="null" strokecolor="none"/> <polygon cx="160.5" cy="161.5" edge="0" fill="#ffffff" orient="x" shape="regularPoly" sides="3" strokeWidth="null" strokecolor="none"/> <g> <path d="m225.016923,53.008793l0,3.419331m-4.558966,-1.709666l9.11791,0m10.303228,4.235512l-25.770656,0m-34.429182,0l24.544724,0m0.220544,-4.058194l1.543807,0l0,8.164451l-1.543807,0l0,-8.164451zm7.939567,-4.473673l1.543805,0l0,16.999955l-1.543805,0l0,-16.999955zm-34.176663,8.126854l1.474036,0l0,0.747515l-1.474036,0l0,-0.747515zm61.677552,0.018809l1.474038,0l0,0.747515l-1.474038,0l0,-0.747515z" fill="#FF0000" sides="3" stroke="#000000" stroke-dasharray="null" stroke-linecap="null" stroke-linejoin="null" stroke-width="null"/> <polygon cx="171.5" cy="159.5" edge="43.256342" fill="#ffffff" orient="x" points="223.47406005859375,91.5 186.01296997070312,113.128173828125 186.01296997070312,69.871826171875 223.47406005859375,91.5 " shape="regularPoly" sides="3" stroke="#000000" stroke-width="null" strokeWidth="null" strokecolor="#000000"/> <line fill="none" stroke="#000000" stroke-dasharray="null" stroke-linecap="null" stroke-linejoin="null" stroke-width="null" x1="171" x2="186" y1="103.5" y2="103.5"/> <path d="m130.801817,80.659041l15.333707,0l2.12165,-4.564833l3.47178,8.787299l3.857534,-8.901421l3.375353,8.787299l3.664657,-8.673176l3.664657,8.730237l2.025206,-4.279526l15.430142,0m-54.224016,-0.396526l1.274586,0l0,0.964554l-1.274586,0l0,-0.964554zm54.225414,-0.065616l1.274584,0l0,0.964554l-1.274584,0l0,-0.964554z" fill="none" stroke="#000000" stroke-dasharray="null" stroke-linecap="null" stroke-linejoin="null" stroke-width="null"/> <line fill="none" stroke="#000000" stroke-dasharray="null" stroke-linecap="null" stroke-linejoin="null" stroke-width="null" x1="171.5" x2="171.5" y1="103.75" y2="135.388167"/> <line fill="none" stroke="#000000" stroke-dasharray="null" stroke-linecap="null" stroke-linejoin="null" stroke-width="null" x1="177.75" x2="177.75" y1="58.75" y2="80.255951"/> <line fill="none" stroke="#000000" stroke-dasharray="null" stroke-linecap="null" stroke-linejoin="null" stroke-width="null" x1="223.75" x2="266.854524" y1="91.75" y2="91.75"/> <line fill="none" stroke="#000000" stroke-dasharray="null" stroke-linecap="null" stroke-linejoin="null" stroke-width="null" x1="241.75" x2="241.75" y1="59.75" y2="91.754167"/> <line fill="none" stroke="#000000" stroke-dasharray="null" stroke-linecap="null" stroke-linejoin="null" stroke-width="null" x1="168.25" x2="180.75" y1="135.75" y2="135.75"/> <line fill="none" stroke="#000000" stroke-dasharray="null" stroke-linecap="null" stroke-linejoin="null" stroke-width="null" x1="169.75" x2="179.25" y1="138.5" y2="138.5"/> <line fill="none" stroke="#000000" stroke-dasharray="null" stroke-linecap="null" stroke-linejoin="null" x1="171" x2="179.75" y1="141.25" y2="141.25"/> </g> </g> </svg>我们现在只需要一点 JavaScript。 我们首先注意到元素属性“fill”的存在。 然后就是下面的简单程序:
<html> <head> </head> <body> <!-- ALL THE SVG FROM ABOVE GOES HERE --> </body> <html> </svg> <script> // Set up a timer interval flash the color. var gateElement = document.getElementById("svg_1"); if ( gateElement ) { setInterval( () => { var fillC = gateElement.getAttribute("fill"); gateElement.setAttribute("fill", (fillC == "#00FF00") ? "#FF0000" : "#00FF00" ); }, 2000 ) } </script> 请注意,我们拥有的是一个最小的 HTML 页面。 您可以将代码剪切并粘贴到您喜欢的编辑器中。 并且,不要忘记剪切和粘贴 SVG 以替换注释。 我的 Chrome 版本要求页面是 HTML 才能有 JavaScript 部分。 所以,这是一个仍然将 SVG 视为独立的浏览器的浏览器。 但是,距离<iframe>时代还有很长的路要走。
如果你剪切和粘贴得恰到好处,你可以调出页面并看到与门一遍又一遍地从红色变为绿色。
推荐阅读: SVG圆分解到路径
使用 VUE 组件构建面板
我们已经在让任何一个面板变得活跃起来,但如果我们想以合理的方式管理大量面板集合,我们就会为我们完成工作。 如果我们只是在第一个示例的基础上构建,情况尤其如此。
虽然第一个示例向我们展示了如何异步更改对象视图,但它没有向我们展示如何将视图与任何数据对象的状态联系起来,更不用说管理机器的数据对象了。 我们当然可以理解setInterval演示如何被fetch处理程序替换,但我们甚至可能无法从为包含 SVG 的页面提供服务的 Web 服务器获取机器的状态。 此外,当我们获取数据时,我们的程序现在需要了解给定页面的 DOM 结构。
幸运的是,Vue等框架已经流行起来,它们可以为我们节省很多工作。
很容易找到关于 Vue 的信息。 Vue 文档非常易于访问。 所以,如果这个讨论太过分了,那么你可能会花一些时间在它自己的网站上学习 Vue。 但是,在 Smashing 页面中有很好的讨论。 Krutie Patel 写了一篇关于制作信息图的精彩文章。 Souvik Sarkar 告诉我们如何使用 Vue 构建天气仪表板。
相关面板分组选择
第一步,我们应该解决搜索面板组的问题。 首先这样做的一个原因是它处于我们人类交互的框架级别。
用户搜索他感兴趣的东西。也许他对一个城镇中位置的所有设备感兴趣。 也许他有很多批次的液体产品,他想缩小到一种产品类型,每批产品都由一小部分物联网设备管理。 因此,用户将首先搜索以获取一个小列表。
这是过程:
- 按功能/参数搜索面板组。
- 查看代表组的图标列表。
- 选择一个图标(单击/点击)。
- 当它们出现时开始使用带有图标的面板。
这是一个很好的第一步的另一个原因是我们可以以最简单的形式使用 Vue。 无需构建工具。 我们只会在 HTML 中包含带有 script 标签的vue.js 事实上,我们甚至不必下载它。 有一个站点正在提供vue.js的工作副本。
我们只需要以下标签:
<script src="https://cdn.jsdelivr.net/npm/[email protected]/dist/vue.js"></script>我直接从关于安装的 Vue 文档中复制了脚本标签。
现在,我们需要一个可以加载图标并将它们变成可以点击的东西的网页。 Vue 让这一切变得非常简单。 事实上,我只是写了一个小应用程序来使用 Vue 管理 Twitter 列表。 它只管理文本字段。 由于它比使用图标的SPWA简单一点,我们可以看一下它,然后将其更改为我们想要的单页应用程序框架。
这是页面外观的一部分:
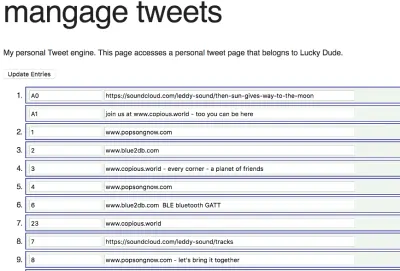
这看起来是一个相当简单的页面。 每个外部数字条目是一个时间段,其中包含一两条推文。 第二条推文是可选的。 如果你编辑一条推文,Vue 机制会更新一个 JavaScript 对象。 该页面由用户单击“更新条目”按钮以通过其按钮处理函数告诉服务器某些内容已更改。
为了让按钮处理程序将数据中继到服务器,它必须将 Vue 数据对象更改为 JSON 字符串。 现在,您可能想知道将 Vue 对象转换为 JSON 会有多困难。 原来是一行代码。 您可以在下面的源代码中找到该行,但如果您想更快地找到它,它会在源代码后面的段落中突出显示。
页面看起来很简单。 人不可貌相。 当然,页面看起来很简单,但是代码简单吗? 是的,确实如此! 使用 Vue,页面几乎可以神奇地管理字段的内容。 这是代码:
<!DOCTYPE html> <html lang="en" prefix="og: https://ogp.me/ns#"> <!-- define microdata scope and type --> <head itemscope itemtype="https://schema.org/Article"> <title>Tweet Keeper</title> <style> body { margin: 2em; } .entryart { border: solid 1px navy; width: 80%; padding: 2px; padding-left: 6px; margin-bottom: 3px; background-color: #EEF4EE; } </style> <script src="https://cdn.jsdelivr.net/npm/[email protected]/dist/vue.js"></script> </head> <body onload="GetTweets()"> <!-- some old fashioned handling --> <!-- The Vue app starts here. This is the HTML part of the Vue object --> <div> <!-- Recognize the name from the Vue doc --> <div itemscope itemtype="https://schema.org/Article"> <h1 itemprop="name">mangage tweets</h1> <p itemprop="description">My personal Tweet engine. This page accesses a personal tweet page that belongs to {{tweetOwner}}.</p> <!-- {{tweetOwner}} is in the data model. --> <button>Update Entries</button> </div> <!-- Here is a Vue loop for generating a lit --> <ol> <li v-for="tweet in tweets"> <!-- here is the first tweet represented as an object with a lable and tweet text --> <div class="entryart"> <input v-model="tweet.def[0].label" /> <input v-model="tweet.def[0].tweet" /> </div> <!-- here is the second tweet in the slot. But, notice that it is optional. --> <div class="entryart" v-if="tweet.def.length > 1"> <input v-model="tweet.def[1].label"/> <input v-model="tweet.def[1].tweet"/> </div> </li> </ol> </div> <script> var twtApp = new Vue({ el: '#tweetAppDiv', data: { tweets: [ // Where is the data? Still on the server.s ], tweetOwner : "Lucky Dude" // picked a name for demo } }); </script> </body> </html> <script> // Notice that you don't have to do everything in the Vue framework. // Here we are using some native API calls var gDefaultPostInfo = { // there server is beyond simple - an example from node.js docs method: 'POST', // or 'PUT' mode: "cors", // no-cors, cors, *same-origin cache: "no-cache", // *default, no-cache, reload, force-cache, only-if-cached credentials: "same-origin", // include, *same-origin, omit redirect: "follow", // manual, *follow, error referrer: "no-referrer", // no-referrer, *client body: "", headers:{ 'Content-Type': 'application/json' } } // // // recall the "onload" function GetTweets(event) { var url = "https://localhost:8080/twitlist1.json" // We have a fixed file name. fetch(url).then((response) => { // this is now browser native response.text().then((text) => { var newData = JSON.parse(text); // DATA UPDATE! This is it. twtApp.tweets = newData // the page update right away with new data. }); }); } function sendTweets() { // recall the button up above. This is not a Vue style button, but still in the Vue app. var url = "https://localhost:8080/" var data = twtApp.tweets; // GET THE DATA OUT OF VUE. That's all folks. // // so happens that Vue pulls out the right data and stringifies it. var jdata = JSON.stringify(data); // data can be `string` or {object}! // gDefaultPostInfo.body = jdata; // that's for fetch - not Vue related // fetch(url,gDefaultPostInfo).then(res => { // We use fetch to POST as well as GET res.json() }).then(response => { console.log('Success:', JSON.stringify(response)) // promises }).catch(error => { console.error('Error:', error) }); } // // // </script>因此,为了突出显示框架强大功能的惊人线条,让我们在这里重复一遍:

A. 这是提取数据。
postOptionsObject.body = JSON.stringify(twtApp.tweets);B. 这是将数据放入 Vue 并看到屏幕更新:
twtApp.tweets = JSON.parse(text) // text is the server response那是多少工作量?
看起来将有一种很好的方式来表达数据将如何更新物联网面板。
现在,让我们将推文变成可点击的图标,用于从 Web 服务器获取组件。
从推文到面板获取图标
人们喜欢将 SVG 用于图标。 据我所知,他们更喜欢 SVG 的这种用途。 我只介绍销售或赠送 SVG 图标的网站数量。 卖点是线条图形的字节数比图像少。 而且,如果我要询问具有类似按钮行为的图片列表,我可能会在 SVG 在 iframe 中的日子里抓取 PNG 或 JPEG。 但是,我们甚至可以在 Vue 贡献者列表中找到帮助我们提供图标服务的库。
We can turn the tweets page into an icon list returned as a search result. Just a little code has to be changed. Of course, there are a few things to be careful about if we want SVG icons to be loaded as buttons. Vue provides mechanisms for putting HTML into the application. These mechanisms have to be used or DOM elements fetched from the server don't get interpreted.
Here is the kind of rendering you can get from view if you follow your first impulse in creating a handlebars style variable location in the application DOM.

Here is the code that produces the result in the picture:
<div> <div class="entryart"> <span class="oneItem" v-for="icon in iconList"> {{icon}} </span> </div> </div> <script> var iconApp = new Vue({ el: '#iconAppTry', data: { iconList: [ // Where is the data? Still on the server. ], queryToken : "Thermo Batches" // picked a name for demo } }); </script> Notice that we have gone from looping over tweets to looping over icons. tweet in tweets changed into icon in iconList . Our twtApp hooks into the DOM element #tweetAppDiv , while our iconApp hooks into the DOM element #iconAppTry . Within the Vue option object, the data subobject has a tweets in the first app, and iconList in the second. The fields are both empty arrays that receive data when the fetch routine does its job.
But, we have imitated our tweet app too closely. In the code above, the iconList is an array, and the server is expected to send an array of strings. So, let's say the server has sent us HTML, and we have it properly decoded with the array assigned to data.iconList . Then, the picture above can be seen.
Now, let's change the code just a little. In this revised code, we can see the following:
v-html="icon"> Vue responds to the v-html syntax by putting in the DOM of the icon element. Notice that the syntax is included after the loop directive as another attribute to the span tag.
By removing the handlebars syntax and using v-html , our picture changes to something more comprehensible:
<div> <div class="entryart"> <span class="oneItem" v-for="icon in iconList" v-html="icon"> </span> </div> </div> <script> var iconApp = new Vue({ el: '#iconAppTry2', data: { iconList: [ // Where is the data? Still on the server. ], queryToken : "Thermo Batches" // picked a name for demo } }); </script> 
While v-html is a quick way to do things, the Vue team recommends using components to get the desired HTML into the page. That seems like a good idea, and we shall soon set about doing that.
But, let's use the v-html syntax for our next example.
It's time to set up our working example for fetching SVG icons. Let's have those icons be responsive to a button click. Once those are working, we can get the panels associated with an icon.
Let's suppose that the SVG required for icons is stored in a database. For our example, we can just fetch a JSON file from the server. The grown-up version of the icon server would store many such files in a database, and deliver them to the page with the same mechanisms.
Also, it's best if the SVG arrives on the page URL encoded since we will be using JSON parse. The SVG can be decoded by calling JavaScript's decodeURIComponent function.
In order to simulate the response to searching, we can make use of several JSON files. The page can have one button for each file. Here is the code for the page:
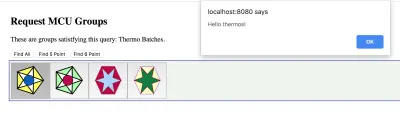
<!DOCTYPE html> <html lang="en" prefix="og: https://ogp.me/ns#"> <!-- define microdata scope and type --> <head itemscope itemtype="https://schema.org/Article"> <title>Search Bar</title> <style> body { margin: 2em; } div { margin: 6px; } .entryart { border: solid 1px navy; width: 80%; padding: 2px; padding-left: 6px; margin: 2px; margin-bottom: 3px; background-color: #EEF4EE; } .oneItem { background-color: #EEFFFF; margin: 2px; padding: 4px; border: solid 1px purple; } </style> <script src="https://cdn.jsdelivr.net/npm/[email protected]/dist/vue.js"></script> </head> <body> <!-- some old fashioned handling --> <!-- The Vue app starts here. This is the HTML part of the Vue object --> <div> <!-- Recognize the name from the Vue doc --> <div> <h2 itemprop="name">Request MCU Groups</h2> <p itemprop="description">These are groups satistfying this query: {{queryToken}}.</p> <!-- {{tweetOwner}} is in the data model. --> <button>Find All</button> <button>Find 5 Point</button> <button>Find 6 Point</button> </div> <!-- Here is a Vue loop for generating a lit --> <div class="entryart"> <button v-for="iconEntry in iconList" @click="goGetPanel(iconEntry.name)" > <div v-html="iconEntry.icon"> </div> </button> </div> </div> <script> var iconApp = new Vue({ el: '#iconAppTry', data: { iconList: [ // Where is the data? Still on the server. ], queryToken : "Thermo Batches" // picked a name for demo }, methods : { goGetPanel: (pname) => { // `this` inside methods points to the Vue instance alert('Hello ' + pname + '!') } } }); </script> </body> </html> <script> // // recall the "onclick" on the <buttons> function GetIcons(points) { // special file names instead of search parameters // var url = (points == 11) ? "https://localhost:8080/batchQuery-all.json" : ((points == 5) ? "https://localhost:8080/batchQuery-five.json" : "https://localhost:8080/batchQuery-six.json") fetch(url).then((response) => { // this is now browser native response.text().then((text) => { var newData = JSON.parse(text); // DATA UPDATE! This is it. newData = newData.map(obj => { obj.icon = decodeURIComponent(obj.icon); return(obj) }); iconApp.iconList = newData; // the page update right away with new data. }); }); } </script>Here is one display of icons that have been fetched from the server:
The data being sent is an array with the following kind of structure:
{ "style" : { "color" : "red", "backgroundColor" : "yellow" }, "icon" : svg1, "name" : "thermos" }, 在这里, svg1是从文件中获取的 SVG。 当然,正义的服务器会从数据库中获取结构,其中 SVG 将存储在结构中。
这是上面代码的一个片段。 这是获取 JSON 并将结构数组放入 Vue 应用程序的代码。 可以看到使用中的fetch的 promise 结构。 文本被解析,在下一行中,编码的 SVG 被解码。 再多一行,Vue 更新页面。 按钮栏中的按钮数量将等于 JSON 数组的长度。
fetch(url).then((response) => { // this is now browser native response.text().then((text) => { var newData = JSON.parse(text); // DATA UPDATE! This is it. newData = newData.map(obj => { obj.icon = decodeURIComponent(obj.icon); return(obj) }); // the page update right away with new data. iconApp.iconList = newData; }); }); 现在,只有两个片段。 Vue 应用程序。 读者会注意到@click指令已包含在按钮中。 数据元素iconEntry.name被传递给引号内的方法。
该方法在 Vue 应用程序中定义:
<div class="entryart"> <button v-for="iconEntry in iconList" @click="goGetPanel(iconEntry.name)" > <div v-html="iconEntry.icon"> </div> </button> </div> </div> 这是方法定义的片段。 methods对象被添加到 app 参数对象中的data对象之后:
, methods: { goGetPanel: (pname) => { // `this` inside methods points to the Vue instance alert('Hello ' + pname + '!') } } 读者应该找到goGetPanel定义,并指出了@click处理程序的使用。 在我们的最终应用程序中, alert调用可以替换为从服务器获取面板的函数。
物联网面板的组件库
我们可以决定我们从服务器获取的面板可以是 HMTL 或只是 SVG 绘图,但如果有多种面板,我们希望创建面板的工作可以通过组件库来简化从中选择。 我们可以想象,可以改进 SVG 编辑器以允许将库组件作为编辑的一部分拖放到图片上。 然后,如果 SVG 编辑器可以输出带有组件标签的图片版本,那么使用 Vue 将允许创建图片,同时确保 JavaScript 自动化和动画整齐地编织在一起。 对于我们的讨论,一些手工编辑可以帮助我们到达那里。
如果我们想用 Vue 组件创建面板,那么我们最好弄清楚如何制作这些组件,然后将它们组合成有用的东西。 我们将不得不切换到使用 Vue 提供的命令行工具并组织我们的工作流程。
成分
Vue文档指出,组件定义的组件data部分(子对象)需要是返回数据的函数。 原因是 Vue 需要在实例之间保持数据分离。 因此,在从 Vue 应用程序初始化到组件定义的过程中,还有另一个小的代码更改。
在这第一段代码中,正在初始化一个 Vue 应用程序:
var iconApp = new Vue({ el: '#iconApp', data: { // this is the data field that can be easily updated }, methods : { ... } }); 在这个新的代码片段中,正在定义和注册一个组件。 首先,请注意,不是创建一个new Vue实例,而是注册了一个名为iconic的组件。 然后, data字段返回 Vue 应用程序创建的任何iconic实例的自定义数据。 最后, template字段出现在组件注册的末尾。 任何可能已经写在网页上以显示组件的 HTML 都可以成为template的一部分。
Vue.component('iconic', data: () => { var instanceData = { // data fields named for the // variables appearing in the template onevar : "test" } return(instanceData); }, methods : { ... }, template: '<div>This appears in every instance {{onevar}}</div>' }); 所以,我们可以想象一个带有温度计的面板。 因此,如果有人提供了thermometer组件,我们会期望在代码中的某处有一个组件定义。 因此:
Vue.component('thermometer', data: () => { var instanceData = { // data fields named for the // variables appearing in the template temperature : 0 } return(instanceData); }, methods : { ... }, template: '<div>Some SVG will go here</div>' });我们正在尝试创建如下所示的内容:
温度计组件与您将在 Vue 教程中遇到的第一个组件非常相似。 但是,弄清楚如何更新它有点棘手。 有一种更好的方法可以使用属性来定义组件的反应性。 而且,在以下内容中:
Vue.component('thermometer', { props: ['temperature'], computed : { y: function() { var t = this.temperature/100; var h = 54.724472; var y_bar = 41.176476 // starts near the top // pretend the scale is 1 to 100, so that the temperature is a precentage return((1 - t)*h + y_bar) }, height : function() { var t = this.temperature/100; var h = 54.724472; // as high as the whole range var y_bar = 41.176476 // pretend the scale is 1 to 100, so that the temperature is a precentage return(t*h) } }, template: '#thermometer-template' }) 因此,而不是将温度表示为数据元素。 它表示为props下的属性。 然后,有一个新部分, computed ,它提供作为属性函数的变量。 我们看到this.temperature用于y和height 。 这些计算变量在 SVG 中用作矩形的属性。
在 SVG 中, y自上而下增长。 因此,当我们希望温度计底部的矩形变小时,红色框的y必须更低,并且高度必须减小,以使 ( y + height ) 保持在温度计零处。
注意组件定义中的template字段。 它实际上是一个文档元素 ID。 被引用的元素是具有特殊类型的脚本部分: type="text/x-template" 。 脚本元素是温度计的 SVG 所在的位置。 而且,SVG 使用了 Vue 变量和控制项,因此可以定义反应性。
这是一些 SVG:
<script type="text/x-template"> <svg xmlns:svg="https://www.w3.org/2000/svg" xmlns="https://www.w3.org/2000/svg" width="20" height="70" version="1.1" > <g transform="translate(0,-180)"> <g transform="matrix(2.0111869,0,0,1.0489665,-215.11053,144.5592)"> <rect stroke-linecap="null" stroke-linejoin="null" width="2.9665921" height="54.724472" x="111.90748" y="41.176476" /> <rect stroke-linecap="null" stroke-linejoin="null" width="2.9665921" x="111.90748" :height="height" :y="y" /> <g transform="matrix(0.76503813,0,0,1,26.586929,0)"> <line y2="57.306953" y1="57.306953" x2="113.15423" x1="107.22105" stroke-linejoin="null" stroke-linecap="null" /> <line y2="74.408356" y1="74.408356" x2="113.15423" x1="107.22105" stroke-linejoin="null" stroke-linecap="null" 读者可以在顶部找到id="thermometer-template" ,再往下看rect元素,可以找到计算变量。
在这里,变量用途被分离出来。 v-bind的 Vue 简写语法正在使用中,使用:height="height"和y相同:
x="111.90748" :height="height" :y="y" 当 SVG 元素的父元素设置作为温度计属性temperature输入的变量时,Vue 会重新计算height和y 。 结果,红框的位置和高度发生了变化。
列出使用温度计的 Vue 应用程序会有所帮助。
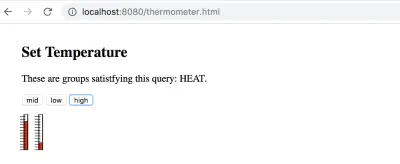
<body> <!-- The Vue app starts here. This is the HTML part of the Vue object --> <div> <!-- Recognize the name from the Vue doc --> <div> <h2 itemprop="name">Set Temperature</h2> <p itemprop="description">These are groups satistfying this query: {{queryToken}}.</p> <!-- {{tweetOwner}} is in the data model. --> <button @click="updateTemp(50,50)">mid</button> <button @click="updateTemp(20,80)">low</button> <button @click="updateTemp(80,20)">high</button> </div> <thermometer :temperature="temp1" ></thermometer> <thermometer :temperature="temp2" ></thermometer> </div> <script> var thermoApp = new Vue({ el: '#thermoApp', data: { temp1 : 30, temp2 : 60, queryToken : "HEAT" }, methods : { updateTemp: function (tval1,tval2) { this.temp1 = tval1; this.temp2 = tval2; } } }); </script> </body> 这就是全部。 有三个按钮调用thermoApp Vue 应用程序的updateTemp方法。 数据部分有两个温度变量。 并且,每个thermometer都会在值发生变化时更新其温度。
下面调用的两个温度计的代码可以在分配给 Vue 应用程序的 HTML 中找到。
<thermometer :temperature="temp1" ></thermometer> <thermometer :temperature="temp2" ></thermometer> 请注意,应用程序将function形式主义用于方法定义。 以这种方式定义updateTemp updateTemp: function (tval1,tval2)允许访问实例变量this 。
此外,以这种方式定义updateTemp updateTemp: (tval1,tval2) =>将this分配给不响应和更新视图的内部数据结构。
组装面板
每个物联网面板都可以是一个组件。 Vue 提供了一种使用子组件定义组件的方法。 或者,有一种插槽机制可用于生成可以环绕任何 HTML 内容的组件。
在接下来的几段中,让我们看看如何用子组件制作一个面板。 从我们的示例中可以快速得出两种形式。 在一种情况下,温度计可以是用 JavaScript 调用的子组件。 在另一种情况下,组件是独立定义的,但在 HTML 中被提及。
在这两种情况下,模板都可以使用相同的 HTML。 这是我们的面板作为模板:
<script type="text/x-template"> <div> <thermometer :temperature="temp1" ></thermometer> <thermometer :temperature="temp2" ></thermometer> </div> </script> 应用程序的第一个细节之间的唯一区别是div元素围绕着两个温度计。 如果模板缺少顶级 DOM 元素,Vue 将抛出错误。 div通过了 Vue 的要求,里面可以包含多个元素。
现在,我们可以并排看到两个温度计。 将温度从顶部传递到最终温度计具有级联下降的值。 在顶层,当应用程序 DOM 中包含一行时,面板会加入应用程序。
<themo-panel :temp1="temp1" :temp2="temp2" ></themo-panel>面板的模板虽然简单,但似乎表明面板可以很容易地根据组件进行设计。 就好像只有物联网组件的语言是可能的。
现在,面板的模板定义很简单。 这是独立定义的子组件:
Vue.component('thermo-panel', { props: ['temp1','temp2'], template: '#thermo-panel-template' }); 这大约是使面板正常工作所需的量。 确实,此版本依赖于一长串属性来定义在消息进入页面时要更新的值。 但是,这是一个好的开始。 更新顶层的data对象可以为温度计设置动画。 然而,随着面板变得复杂,可能需要另一种方法来显示变化。
已经提到了指定子组件的其他方法,对于面板,我们应该看看它。 这里是:
Vue.component('thermo-panel', { props: ['temp1','temp2'], template: '#thermo-panel-template', components: { // a sub component for the labels 'thermometer': { props: { temperature: Number, }, template: '#thermometer-template', computed : { y: function() { var t = this.temperature/100; var h = 54.724472; var y_bar = 41.176476 // starts near the top // pretend the scale is 1 to 100, so that the temperature is a precentage return((1 - t)*h + y_bar) }, height : function() { var t = this.temperature/100; var h = 54.724472; // as high as the whole range var y_bar = 41.176476 // pretend the scale is 1 to 100, so that the temperature is a precentage return(t*h) } } } } }); 当然还有更多代码,但那是因为thermometer组件的 JavaScript 包含在thermo-panel的组件列表中。 这两种方法做同样的工作,但它们提供了不同的方式来打包组件定义。
目前,我的偏好是第一种方式。 如果只需要更改模板和属性,修改面板并动态检索它们应该会容易得多。 为此,独立定义的组件形成组件库。 但是,虽然这看起来更好,但在下面使用第二种看起来更冗长的方式会变得更方便。
鉴于我们可以以明确定义的方式从组件中制作响应式面板,我将在我的文章的下一部分中解释我们如何将它们作为可以进行简单查询的数据库进行管理。