使用 Google Cloud Platform 构建无服务器前端应用程序
已发表: 2022-03-10最近,应用程序的开发范式已经开始从手动部署、扩展和更新应用程序中使用的资源转变为依赖第三方云服务提供商来完成这些资源的大部分管理。
作为希望在尽可能快的时间内构建适合市场的应用程序的开发人员或组织,您的主要关注点可能是向用户提供核心应用程序服务,而您花费较少的时间进行配置、部署和压力测试你的申请。 如果这是您的用例,那么以无服务器方式处理应用程序的业务逻辑可能是您的最佳选择。 但是怎么做?
本文对希望在其应用程序中构建某些功能的前端工程师或希望使用部署到 Google Cloud Platform 的无服务器应用程序从现有后端服务中提取和处理某些功能的后端工程师很有帮助。
注意:要从此处介绍的内容中受益,您需要有使用 React 的经验。 无需具备无服务器应用程序的经验。
在开始之前,让我们了解什么是无服务器应用程序,以及在前端工程师的上下文中构建应用程序时如何使用无服务器架构。
无服务器应用程序
无服务器应用程序是将应用程序分解为微小的可重用事件驱动功能,由公共云中的第三方云服务提供商代表应用程序作者托管和管理。 这些由某些事件触发并按需执行。 虽然serverless词后面的“ less ”后缀表示没有服务器,但这并不是 100% 的情况。 这些应用程序仍然在服务器和其他硬件资源上运行,但在这种情况下,这些资源不是由开发人员提供,而是由第三方云服务提供商提供。 所以它们对应用程序作者来说是无服务器的,但仍然在服务器上运行并且可以通过公共互联网访问。
无服务器应用程序的一个示例用例是向访问您的登录页面并订阅接收产品发布电子邮件的潜在用户发送电子邮件。 在这个阶段,您可能没有运行后端服务,并且不想牺牲创建、部署和管理服务所需的时间和资源,这一切都是因为您需要发送电子邮件。 在这里,您可以编写一个使用电子邮件客户端的文件并部署到任何支持无服务器应用程序的云提供商,并在您将此无服务器应用程序连接到您的登录页面时让他们代表您管理此应用程序。
虽然有很多原因可以让您考虑利用无服务器应用程序或所谓的功能即服务 (FAAS),但对于您的前端应用程序,您应该考虑以下一些非常显着的原因:
- 应用程序自动缩放
无服务器应用程序是水平扩展的,这种“横向扩展”是由云提供商根据调用量自动完成的,因此开发人员不必在应用程序负载过重时手动添加或删除资源。 - 成本效益
作为事件驱动的无服务器应用程序仅在需要时运行,这反映在费用上,因为它们是根据调用的时间数计费的。 - 灵活性
无服务器应用程序被构建为高度可重用,这意味着它们不绑定到单个项目或应用程序。 可以将特定功能提取到无服务器应用程序中,跨多个项目或应用程序部署和使用。 无服务器应用程序也可以用应用程序作者的首选语言编写,尽管一些云提供商只支持少量的语言。
在使用无服务器应用程序时,每个开发人员在公共云中都有大量的云提供商可供使用。 在本文的上下文中,我们将重点介绍 Google Cloud Platform 上的无服务器应用程序——它们是如何创建、管理、部署的,以及它们如何与 Google Cloud 上的其他产品集成。 为此,我们将向这个现有的 React 应用程序添加新功能,同时完成以下过程:
- 在云端存储和检索用户数据;
- 在 Google Cloud 上创建和管理 cron 作业;
- 将 Cloud Functions 部署到 Google Cloud。
注意: Serverless 应用程序不仅仅绑定到 React,只要你喜欢的前端框架或库可以发出HTTP请求,它就可以使用 serverless 应用程序。
谷歌云函数
Google Cloud 允许开发人员使用 Cloud Functions 创建无服务器应用程序并使用 Functions Framework 运行它们。 正如它们所称,云函数是部署到 Google Cloud 的可重用事件驱动函数,用于侦听六个可用事件触发器中的特定触发器,然后执行它被写入执行的操作。
短暂的云函数(默认执行超时为 60 秒,最长为 9 分钟)可以使用 JavaScript、Python、Golang 和 Java 编写并使用它们的运行时执行。 在 JavaScript 中,它们只能使用一些可用的 Node 运行时版本来执行,并且使用纯 JavaScript 以 CommonJS 模块的形式编写,因为它们被导出为要在 Google Cloud 上运行的主要功能。
云函数的一个示例是下面的一个示例,它是用于处理用户数据的函数的空样板。
// index.js exports.firestoreFunction = function (req, res) { return res.status(200).send({ data: `Hello ${req.query.name}` }); } 上面我们有一个导出函数的模块。 执行时,它接收类似于HTTP路由的请求和响应参数。
注意:当发出请求时,云函数会匹配每个HTTP协议。 当期望请求参数中的数据时,这是值得注意的,因为在发出执行云功能的请求时附加的数据将出现在POST请求的请求正文中,而GET请求的查询正文中。
云功能可以在开发过程中在本地执行,方法是将@google-cloud/functions-framework包安装在写入功能所在的同一文件夹中,或者通过运行npm i -g @google-cloud/functions-framework进行全局安装以将其用于多个功能命令行中npm i -g @google-cloud/functions-framework 。 安装后,应将其添加到package.json脚本中,导出模块的名称类似于以下:
"scripts": { "start": "functions-framework --target=firestoreFunction --port=8000", } 上面我们在package.json文件中的脚本中有一个命令,它运行 functions-framework 并将firestoreFunction指定为要在端口8000上本地运行的目标函数。
我们可以通过使用 curl 向 localhost 上的端口8000发出GET请求来测试此函数的端点。 将以下命令粘贴到终端中将执行此操作并返回响应。
curl https://localhost:8000?name="Smashing Magazine Author" 上面的命令使用GET HTTP方法发出请求,并以200状态代码和包含在查询中添加的名称的对象数据进行响应。
部署云功能
在可用的部署方法中,从本地计算机部署云功能的一种快速方法是在安装云 Sdk 后使用它。 在使用您在 Google Cloud 上的项目对 gcloud sdk 进行身份验证后,从终端运行以下命令,会将本地创建的函数部署到 Cloud Function 服务。
gcloud functions deploy "demo-function" --runtime nodejs10 --trigger-http --entry-point=demo --timeout=60 --set-env-vars=[name="Developer"] --allow-unauthenticated使用下面解释的标志,上面的命令将 HTTP 触发的函数部署到名为“ demo-function ”的谷歌云。
- 姓名
这是部署云功能时为其指定的名称,并且是必需的。 -
region
这是要部署云功能的区域。 默认情况下,它部署到us-central1。 -
trigger-http
这将选择 HTTP 作为函数的触发器类型。 -
allow-unauthenticated
这允许使用其生成的端点通过 Internet 在 Google Cloud 外部调用该函数,而无需检查调用者是否经过身份验证。 -
source
从终端到包含要部署的功能的文件的本地路径。 -
entry-point
这是要从编写函数的文件中部署的特定导出模块。 -
runtime
这是此已接受运行时列表中用于函数的语言运行时。 -
timeout
这是函数在超时之前可以运行的最长时间。 默认为 60 秒,最长可设置为 9 分钟。
注意:使函数允许未经身份验证的请求意味着具有函数端点的任何人也可以在没有您授予的情况下发出请求。 为了缓解这种情况,我们可以通过环境变量或通过在每个请求上请求授权标头来确保端点保持私有。
现在我们的演示功能已经部署并且我们有了端点,我们可以测试这个功能,就好像它正在使用全局安装的自动加农炮在真实世界的应用程序中使用一样。 从打开的终端运行autocannon -d=5 -c=300 CLOUD_FUNCTION_URL将在 5 秒内生成 300 个对云函数的并发请求。 这足以启动云功能并生成一些我们可以在功能仪表板上探索的指标。
注意:部署后会在终端中打印出函数的端点。 如果不是这种情况,请从终端运行gcloud function describe FUNCTION_NAME以获取有关已部署函数的详细信息,包括端点。
使用仪表板上的指标选项卡,我们可以看到最后一个请求的可视化表示,包括进行了多少次调用、它们持续了多长时间、函数的内存占用以及为处理发出的请求而旋转了多少实例。
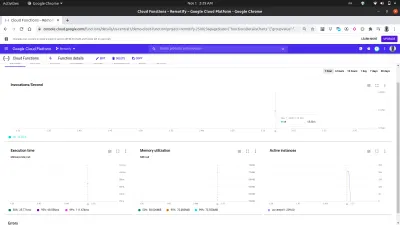
仔细查看上图中的 Active Instances 图表可以看出 Cloud Functions 的水平扩展能力,我们可以看到在几秒钟内启动了 209 个实例来处理使用 autocannon 发出的请求。
云函数日志
部署到 Google 云的每个函数都有一个日志,每次执行此函数时,都会在该日志中创建一个新条目。 从函数仪表板上的日志选项卡中,我们可以看到来自云函数的所有日志条目的列表。
下面是我们部署demo-function中的日志条目,这些日志条目是由于我们使用autocannon发出的请求而创建的。
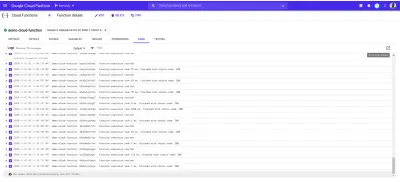
上面的每个日志条目都准确地显示了一个函数的执行时间、执行时间以及它以什么状态码结束。 如果函数导致任何错误,错误的详细信息(包括错误发生的行)将显示在此处的日志中。
Google Cloud 上的 Logs Explorer 可用于查看有关来自云功能的日志的更全面的详细信息。
具有前端应用程序的云功能
云功能对前端工程师来说非常有用和强大。 没有管理后端应用程序知识的前端工程师可以将功能提取到云功能中,部署到 Google Cloud 并通过其端点向云功能发出HTTP请求,并在前端应用程序中使用。
为了展示如何在前端应用程序中使用云功能,我们将为这个 React 应用程序添加更多功能。 该应用程序已经在身份验证和主页设置之间建立了基本路由。 我们将扩展它以使用 React Context API 来管理我们的应用程序状态,因为创建的云函数的使用将在应用程序 reducer 中完成。
首先,我们使用createContext API 创建应用程序的上下文,并创建一个 reducer 来处理应用程序中的操作。
// state/index.js import { createContext } from “react”;export const UserReducer = (action, state) => { switch (action.type) { case “CREATE-USER”: break; 案例“上传用户图像”:中断; 案例“FETCH-DATA”:中断案例“LOGOUT”:中断; 默认值:console.log(
${action.type} is not recognized) } };导出 const userState = { 用户:空,isLoggedIn :假 };
导出 const UserContext = createContext(userState);
上面,我们首先创建了一个包含 switch 语句的UserReducer函数,允许它根据分派到其中的操作类型执行操作。 switch 语句有四种情况,这些是我们将要处理的操作。 目前他们还没有做任何事情,但是当我们开始与我们的云功能集成时,我们将逐步实现要在其中执行的操作。
我们还使用 React createContext API 创建和导出了应用程序的上下文,并为其提供了userState对象的默认值,其中包含当前的用户值,该值将在身份验证后从 null 更新为用户的数据,还有一个isLoggedIn布尔值来判断是否用户是否登录。
现在我们可以继续使用我们的上下文,但在我们这样做之前,我们需要使用附加到UserContext的 Provider 包装整个应用程序树,以便子组件能够订阅我们的上下文的值更改。
// index.js import React from "react"; import ReactDOM from "react-dom"; import "./index.css"; import App from "./app"; import { UserContext, userState } from "./state/"; ReactDOM.render( <React.StrictMode> <UserContext.Provider value={userState}> <App /> </UserContext.Provider> </React.StrictMode>, document.getElementById("root") ); serviceWorker.unregister(); 我们在根组件中使用UserContext提供程序包装我们的输入应用程序,并在 value 属性中传递我们之前创建的userState默认值。
现在我们已经完全设置了应用程序状态,我们可以开始使用 Google Cloud Firestore 通过云功能创建用户数据模型。
处理应用程序数据
此应用程序中的用户数据由唯一 ID、电子邮件、密码和图像的 URL 组成。 使用云功能,这些数据将使用 Google Cloud Platform 上提供的 Cloud Firestore 服务存储在云端。
Google Cloud Firestore是一个灵活的 NoSQL 数据库,它是从 Firebase 实时数据库中分离出来的,具有新的增强功能,可以提供更丰富、更快速的查询以及离线数据支持。 Firestore 服务中的数据被组织成集合和文档,类似于 MongoDB 等其他 NoSQL 数据库。
可以通过 Google Cloud Console 直观地访问 Firestore。 要启动它,请打开左侧导航窗格并向下滚动到 Database 部分,然后单击 Firestore。 这将为具有现有数据的用户显示集合列表,或者在没有现有集合时提示用户创建新集合。 我们将创建一个用户集合以供我们的应用程序使用。
与 Google Cloud Platform 上的其他服务类似,Cloud Firestore 也有一个 JavaScript 客户端库,用于在节点环境中使用(如果在浏览器中使用会抛出错误)。 为了即兴发挥,我们使用@google-cloud/firestore包在云功能中使用 Cloud Firestore。
将 Cloud Firestore 与云功能一起使用
首先,我们将创建的第一个函数从demo-function重命名为firestoreFunction ,然后将其扩展以连接 Firestore 并将数据保存到用户的集合中。
require("dotenv").config(); const { Firestore } = require("@google-cloud/firestore"); const { SecretManagerServiceClient } = require("@google-cloud/secret-manager"); const client = new SecretManagerServiceClient(); exports.firestoreFunction = function (req, res) { return { const { email, password, type } = req.body; const firestore = new Firestore(); const document = firestore.collection("users"); console.log(document) // prints details of the collection to the function logs if (!type) { res.status(422).send("An action type was not specified"); } switch (type) { case "CREATE-USER": break case "LOGIN-USER": break; default: res.status(422).send(`${type} is not a valid function action`) } }; 为了处理更多涉及 fire-store 的操作,我们添加了一个带有两种情况的 switch 语句来处理我们应用程序的身份验证需求。 我们的 switch 语句评估一个type表达式,当我们从我们的应用程序向此函数发出请求时,我们添加到请求正文中,并且每当我们的请求正文中不存在此type数据时,该请求被标识为错误请求和400状态代码与指示丢失type的消息一起作为响应发送。
我们使用 Cloud Firestore 客户端库中的应用程序默认凭据 (ADC) 库与 Firestore 建立连接。 在下一行,我们在另一个变量中调用集合方法并传入我们集合的名称。 我们将使用它来进一步对包含的文档的集合执行其他操作。
注意: Google Cloud 上服务的客户端库使用初始化构造函数时传入的创建的服务帐户密钥连接到各自的服务。 当服务帐户密钥不存在时,它默认使用应用程序默认凭据,然后使用分配给云功能的IAM角色进行连接。
使用 Gcloud SDK 编辑本地部署的函数的源代码后,我们可以从终端重新运行之前的命令来更新和重新部署云函数。
现在已经建立了连接,我们可以实现CREATE-USER案例以使用请求正文中的数据创建新用户。
require("dotenv").config(); const { Firestore } = require("@google-cloud/firestore"); const path = require("path"); const { v4 : uuid } = require("uuid") const cors = require("cors")({ origin: true }); const client = new SecretManagerServiceClient(); exports.firestoreFunction = function (req, res) { return cors(req, res, () => { const { email, password, type } = req.body; const firestore = new Firestore(); const document = firestore.collection("users"); if (!type) { res.status(422).send("An action type was not specified"); } switch (type) { case "CREATE-USER": if (!email || !password) { res.status(422).send("email and password fields missing"); } const id = uuid() return bcrypt.genSalt(10, (err, salt) => { bcrypt.hash(password, salt, (err, hash) => { document.doc(id) .set({ id : id email: email, password: hash, img_uri : null }) .then((response) => res.status(200).send(response)) .catch((e) => res.status(501).send({ error : e }) ); }); }); case "LOGIN": break; default: res.status(400).send(`${type} is not a valid function action`) } }); }; 我们使用 uuid 包生成了一个 UUID,将其作为要保存的文档的 ID,方法是将其传递给文档的set方法以及用户的 ID。 默认情况下,每个插入的文档都会生成一个随机 ID,但在这种情况下,我们将在处理图像上传时更新文档,而 UUID 将用于获取要更新的特定文档。 我们不是以纯文本形式存储用户密码,而是首先使用 bcryptjs 对其进行加盐,然后将结果哈希存储为用户密码。
将firestoreFunction云函数集成到应用程序中,我们从用户减速器中的CREATE_USER案例中使用它。
单击Create Account按钮后,将向具有CREATE_USER类型的 reducer 发送一个操作,以向firestoreFunction函数的端点发出一个包含键入的电子邮件和密码的POST请求。
import { createContext } from "react"; import { navigate } from "@reach/router"; import Axios from "axios"; export const userState = { user : null, isLoggedIn: false, }; export const UserReducer = (state, action) => { switch (action.type) { case "CREATE_USER": const FIRESTORE_FUNCTION = process.env.REACT_APP_FIRESTORE_FUNCTION; const { userEmail, userPassword } = action; const data = { type: "CREATE-USER", email: userEmail, password: userPassword, }; Axios.post(`${FIRESTORE_FUNCTION}`, data) .then((res) => { navigate("/home"); return { ...state, isLoggedIn: true }; }) .catch((e) => console.log(`couldnt create user. error : ${e}`)); break; case "LOGIN-USER": break; case "UPLOAD-USER-IMAGE": break; case "FETCH-DATA" : break case "LOGOUT": navigate("/login"); return { ...state, isLoggedIn: false }; default: break; } }; export const UserContext = createContext(userState); 上面,我们使用 Axios 向firestoreFunction发出请求,在解决此请求后,我们将用户初始状态从null设置为从请求返回的数据,最后我们将用户作为经过身份验证的用户路由到主页.

至此,一个新用户就可以成功创建账号并成功路由到首页了。 此过程演示了我们如何使用 Firestore 从云功能执行基本的数据创建。
处理文件存储
大多数时候,在应用程序中存储和检索用户文件是应用程序中非常需要的功能。 在连接到node.js后端的应用程序中,Multer通常用作中间件来处理上传文件进来的multipart/form-data。但是在没有node.js后端的情况下,我们可以使用在线文件存储服务,例如 Google Cloud Storage,用于存储静态应用程序资产。
Google Cloud Storage 是一种全球可用的文件存储服务,用于将任意数量的数据作为应用程序的对象存储到存储桶中。 它足够灵活,可以处理小型和大型应用程序的静态资产存储。
要在应用程序中使用云存储服务,我们可以使用可用的存储 API 端点或使用官方节点存储客户端库。 但是,Node Storage 客户端库在浏览器窗口中不起作用,因此我们可以在我们将使用该库的地方使用云函数。
这方面的一个例子是下面的云函数,它将文件连接并上传到创建的云存储桶。
const cors = require("cors")({ origin: true }); const { Storage } = require("@google-cloud/storage"); const StorageClient = new Storage(); exports.Uploader = (req, res) => { const { file } = req.body; StorageClient.bucket("TEST_BUCKET") .file(file.name) .then((response) => { console.log(response); res.status(200).send(response) }) .catch((e) => res.status(422).send({error : e})); }); };从上面的云函数中,我们正在执行以下两个主要操作:
首先,我们在
Storage constructor中创建与 Cloud Storage 的连接,它使用 Google Cloud 上的应用程序默认凭据 (ADC) 功能向 Cloud Storage 进行身份验证。其次,我们通过调用
.file方法并传入文件名,将请求正文中包含的文件上传到TEST_BUCKET。 由于这是一个异步操作,我们使用一个 Promise 来了解该操作何时已解决,并返回一个200响应,从而结束调用的生命周期。
现在,我们可以扩展上面的Uploader Cloud Function 来处理用户头像的上传。 云函数将接收用户的个人资料图像,将其存储在我们应用程序的云存储桶中,然后更新 Firestore 服务中用户集合中用户的img_uri数据。
require("dotenv").config(); const { Firestore } = require("@google-cloud/firestore"); const cors = require("cors")({ origin: true }); const { Storage } = require("@google-cloud/storage"); const StorageClient = new Storage(); const BucketName = process.env.STORAGE_BUCKET exports.Uploader = (req, res) => { return Cors(req, res, () => { const { file , userId } = req.body; const firestore = new Firestore(); const document = firestore.collection("users"); StorageClient.bucket(BucketName) .file(file.name) .on("finish", () => { StorageClient.bucket(BucketName) .file(file.name) .makePublic() .then(() => { const img_uri = `https://storage.googleapis.com/${Bucket}/${file.path}`; document .doc(userId) .update({ img_uri, }) .then((updateResult) => res.status(200).send(updateResult)) .catch((e) => res.status(500).send(e)); }) .catch((e) => console.log(e)); }); }); };现在我们扩展了上面的上传功能来执行以下额外的操作:
- 首先,它通过初始化 Firestore 构造函数与 Firestore 服务建立新连接以获取我们的
users集合,并使用应用程序默认凭据 (ADC) 向 Cloud Storage 进行身份验证。 - 上传在请求正文中添加的文件后,我们通过调用上传文件的
makePublic方法将其公开,以便通过公共 URL 访问。 根据云存储的默认访问控制,如果不公开文件,则无法通过 Internet 访问文件,并且能够在应用程序加载时执行此操作。
注意:公开文件意味着使用您的应用程序的任何人都可以复制文件链接并不受限制地访问该文件。 防止这种情况发生的一种方法是使用签名 URL 授予对存储桶中文件的临时访问权限,而不是将其完全公开。
- 接下来,我们更新用户的现有数据以包含上传文件的 URL。 我们使用 Firestore 的
WHERE查询找到特定用户的数据,并使用请求正文中包含的userId,然后我们将img_uri字段设置为包含新更新图像的 URL。
上面的Upload云功能可以在任何在 Firestore 服务中注册用户的应用程序中使用。 向端点发出POST请求所需的一切,将用户的 IS 和图像放入请求正文中。
应用程序中的一个示例是UPLOAD-FILE案例,它向函数发出POST请求,并将从请求返回的图像链接置于应用程序状态。
# index.js import Axios from 'axios' const UPLOAD_FUNCTION = process.env.REACT_APP_UPLOAD_FUNCTION export const UserReducer = (state, action) => { switch (action.type) { case "CREATE-USER" : # .....CREATE-USER-LOGIC .... case "UPLOAD-FILE": const { file, id } = action return Axios.post(UPLOAD_FUNCTION, { file, id }, { headers: { "Content-Type": "image/png", }, }) .then((response) => {}) .catch((e) => console.log(e)); default : return console.log(`${action.type} case not recognized`) } } 从上面的 switch 案例中,我们使用 Axios 向UPLOAD_FUNCTION发出POST请求,传入要包含在请求正文中的添加文件,并且我们还在请求标头中添加了图像Content-Type 。
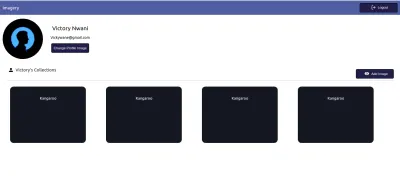
上传成功后,云函数返回的响应包含用户的数据文档,该数据文档已更新为包含上传到谷歌云存储的图像的有效 url。 然后我们可以更新用户的状态以包含新数据,这也将更新配置文件组件中用户的配置文件图像src元素。
处理 Cron 作业
重复的自动化任务,例如向用户发送电子邮件或在特定时间执行内部操作,大多数时候是应用程序的一个包含功能。 在常规的 node.js 应用程序中,可以使用 node-cron 或 node-schedule 将此类任务作为 cron 作业处理。 在使用 Google Cloud Platform 构建无服务器应用程序时,Cloud Scheduler 还旨在执行 cron 操作。
注意:虽然 Cloud Scheduler 在创建将来执行的作业方面与 Unix cron 实用程序的工作方式类似,但重要的是要注意 Cloud Scheduler 不会像 cron 实用程序那样执行命令。 相反,它使用指定的目标执行操作。
顾名思义,Cloud Scheduler 允许用户安排在未来某个时间执行的操作。 每个操作都称为一个作业,可以从 Cloud Console 的调度程序部分直观地创建、更新甚至销毁作业。 除了名称和描述字段外,Cloud Scheduler 上的作业还包括以下内容:
- 频率
这用于安排 Cron 作业的执行。 计划使用 unix-cron 格式指定,该格式最初在 Linux 环境中的 cron 表上创建后台作业时使用。 unix-cron 格式由一个包含五个值的字符串组成,每个值代表一个时间点。 下面我们可以看到五个字符串中的每一个以及它们所代表的值。
- - - - - - - - - - - - - - - - minute ( - 59 ) | - - - - - - - - - - - - - hour ( 0 - 23 ) | | - - - - - - - - - - - - day of month ( 1 - 31 ) | | | - - - - - - - - - month ( 1 - 12 ) | | | | - - - - - -- day of week ( 0 - 6 ) | | | | | | | | | | | | | | | | | | | | | | | | | * * * * *尝试为作业生成频率时间值时,Crontab 生成器工具会派上用场。 如果您发现很难将时间值放在一起,Crontab 生成器有一个可视下拉列表,您可以在其中选择构成时间表的值,然后复制生成的值并用作频率。
- 时区
执行 cron 作业的时区。 由于时区之间的时间差异,不同指定时区执行的cron作业会有不同的执行时间。 - 目标
这是执行指定作业时使用的内容。 目标可以是HTTP类型,其中作业在指定时间向 URL 或 Pub/Sub 主题发出请求,作业可以将消息发布到或从中提取消息,最后是 App Engine 应用程序。
Cloud Scheduler 与 HTTP 触发的 Cloud Functions 完美结合。 当创建 Cloud Scheduler 中的作业并将其目标设置为 HTTP 时,该作业可用于执行云功能。 所需要做的就是指定云函数的端点,指定请求的 HTTP 动词,然后在显示的正文字段中添加需要传递给函数的任何数据。 如以下示例所示:
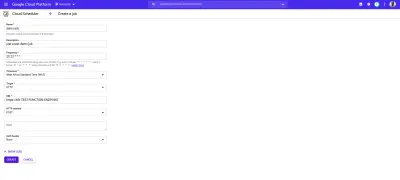
上图中的 cron 作业将在每天上午 9 点运行,向云函数的示例端点发出POST请求。
一个更现实的 cron 作业用例是使用诸如 Mailgun 之类的外部邮件服务以给定的时间间隔向用户发送预定的电子邮件。 为了看到这一点,我们将创建一个新的云函数,它使用 nodemailer JavaScript 包将 HTML 电子邮件发送到指定的电子邮件地址以连接到 Mailgun:
# index.js require("dotenv").config(); const nodemailer = require("nodemailer"); exports.Emailer = (req, res) => { let sender = process.env.SENDER; const { reciever, type } = req.body var transport = nodemailer.createTransport({ host: process.env.HOST, port: process.env.PORT, secure: false, auth: { user: process.env.SMTP_USERNAME, pass: process.env.SMTP_PASSWORD, }, }); if (!reciever) { res.status(400).send({ error: `Empty email address` }); } transport.verify(function (error, success) { if (error) { res .status(401) .send({ error: `failed to connect with stmp. check credentials` }); } }); switch (type) { case "statistics": return transport.sendMail( { from: sender, to: reciever, subject: "Your usage satistics of demo app", html: { path: "./welcome.html" }, }, (error, info) => { if (error) { res.status(401).send({ error : error }); } transport.close(); res.status(200).send({data : info}); } ); default: res.status(500).send({ error: "An available email template type has not been matched.", }); } };Using the cloud function above we can send an email to any user's email address specified as the receiver value in the request body. It performs the sending of emails through the following steps:
- It creates an SMTP transport for sending messages by passing the
host,userandpasswhich stands for password, all displayed on the user's Mailgun dashboard when a new account is created. - Next, it verifies if the SMTP transport has the credentials needed in order to establish a connection. If there's an error in establishing the connection, it ends the function's invocation and sends back a
401 unauthenticatedstatus code. - Next, it calls the
sendMailmethod to send the email containing the HTML file as the email's body to the receiver's email address specified in thetofield.
Note : We use a switch statement in the cloud function above to make it more reusable for sending several emails for different recipients. This way we can send different emails based on the type field included in the request body when calling this cloud function.
Now that there is a function that can send an email to a user; we are left with creating the cron job to invoke this cloud function. This time, the cron jobs are created dynamically each time a new user is created using the official Google cloud client library for the Cloud Scheduler from the initial firestoreFunction .
We expand the CREATE-USER case to create the job which sends the email to the created user at a one-day interval.
require("dotenv").config();cloc const { Firestore } = require("@google-cloud/firestore"); const scheduler = require("@google-cloud/scheduler") const cors = require("cors")({ origin: true }); const EMAILER = proccess.env.EMAILER_ENDPOINT const parent = ScheduleClient.locationPath( process.env.PROJECT_ID, process.env.LOCATION_ID ); exports.firestoreFunction = function (req, res) { return cors(req, res, () => { const { email, password, type } = req.body; const firestore = new Firestore(); const document = firestore.collection("users"); const client = new Scheduler.CloudSchedulerClient() if (!type) { res.status(422).send({ error : "An action type was not specified"}); } switch (type) { case "CREATE-USER":const job = { httpTarget: { uri: process.env.EMAIL_FUNCTION_ENDPOINT, httpMethod: "POST", body: { email: email, }, }, schedule: "*/30 */6 */5 10 4", timezone: "Africa/Lagos", }if (!email || !password) { res.status(422).send("email and password fields missing"); } return bcrypt.genSalt(10, (err, salt) => { bcrypt.hash(password, salt, (err, hash) => { document .add({ email: email, password: hash, }) .then((response) => {client.createJob({ parent : parent, job : job }).then(() => res.status(200).send(response)) .catch(e => console.log(`unable to create job : ${e}`) )}) .catch((e) => res.status(501).send(`error inserting data : ${e}`) ); }); }); default: res.status(422).send(`${type} is not a valid function action`) } }); };
From the snippet above, we can see the following:
- A connection to the Cloud Scheduler from the Scheduler constructor using the Application Default Credentials (ADC) is made.
- We create an object consisting of the following details which make up the cron job to be created:
-
uri
The endpoint of our email cloud function in which a request would be made to. -
body
This is the data containing the email address of the user to be included when the request is made. -
schedule
The unix cron format representing the time when this cron job is to be performed.
-
- After the promise from inserting the user's data document is resolved, we create the cron job by calling the
createJobmethod and passing in the job object and the parent. - The function's execution is ended with a
200status code after the promise from thecreateJoboperation has been resolved.
After the job is created, we'll see it listed on the scheduler page.
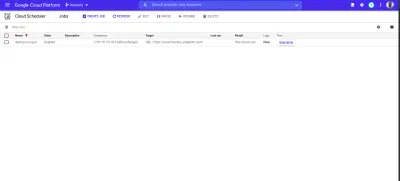
From the image above we can see the time scheduled for this job to be executed. We can decide to manually run this job or wait for it to be executed at the scheduled time.
结论
Within this article, we have had a good look into serverless applications and the benefits of using them. We also had an extensive look at how developers can manage their serverless applications on the Google Cloud using Cloud Functions so you now know how the Google Cloud is supporting the use of serverless applications.
Within the next years to come, we will certainly see a large number of developers adapt to the use of serverless applications when building applications. If you are using cloud functions in a production environment, it is recommended that you read this article from a Google Cloud advocate on “6 Strategies For Scaling Your Serverless Applications”.
The source code of the created cloud functions are available within this Github repository and also the used front-end application within this Github repository. The front-end application has been deployed using Netlify and can be tested live here.
参考
- 谷歌云
- 云函数
- 云源存储库
- Cloud Scheduler overview
- 云防火墙
- “6 Strategies For Scaling Your Serverless Applications,” Preston Holmes
