Node 入门:API、HTTP 和 ES6+ JavaScript 简介
已发表: 2022-03-10您可能听说过 Node.js 是“基于 Chrome 的 V8 JavaScript 引擎构建的异步 JavaScript 运行时”,并且它“使用事件驱动的非阻塞 I/O 模型,使其轻量且高效”。 但对某些人来说,这并不是最好的解释。
什么是节点? Node“异步”究竟意味着什么,它与“同步”有何不同? “事件驱动”和“非阻塞”到底是什么意思,Node 如何适应应用程序、互联网网络和服务器的大局?
我们将尝试在本系列中回答所有这些问题以及更多问题,因为我们将深入了解 Node 的内部工作原理,了解超文本传输协议、API 和 JSON,并使用构建我们自己的 Bookshelf API MongoDB、Express、Lodash、Mocha 和 Handlebars。
什么是 Node.js
Node 只是一个环境或运行时,在浏览器之外运行普通的 JavaScript(略有不同)。 我们可以使用它来构建桌面应用程序(使用 Electron 等框架)、编写 Web 或应用程序服务器等等。
阻塞/非阻塞和同步/异步
假设我们正在调用数据库以检索有关用户的属性。 这个调用需要时间,如果请求是“阻塞的”,那么这意味着它将阻塞我们程序的执行,直到调用完成。 在这种情况下,我们发出了一个“同步”请求,因为它最终阻塞了线程。
因此,同步操作会阻塞进程或线程,直到该操作完成,使线程处于“等待状态”。 另一方面,异步操作是非阻塞的。 它允许线程的执行继续进行,无论操作完成所需的时间或完成的结果如何,并且线程的任何部分都不会在任何时候陷入等待状态。
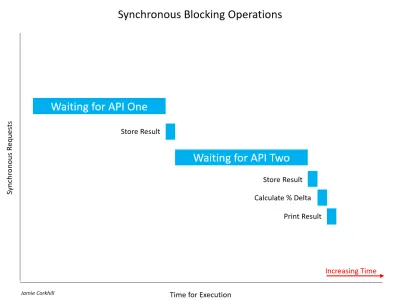
让我们看另一个阻塞线程的同步调用示例。 假设我们正在构建一个应用程序,它比较两个 Weather API 的结果以找出它们的温度差异百分比。 我们以阻塞方式调用 Weather API One 并等待结果。 一旦我们得到结果,我们调用 Weather API 2 并等待它的结果。 如果您不熟悉 API,请不要担心。 我们将在接下来的部分中介绍它们。 现在,只需将 API 视为两台计算机可以相互通信的媒介。

请允许我注意,重要的是要认识到并非所有同步调用都一定是阻塞的。 如果同步操作可以在不阻塞线程或导致等待状态的情况下完成,则它是非阻塞的。 大多数情况下,同步调用会被阻塞,它们完成所需的时间将取决于多种因素,例如 API 服务器的速度、最终用户的 Internet 连接下载速度等。
在上图的情况下,我们不得不等待很长时间才能从 API One 中检索第一个结果。 此后,我们必须等待同样长的时间才能从 API 2 获得响应。 在等待这两个响应时,用户会注意到我们的应用程序挂起——UI 会直接锁定——这对用户体验不利。
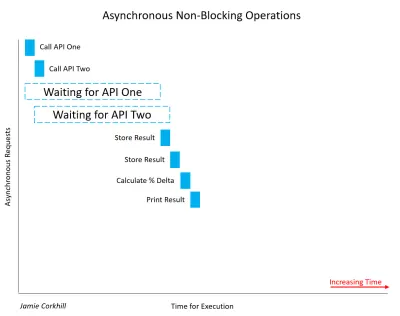
在非阻塞调用的情况下,我们会有这样的事情:

您可以清楚地看到我们完成执行的速度有多快。 与其在 API 1 上等待,然后在 API 2 上等待,我们可以等待它们同时完成并以近 50% 的速度获得我们的结果。 注意,一旦我们调用 API One 并开始等待它的响应,我们也调用 API 2 并与 API One 同时开始等待它的响应。
在这一点上,在进入更具体和具体的示例之前,重要的是要提一下,为方便起见,术语“同步”通常缩写为“同步”,而术语“异步”通常缩写为“异步”。 您将在方法/函数名称中看到此表示法。
回调函数
你可能想知道,“如果我们可以异步处理一个调用,我们怎么知道这个调用什么时候完成并且我们有响应?” 通常,我们将回调函数作为参数传递给异步方法,该方法将在稍后“回调”该函数并做出响应。 我在这里使用 ES5 函数,但我们稍后会更新到 ES6 标准。
function asyncAddFunction(a, b, callback) { callback(a + b); //This callback is the one passed in to the function call below. } asyncAddFunction(2, 4, function(sum) { //Here we have the sum, 2 + 4 = 6. }); 这样的函数被称为“高阶函数”,因为它需要一个函数(我们的回调)作为参数。 或者,回调函数可能会接收一个错误对象和一个响应对象作为参数,并在异步函数完成时显示它们。 我们稍后会在 Express 中看到这一点。 当我们调用asyncAddFunction(...)时,您会注意到我们为方法定义中的回调参数提供了一个回调函数。 这个函数是一个匿名函数(它没有名字)并且是使用Expression Syntax编写的。 另一方面,方法定义是一个函数语句。 它不是匿名的,因为它实际上有一个名称(即“asyncAddFunction”)。
有些人可能会注意到混淆,因为在方法定义中,我们确实提供了一个名称,即“回调”。 但是,作为第三个参数asyncAddFunction(...)的匿名函数不知道名称,因此它保持匿名。 我们也不能稍后按名称执行该函数,我们必须再次通过异步调用函数来触发它。
作为同步调用的示例,我们可以使用 Node.js 的readFileSync(...)方法。 同样,我们稍后将迁移到 ES6+。
var fs = require('fs'); var data = fs.readFileSync('/example.txt'); // The thread will be blocked here until complete.如果我们异步执行此操作,我们将传入一个回调函数,该函数将在异步操作完成时触发。
var fs = require('fs'); var data = fs.readFile('/example.txt', function(err, data) { //Move on, this will fire when ready. if(err) return console.log('Error: ', err); console.log('Data: ', data); // Assume var data is defined above. }); // Keep executing below, don't wait on the data. 如果您以前从未见过以这种方式使用return ,我们只是说停止函数执行,因此如果定义了错误对象,我们就不会打印数据对象。 我们也可以将 log 语句包装在else子句中。
就像我们的asyncAddFunction(...)一样, fs.readFile(...)函数背后的代码类似于:
function readFile(path, callback) { // Behind the scenes code to read a file stream. // The data variable is defined up here. callback(undefined, data); //Or, callback(err, undefined); }让我们看看异步函数调用的最后一个实现。 这将有助于巩固稍后触发回调函数的想法,并有助于我们理解典型 Node.js 程序的执行。
setTimeout(function() { // ... }, 1000); setTimeout(...)方法为第一个参数接收一个回调函数,该函数将在指定为第二个参数的毫秒数发生后触发。
让我们看一个更复杂的例子:
console.log('Initiated program.'); setTimeout(function() { console.log('3000 ms (3 sec) have passed.'); }, 3000); setTimeout(function() { console.log('0 ms (0 sec) have passed.'); }, 0); setTimeout(function() { console.log('1000 ms (1 sec) has passed.'); }, 1000); console.log('Terminated program');我们收到的输出是:
Initiated program. Terminated program. 0 ms (0 sec) have passed. 1000 ms (1 sec) has passed. 3000 ms (3 sec) have passed. 您可以看到第一个日志语句按预期运行。 瞬间,最后一条日志语句打印到屏幕上,因为这发生在第二个setTimeout(...)之后超过 0 秒之前。 紧接着,第二个、第三个和第一个setTimeout(...)方法执行。
如果 Node.js 不是非阻塞的,我们会看到第一个日志语句,等待 3 秒才能看到下一个,立即看到第三个(0 秒setTimeout(...) ,然后必须再等待一个秒看最后两条日志语句。Node 的非阻塞特性使所有计时器从程序执行的那一刻开始倒计时,而不是按键入的顺序倒计时。您可能需要查看 Node API,the调用堆栈和事件循环以获取有关 Node 如何在后台工作的更多信息。
需要注意的是,仅仅因为您看到回调函数并不一定意味着代码中有异步调用。 我们将上面的asyncAddFunction(…)方法称为“async”,因为我们假设该操作需要时间才能完成——例如调用服务器。 实际上,将两个数字相加的过程不是异步的,因此这实际上是一个使用回调函数的示例,它实际上不会阻塞线程。
回调的承诺
回调在 JavaScript 中很快就会变得混乱,尤其是多个嵌套的回调。 我们熟悉将回调作为参数传递给函数,但 Promise 允许我们将回调附加到从函数返回的对象上。 这将使我们能够以更优雅的方式处理多个异步调用。
例如,假设我们正在进行 API 调用,而我们的函数(不是唯一命名为“ makeAPICall(...) ”)接受一个 URL 和一个回调。
我们的函数makeAPICall(...)将被定义为
function makeAPICall(path, callback) { // Attempt to make API call to path argument. // ... callback(undefined, res); // Or, callback(err, undefined); depending upon the API's response. }我们会这样称呼它:
makeAPICall('/example', function(err1, res1) { if(err1) return console.log('Error: ', err1); // ... }); 如果我们想使用第一次的响应进行另一个 API 调用,我们将不得不嵌套两个回调。 假设我需要将res1对象中的userName属性注入到第二个 API 调用的路径中。 我们会有:
makeAPICall('/example', function(err1, res1) { if(err1) return console.log('Error: ', err1); makeAPICall('/newExample/' + res1.userName, function(err2, res2) { if(err2) return console.log('Error: ', err2); console.log(res2); }); }); 注意:注入res1.userName属性而不是字符串连接的 ES6+ 方法是使用“模板字符串”。 这样,我们将使用反引号( ` )而不是将我们的字符串封装在引号( '或" )中。位于键盘上的 Escape 键下方。然后,我们将使用符号${}将任何 JS 表达式嵌入其中最后,我们之前的路径是: /newExample/${res.UserName} ,用反引号括起来。
很明显,这种嵌套回调的方法很快就会变得非常不优雅,即所谓的“JavaScript 末日金字塔”。 进入,如果我们使用 Promise 而不是回调,我们可以从第一个示例中重构我们的代码,如下所示:
makeAPICall('/example').then(function(res) { // Success callback. // ... }, function(err) { // Failure callback. console.log('Error:', err); }); then()函数的第一个参数是我们的成功回调,第二个参数是我们的失败回调。 或者,我们可以将第二个参数丢失给 .then( .then() ,并改为调用.catch() 。 .then( .then()的参数是可选的,调用.catch()将等效于.then(successCallback, null) 。
使用.catch() ,我们有:
makeAPICall('/example').then(function(res) { // Success callback. // ... }).catch(function(err) { // Failure Callback console.log('Error: ', err); });我们还可以对其进行重构以提高可读性:
makeAPICall('/example') .then(function(res) { // ... }) .catch(function(err) { console.log('Error: ', err); }); 重要的是要注意,我们不能只在任何函数上添加.then()调用并期望它能够工作。 我们调用的函数必须实际返回一个 Promise,一个 Promise 会在异步操作完成时触发.then() 。 在这种情况下, makeAPICall(...)会做它的事情,完成时触发then()块或catch()块。
为了使makeAPICall(...)返回一个 Promise,我们将一个函数分配给一个变量,其中该函数是 Promise 构造函数。 Promise 可以被执行或被拒绝,其中被执行意味着与承诺相关的动作成功完成,被拒绝意味着相反。 一旦承诺被履行或被拒绝,我们就说它已经解决,在等待它解决的时候,也许在异步调用期间,我们说承诺是未决的。
Promise 构造函数接受一个回调函数作为参数,它接收两个参数resolve和reject ,我们将在稍后调用它们来触发.then()中的成功回调或.then()失败回调或.catch() (如果提供)。
这是一个示例:
var examplePromise = new Promise(function(resolve, reject) { // Do whatever we are going to do and then make the appropiate call below: resolve('Happy!'); // — Everything worked. reject('Sad!'); // — We noticed that something went wrong. }):然后,我们可以使用:
examplePromise.then(/* Both callback functions in here */); // Or, the success callback in .then() and the failure callback in .catch(). 但是请注意, examplePromise不能接受任何参数。 这种方式违背了目的,所以我们可以返回一个承诺。
function makeAPICall(path) { return new Promise(function(resolve, reject) { // Make our async API call here. if (/* All is good */) return resolve(res); //res is the response, would be defined above. else return reject(err); //err is error, would be defined above. }); } Promise 确实可以通过“Promise Chaining”的概念来改进我们的代码的结构,进而提高代码的优雅性。 这将允许我们在.then()子句中返回一个新的 Promise,因此我们可以在其后附加第二个.then() ,这将从第二个 Promise 触发适当的回调。
用 Promises 重构我们上面的多 API URL 调用,我们得到:
makeAPICall('/example').then(function(res) { // First response callback. Fires on success to '/example' call. return makeAPICall(`/newExample/${res.UserName}`); // Returning new call allows for Promise Chaining. }, function(err) { // First failure callback. Fires if there is a failure calling with '/example'. console.log('Error:', err); }).then(function(res) { // Second response callback. Fires on success to returned '/newExample/...' call. console.log(res); }, function(err) { // Second failure callback. Fire if there is a failure calling with '/newExample/...' console.log('Error:', err); }); 请注意,我们首先调用makeAPICall('/example') 。 这会返回一个承诺,因此我们附加一个.then() 。 在then()内部,我们返回一个对makeAPICall(...)的新调用,它本身,如前所述,返回一个承诺,允许我们在第一个之后链接一个新的.then() 。
像上面一样,我们可以重构它以提高可读性,并删除通用catch() all 子句的失败回调。 然后,我们可以遵循 DRY 原则(Don't Repeat Yourself),只需要实现一次错误处理。
makeAPICall('/example') .then(function(res) { // Like earlier, fires with success and response from '/example'. return makeAPICall(`/newExample/${res.UserName}`); // Returning here lets us chain on a new .then(). }) .then(function(res) { // Like earlier, fires with success and response from '/newExample'. console.log(res); }) .catch(function(err) { // Generic catch all method. Fires if there is an err with either earlier call. console.log('Error: ', err); }); 请注意, .then()中的成功和失败回调仅针对.then()对应的单个 Promise 的状态触发。 但是, catch块将捕获在任何.then()中触发的任何错误。
ES6 Const vs. Let
在我们所有的示例中,我们一直在使用 ES5 函数和旧的var关键字。 虽然今天仍有数百万行代码使用这些 ES5 方法运行,但更新到当前的 ES6+ 标准很有用,我们将重构上面的一些代码。 让我们从const和let开始。
您可能习惯于使用var关键字声明变量:
var pi = 3.14;使用 ES6+ 标准,我们可以做到这一点
let pi = 3.14;要么
const pi = 3.14; 其中const表示“常量”——一个以后不能重新分配的值。 (除了对象属性——我们很快就会介绍。另外,声明为const的变量不是不可变的,只有对变量的引用是。)
在旧的 JavaScript 中,块作用域,例如if 、 while 、 {}中的那些。 for等不会以任何方式影响var ,这与 Java 或 C++ 等更多静态类型的语言完全不同。 也就是说, var的作用域是整个封闭函数——它可以是全局的(如果放置在函数之外),也可以是局部的(如果放置在函数内)。 为了证明这一点,请参见以下示例:
function myFunction() { var num = 5; console.log(num); // 5 console.log('--'); for(var i = 0; i < 10; i++) { var num = i; console.log(num); //num becomes 0 — 9 } console.log('--'); console.log(num); // 9 console.log(i); // 10 } myFunction();输出:
5 --- 0 1 2 3 ... 7 8 9 --- 9 10 这里要注意的重要一点是,在for范围内定义一个新的var num直接影响了for外部和之上的var num 。 这是因为var的范围始终是封闭函数的范围,而不是块。
同样,默认情况下, for()中的var i默认为myFunction的范围,因此我们可以在循环外访问i并获得 10。
在给变量赋值方面, let等价于var ,只是let有块作用域,所以上面var出现的异常不会发生。
function myFunction() { let num = 5; console.log(num); // 5 for(let i = 0; i < 10; i++) { let num = i; console.log('--'); console.log(num); // num becomes 0 — 9 } console.log('--'); console.log(num); // 5 console.log(i); // undefined, ReferenceError } 查看const关键字,您可以看到如果我们尝试重新分配给它,我们会遇到错误:
const c = 299792458; // Fact: The constant "c" is the speed of light in a vacuum in meters per second. c = 10; // TypeError: Assignment to constant variable. 当我们将const变量分配给对象时,事情变得有趣了:
const myObject = { name: 'Jane Doe' }; // This is illegal: TypeError: Assignment to constant variable. myObject = { name: 'John Doe' }; // This is legal. console.log(myObject.name) -> John Doe myObject.name = 'John Doe'; 如您所见,只有内存中对分配给const对象的对象的引用是不可变的,而不是其自身的值。
ES6 箭头函数
您可能习惯于创建这样的函数:
function printHelloWorld() { console.log('Hello, World!'); }使用箭头函数,这将变为:
const printHelloWorld = () => { console.log('Hello, World!'); };假设我们有一个返回数字平方的简单函数:
const squareNumber = (x) => { return x * x; } squareNumber(5); // We can call an arrow function like an ES5 functions. Returns 25.你可以看到,就像 ES5 函数一样,我们可以接受带括号的参数,我们可以使用正常的 return 语句,我们可以像调用其他函数一样调用函数。
需要注意的是,如果我们的函数不带参数(如上面的printHelloWorld() ),则需要括号,如果只带一个,我们可以删除括号,因此我们之前的squareNumber()方法定义可以重写为:
const squareNumber = x => { // Notice we have dropped the parentheses for we only take in one argument. return x * x; }是否选择将单个参数封装在括号中是个人喜好问题,您可能会看到开发人员同时使用这两种方法。
最后,如果我们只想隐式返回一个表达式,就像上面的squareNumber(...)一样,我们可以将 return 语句与方法签名对齐:
const squareNumber = x => x * x;那是,
const test = (a, b, c) => expression是相同的
const test = (a, b, c) => { return expression }请注意,当使用上述速记隐式返回对象时,事情变得模糊不清。 是什么阻止 JavaScript 相信我们需要封装对象的括号不是我们的函数体? 为了解决这个问题,我们将对象的括号括在括号中。 这明确地让 JavaScript 知道我们确实在返回一个对象,而不仅仅是定义一个主体。
const test = () => ({ pi: 3.14 }); // Spaces between brackets are a formality to make the code look cleaner.为了帮助巩固 ES6 函数的概念,我们将重构一些早期的代码,以便我们比较两种表示法之间的差异。
上面的asyncAddFunction(...)可以重构为:
function asyncAddFunction(a, b, callback){ callback(a + b); }到:
const aysncAddFunction = (a, b, callback) => { callback(a + b); };甚至:
const aysncAddFunction = (a, b, callback) => callback(a + b); // This will return callback(a + b).调用函数时,我们可以为回调传入一个箭头函数:
asyncAddFunction(10, 12, sum => { // No parentheses because we only take one argument. console.log(sum); }可以清楚地看到这种方法如何提高代码的可读性。 为了向您展示一个案例,我们可以使用上面基于 ES5 Promise 的旧示例,并将其重构为使用箭头函数。
makeAPICall('/example') .then(res => makeAPICall(`/newExample/${res.UserName}`)) .then(res => console.log(res)) .catch(err => console.log('Error: ', err)); 现在,箭头函数有一些注意事项。 一方面,它们不绑定this关键字。 假设我有以下对象:
const Person = { name: 'John Doe', greeting: () => { console.log(`Hi. My name is ${this.name}.`); } } 您可能期望调用Person.greeting()将返回“Hi. 我叫约翰·多伊。” 相反,我们得到:“嗨。 我的名字不详。” 这是因为箭头函数没有this ,因此尝试在箭头函数内部使用this默认为封闭范围的this ,而Person对象的封闭范围是window ,在浏览器中,或module.exports在节点。
为了证明这一点,如果我们再次使用同一个对象,但将全局this的name属性设置为类似于 'Jane Doe',那么箭头函数中的this.name将返回 'Jane Doe',因为全局this在封闭范围,或者是Person对象的父对象。
this.name = 'Jane Doe'; const Person = { name: 'John Doe', greeting: () => { console.log(`Hi. My name is ${this.name}.`); } } Person.greeting(); // Hi. My name is Jane Doe这被称为“词法范围”,我们可以通过使用所谓的“短语法”来绕过它,这是我们丢失冒号和箭头的地方,以便重构我们的对象:
const Person = { name: 'John Doe', greeting() { console.log(`Hi. My name is ${this.name}.`); } } Person.greeting() //Hi. My name is John Doe.ES6 类
虽然 JavaScript 从不支持类,但您始终可以使用上述对象来模拟它们。 EcmaScript 6 为使用class和new关键字的类提供支持:
class Person { constructor(name) { this.name = name; } greeting() { console.log(`Hi. My name is ${this.name}.`); } } const person = new Person('John'); person.greeting(); // Hi. My name is John. 使用new关键字时会自动调用构造函数,我们可以向其中传递参数以初始设置对象。 任何有使用更多静态类型的面向对象编程语言(如 Java、C++ 和 C#)经验的读者都应该熟悉这一点。
无需过多介绍 OOP 概念,另一种这样的范式是“继承”,即允许一个类从另一个类继承。 例如,一个名为Car的类将非常通用——包含所有汽车都需要的“stop”、“start”等方法。 那么,一个名为SportsCar的类的子集可能会从Car继承基本操作并覆盖它需要自定义的任何内容。 我们可以将这样的类表示如下:
class Car { constructor(licensePlateNumber) { this.licensePlateNumber = licensePlateNumber; } start() {} stop() {} getLicensePlate() { return this.licensePlateNumber; } // … } class SportsCar extends Car { constructor(engineRevCount, licensePlateNumber) { super(licensePlateNumber); // Pass licensePlateNumber up to the parent class. this.engineRevCount = engineRevCount; } start() { super.start(); } stop() { super.stop(); } getLicensePlate() { return super.getLicensePlate(); } getEngineRevCount() { return this.engineRevCount; } } 您可以清楚地看到super关键字允许我们从父类或超级类访问属性和方法。
JavaScript 事件
事件是您有能力响应的发生的动作。 假设您正在为您的应用程序构建一个登录表单。 当用户按下“提交”按钮时,您可以通过代码中的“事件处理程序”(通常是一个函数)对该事件做出反应。 当这个函数被定义为事件处理程序时,我们说我们正在“注册一个事件处理程序”。 提交按钮单击的事件处理程序可能会检查用户提供的输入的格式,对其进行清理以防止诸如 SQL 注入或跨站点脚本之类的攻击(请注意,不能考虑客户端上的任何代码安全。始终清理服务器上的数据——从不信任浏览器中的任何内容),然后检查该用户名和密码组合是否存在于数据库中以验证用户并为他们提供令牌。
由于这是一篇关于 Node 的文章,我们将重点关注 Node 事件模型。
我们可以使用 Node 中的events模块来发出和响应特定事件。 任何发出事件的对象都是EventEmitter类的实例。
我们可以通过调用emit()方法发出一个事件,并通过on()方法监听该事件,这两个方法都通过EventEmitter类公开。
const EventEmitter = require('events'); const myEmitter = new EventEmitter(); myEmitter现在是EventEmitter类的一个实例,我们可以访问emit()和on() :
const EventEmitter = require('events'); const myEmitter = new EventEmitter(); myEmitter.on('someEvent', () => { console.log('The "someEvent" event was fired (emitted)'); }); myEmitter.emit('someEvent'); // This will call the callback function above. myEmitter.on()的第二个参数是事件发出时将触发的回调函数——这是事件处理程序。 第一个参数是事件的名称,可以是我们喜欢的任何名称,但建议使用 camelCase 命名约定。
此外,事件处理程序可以采用任意数量的参数,这些参数在事件发出时传递:
const EventEmitter = require('events'); const myEmitter = new EventEmitter(); myEmitter.on('someEvent', (data) => { console.log(`The "someEvent" event was fired (emitted) with data: ${data}`); }); myEmitter.emit('someEvent', 'This is the data payload'); 通过使用继承,我们可以将 'EventEmitter' 的emit()和on()方法暴露给任何类。 这是通过创建一个 Node.js 类并使用extends保留关键字来继承EventEmitter上可用的属性来完成的:
const EventEmitter = require('events'); class MyEmitter extends EventEmitter { // This is my class. I can emit events from a MyEmitter object. } 假设我们正在构建一个车辆碰撞通知程序,该程序接收来自车体上的陀螺仪、加速度计和压力计的数据。 当车辆与物体碰撞时,那些外部传感器将检测到碰撞,执行collide(...)函数并将聚合的传感器数据作为一个不错的 JavaScript 对象传递给它。 此函数将发出一个collision事件,通知供应商发生了碰撞。
const EventEmitter = require('events'); class Vehicle extends EventEmitter { collide(collisionStatistics) { this.emit('collision', collisionStatistics) } } const myVehicle = new Vehicle(); myVehicle.on('collision', collisionStatistics => { console.log('WARNING! Vehicle Impact Detected: ', collisionStatistics); notifyVendor(collisionStatistics); }); myVehicle.collide({ ... }); 这是一个复杂的示例,因为我们可以将代码放在类的碰撞函数中的事件处理程序中,但它仍然演示了节点事件模型的功能。 请注意,一些教程将显示允许对象发出事件的util.inherits()方法。 这已被 ES6 Classes 和extends弃用。

节点包管理器
使用 Node 和 JavaScript 进行编程时,经常会听到npm 。 Npm 是一个包管理器,它可以做到这一点——允许下载解决 JavaScript 中常见问题的第三方包。 Yarn、Npx、Grunt 和 Bower 等其他解决方案也存在,但在本节中,我们将只关注npm以及如何使用它通过简单的命令行界面 (CLI) 为应用程序安装依赖项。
让我们从简单的开始,只npm 。 访问 NpmJS 主页以查看 NPM 提供的所有包。 当您启动一个将依赖于 NPM 包的新项目时,您必须通过项目根目录中的终端运行npm init 。 您将被问到一系列问题,这些问题将用于创建package.json文件。 此文件存储您的所有依赖项——应用程序依赖于运行的模块、脚本——用于运行测试、构建项目、启动开发服务器等的预定义终端命令,等等。
要安装一个包,只需运行npm install [package-name] --save 。 save标志将确保包及其版本记录在package.json文件中。 从npm版本 5 开始,默认情况下会保存依赖项,因此--save可以省略。 您还会注意到一个新的node_modules文件夹,其中包含您刚刚安装的那个包的代码。 这也可以缩短为npm i [package-name] 。 作为一个有用的说明, node_modules文件夹由于其大小不应该包含在 GitHub 存储库中。 每当您从 GitHub(或任何其他版本管理系统)克隆存储库时,请务必运行命令npm install以获取并获取package.json文件中定义的所有包,自动创建node_modules目录。 您还可以安装特定版本的包:例如npm i [package-name]@1.10.1 --save 。
删除一个包类似于安装一个: npm remove [package-name] 。
您还可以全局安装软件包。 该软件包将适用于所有项目,而不仅仅是您正在处理的项目。 您可以在npm i [package-name]之后使用-g标志执行此操作。 这通常用于 CLI,例如 Google Firebase 和 Heroku。 尽管这种方法很容易,但通常认为全局安装包是不好的做法,因为它们没有保存在package.json文件中,如果其他开发人员尝试使用您的项目,他们将无法获得所有必需的依赖项npm install 。
API 和 JSON
API 是编程中非常常见的范例,即使您刚刚开始作为开发人员的职业生涯,API 及其使用,尤其是在 Web 和移动开发中,也可能会经常出现。
API是一种应用程序编程接口,它基本上是两个解耦系统可以相互通信的方法。 在更专业的术语中,API 允许系统或计算机程序(通常是服务器)接收请求并发送适当的响应(到客户端,也称为主机)。
假设您正在构建一个天气应用程序。 您需要一种将用户地址地理编码为纬度和经度的方法,然后需要一种方法来获得该特定位置的当前或预测天气。
作为开发人员,您希望专注于构建您的应用程序并将其货币化,而不是将基础设施到位以对地址进行地理编码或在每个城市放置气象站。
Luckily for you, companies like Google and OpenWeatherMap have already put that infrastructure in place, you just need a way to talk to it — that is where the API comes in. While, as of now, we have developed a very abstract and ambiguous definition of the API, bear with me. We'll be getting to tangible examples soon.
Now, it costs money for companies to develop, maintain, and secure that aforementioned infrastructure, and so it is common for corporations to sell you access to their API. This is done with that is known as an API key, a unique alphanumeric identifier associating you, the developer, with the API. Every time you ask the API to send you data, you pass along your API key. The server can then authenticate you and keep track of how many API calls you are making, and you will be charged appropriately. The API key also permits Rate-Limiting or API Call Throttling (a method of throttling the number of API calls in a certain timeframe as to not overwhelm the server, preventing DOS attacks — Denial of Service). Most companies, however, will provide a free quota, giving you, as an example, 25,000 free API calls a day before charging you.
Up to this point, we have established that an API is a method by which two computer programs can communicate with each other. If a server is storing data, such as a website, and your browser makes a request to download the code for that site, that was the API in action.
Let us look at a more tangible example, and then we'll look at a more real-world, technical one. Suppose you are eating out at a restaurant for dinner. You are equivalent to the client, sitting at the table, and the chef in the back is equivalent to the server.
Since you will never directly talk to the chef, there is no way for him/her to receive your request (for what order you would like to make) or for him/her to provide you with your meal once you order it. We need someone in the middle. In this case, it's the waiter, analogous to the API. The API provides a medium with which you (the client) may talk to the server (the chef), as well as a set of rules for how that communication should be made (the menu — one meal is allowed two sides, etc.)
Now, how do you actually talk to the API (the waiter)? You might speak English, but the chef might speak Spanish. Is the waiter expected to know both languages to translate? What if a third person comes in who only speaks Mandarin? 然后怎样呢? Well, all clients and servers have to agree to speak a common language, and in computer programming, that language is JSON, pronounced JAY-sun, and it stands for JavaScript Object Notation.
At this point, we don't quite know what JSON looks like. It's not a computer programming language, it's just, well, a language, like English or Spanish, that everyone (everyone being computers) understands on a guaranteed basis. It's guaranteed because it's a standard, notably RFC 8259 , the JavaScript Object Notation (JSON) Data Interchange Format by the Internet Engineering Task Force (IETF).
Even without formal knowledge of what JSON actually is and what it looks like (we'll see in an upcoming article in this series), we can go ahead introduce a technical example operating on the Internet today that employs APIs and JSON. APIs and JSON are not just something you can choose to use, it's not equivalent to one out of a thousand JavaScript frameworks you can pick to do the same thing. It is THE standard for data exchange on the web.
Suppose you are building a travel website that compares prices for aircraft, rental car, and hotel ticket prices. Let us walk through, step-by-step, on a high level, how we would build such an application. Of course, we need our User Interface, the front-end, but that is out of scope for this article.
We want to provide our users with the lowest price booking method. Well, that means we need to somehow attain all possible booking prices, and then compare all of the elements in that set (perhaps we store them in an array) to find the smallest element (known as the infimum in mathematics.)
How will we get this data? Well, suppose all of the booking sites have a database full of prices. Those sites will provide an API, which exposes the data in those databases for use by you. You will call each API for each site to attain all possible booking prices, store them in your own array, find the lowest or minimum element of that array, and then provide the price and booking link to your user. We'll ask the API to query its database for the price in JSON, and it will respond with said price in JSON to us. We can then use, or parse, that accordingly. We have to parse it because APIs will return JSON as a string, not the actual JavaScript data type of JSON. This might not make sense now, and that's okay. We'll be covering it more in a future article.
Also, note that just because something is called an API does not necessarily mean it operates on the web and sends and receives JSON. The Java API, for example, is just the list of classes, packages, and interfaces that are part of the Java Development Kit (JDK), providing programming functionality to the programmer.
好的。 We know we can talk to a program running on a server by way of an Application Programming Interface, and we know that the common language with which we do this is known as JSON. But in the web development and networking world, everything has a protocol. What do we actually do to make an API call, and what does that look like code-wise? That's where HTTP Requests enter the picture, the HyperText Transfer Protocol, defining how messages are formatted and transmitted across the Internet. Once we have an understanding of HTTP (and HTTP verbs, you'll see that in the next section), we can look into actual JavaScript frameworks and methods (like fetch() ) offered by the JavaScript API (similar to the Java API), that actually allow us to make API calls.
HTTP And HTTP Requests
HTTP is the HyperText Transfer Protocol. It is the underlying protocol that determines how messages are formatted as they are transmitted and received across the web. Let's think about what happens when, for example, you attempt to load the home page of Smashing Magazine in your web browser.
You type the website URL (Uniform Resource Locator) in the URL bar, where the DNS server (Domain Name Server, out of scope for this article) resolves the URL into the appropriate IP Address. The browser makes a request, called a GET Request, to the Web Server to, well, GET the underlying HTML behind the site. The Web Server will respond with a message such as “OK”, and then will go ahead and send the HTML down to the browser where it will be parsed and rendered accordingly.
这里有几点需要注意。 First, the GET Request, and then the “OK” response. Suppose you have a specific database, and you want to write an API to expose that database to your users. Suppose the database contains books the user wants to read (as it will in a future article in this series). Then there are four fundamental operations your user may want to perform on this database, that is, Create a record, Read a record, Update a record, or Delete a record, known collectively as CRUD operations.
Let's look at the Read operation for a moment. Without incorrectly assimilating or conflating the notion of a web server and a database, that Read operation is very similar to your web browser attempting to get the site from the server, just as to read a record is to get the record from the database.
这称为 HTTP 请求。 您正在向某处的某个服务器发出请求以获取一些数据,因此,该请求被适当地命名为“GET”,大写是表示此类请求的标准方式。
那么 CRUD 的 Create 部分呢? 好吧,当谈到 HTTP 请求时,这就是所谓的 POST 请求。 就像您可以在社交媒体平台上发布消息一样,您也可以将新记录发布到数据库中。
CRUD 的更新允许我们使用 PUT 或 PATCH 请求来更新资源。 HTTP 的 PUT 将创建一条新记录或更新/替换旧记录。
让我们更详细地看一下,然后我们将进入 PATCH。
API 通常通过向 URL 中的特定路由发出 HTTP 请求来工作。 假设我们正在制作一个 API 来与包含用户书单的数据库对话。 然后我们也许可以在 URL .../books上查看这些书。 对.../books的 POST 请求将使用您在.../books路由中定义的任何属性(想想 id、标题、ISBN、作者、发布数据等)创建一本新书。 现在将所有书籍存储在.../books的底层数据结构是什么并不重要。 我们只关心 API 公开那个端点(通过路由访问)来操作数据。 前面的句子很关键:一个 POST 请求在...books/路由上创建一本新书。 因此,PUT 和 POST 之间的区别在于,如果不存在这样的书,PUT 将创建一本新书(与 POST 一样),或者,如果该书已经存在于上述数据结构中,它将替换现有书。
假设每本书具有以下属性:id、title、ISBN、author、hasRead(布尔值)。
然后添加一本新书,如前所述,我们将向.../books发出 POST 请求。 如果我们想完全更新或替换一本书,我们将向.../books/id发出 PUT 请求,其中id是我们要替换的书的 ID。
虽然 PUT 完全替换了现有书籍,但 PATCH 更新了与特定书籍有关的内容,可能会修改我们在上面定义的hasRead布尔属性——因此我们会向…/books/id发出 PATCH 请求,发送新数据。
现在可能很难理解它的含义,因为到目前为止,我们已经在理论上建立了一切,但还没有看到任何实际发出 HTTP 请求的有形代码。 但是,我们很快就会谈到这一点,本文将介绍 GET,其余部分将在以后的文章中介绍。
最后一个基本的 CRUD 操作称为删除。 如您所料,这种 HTTP 请求的名称是“DELETE”,它的工作方式与 PATCH 非常相似,需要在路由中提供图书的 ID。
到目前为止,我们已经了解到,路由是您向其发出 HTTP 请求的特定 URL,并且端点是 API 提供的函数,对它公开的数据做一些事情。 也就是说,端点是位于路由另一端的编程语言函数,它执行您指定的任何 HTTP 请求。 我们还了解到,存在诸如 POST、GET、PUT、PATCH、DELETE 等术语(称为 HTTP 动词),它们实际上指定了您对 API 发出的请求。 与 JSON 一样,这些 HTTP 请求方法是由 Internet 工程任务组 (IETF) 定义的 Internet 标准,最值得注意的是 RFC 7231,第 4 节:请求方法和 RFC 5789,第 2 节:补丁方法,其中 RFC 是征求意见。
因此,我们可能会向 URL .../books/id发出 GET 请求,其中传入的 ID 称为参数。 我们可以向.../books发出 POST、PUT 或 PATCH 请求来创建资源,或者向.../books/id发出修改/替换/更新资源的请求。 我们还可以向.../books/id发出 DELETE 请求以删除特定书籍。
可以在此处找到 HTTP 请求方法的完整列表。
还需要注意的是,在发出 HTTP 请求后,我们会收到响应。 具体响应取决于我们如何构建 API,但您应该始终收到状态码。 之前,我们说过,当您的网络浏览器向网络服务器请求 HTML 时,它会以“OK”响应。 这称为 HTTP 状态代码,更具体地说,是 HTTP 200 OK。 状态码仅指定端点中指定的操作或动作(请记住,这是我们完成所有工作的函数)如何完成。 HTTP 状态码是服务器发回的,可能有很多你熟悉的,比如 404 Not Found(找不到资源或文件,这就像向.../books/id发出 GET 请求一样) .../books/id不存在这样的 ID。)
可以在此处找到 HTTP 状态代码的完整列表。
MongoDB
MongoDB 是一种类似于 Firebase 实时数据库的非关系型 NoSQL 数据库。 您将通过 Node 包(例如 MongoDB Native Driver 或 Mongoose)与数据库通信。
在 MongoDB 中,数据存储在 JSON 中,这与 MySQL、PostgreSQL 或 SQLite 等关系数据库有很大不同。 两者都称为数据库,SQL 表称为集合,SQL 表行称为文档,SQL 表列称为字段。
当我们创建我们的第一个 Bookshelf API 时,我们将在本系列的下一篇文章中使用 MongoDB 数据库。 上面列出的基本 CRUD 操作可以在 MongoDB 数据库上执行。
建议您通读 MongoDB 文档以了解如何在 Atlas Cluster 上创建实时数据库并使用 MongoDB Native Driver 对其进行 CRUD 操作。 在本系列的下一篇文章中,我们将学习如何设置本地数据库和云生产数据库。
构建命令行节点应用程序
在构建应用程序时,您会看到许多作者在文章开头转储了他们的整个代码库,然后尝试解释其后的每一行。 在本文中,我将采用不同的方法。 我将逐行解释我的代码,同时构建应用程序。 我不会担心模块化或性能,不会将代码库拆分为单独的文件,也不会遵循 DRY 原则或尝试使代码可重用。 刚学习时,让事情尽可能简单是很有用的,这就是我将在这里采用的方法。
让我们清楚我们正在构建什么。 我们不会关心用户输入,所以我们不会使用像 Yargs 这样的包。 我们也不会构建自己的 API。 当我们使用 Express Web 应用程序框架时,这将在本系列的后续文章中介绍。 我采用这种方法是为了不将 Node.js 与 Express 和 API 的强大功能混为一谈,因为大多数教程都是这样做的。 相反,我将提供一种(多种)方法来调用和接收来自使用第三方 JavaScript 库的外部 API 的数据。 我们将调用的 API 是 Weather API,我们将从 Node 访问它并将其输出转储到终端,可能带有一些格式,称为“漂亮打印”。 我将介绍整个过程,包括如何设置 API 和获取 API 密钥,其步骤提供了截至 2019 年 1 月的正确结果。
我们将为此项目使用 OpenWeatherMap API,因此要开始使用,请导航到 OpenWeatherMap 注册页面并使用表单创建一个帐户。 登录后,在仪表板页面上找到 API Keys 菜单项(位于此处)。 如果您刚刚创建了一个帐户,则必须为您的 API 密钥选择一个名称并点击“生成”。 您的新 API 密钥可能需要至少 2 小时才能正常运行并与您的帐户关联。
在开始构建应用程序之前,我们将访问 API 文档以了解如何格式化我们的 API 密钥。 在这个项目中,我们将指定一个邮政编码和一个国家代码来获取该位置的天气信息。
从文档中,我们可以看到我们这样做的方法是提供以下 URL:
api.openweathermap.org/data/2.5/weather?zip={zip code},{country code}我们可以向其中输入数据:
api.openweathermap.org/data/2.5/weather?zip=94040,us现在,在我们真正从这个 API 获取相关数据之前,我们需要提供我们的新 API Key 作为查询参数:
api.openweathermap.org/data/2.5/weather?zip=94040,us&appid={YOUR_API_KEY} 现在,将该 URL 复制到 Web 浏览器的新选项卡中,将{YOUR_API_KEY}占位符替换为您之前注册帐户时获得的 API 密钥。
您可以看到的文本实际上是 JSON — 如前所述,这是公认的网络语言。
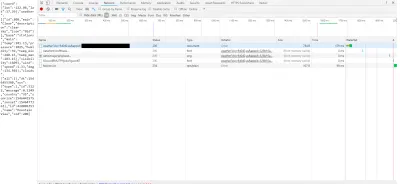
要进一步检查,请在 Google Chrome 中按 Ctrl + Shift + I打开 Chrome 开发人员工具,然后导航到网络选项卡。 目前这里应该没有数据。

要实际监控网络数据,请重新加载页面,然后观察选项卡中是否填充了有用的信息。 单击下图所示的第一个链接。

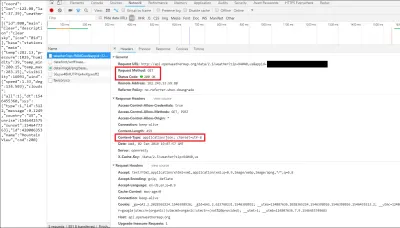
单击该链接后,我们实际上可以查看 HTTP 特定信息,例如标头。 标头在 API 的响应中发送(在某些情况下,您还可以将自己的标头发送到 API,或者您甚至可以创建自己的自定义标头(通常以x-为前缀)以在构建自己的 API 时发回),并且只包含客户端或服务器可能需要的额外信息。
在这种情况下,您可以看到我们向 API 发出了 HTTP GET 请求,它以 HTTP 状态 200 OK 响应。 您还可以看到发回的数据采用 JSON 格式,如“响应标头”部分中所列。

如果您点击预览选项卡,您实际上可以将 JSON 视为 JavaScript 对象。 您可以在浏览器中看到的文本版本是一个字符串,因为 JSON 始终作为字符串在 Web 上传输和接收。 这就是为什么我们必须在我们的代码中解析 JSON,以将其转换为更易读的格式——在这种情况下(几乎在所有情况下)——一个 JavaScript 对象。
您还可以使用 Google Chrome 扩展程序“JSON View”自动执行此操作。
要开始构建我们的应用程序,我将打开一个终端并创建一个新的根目录,然后cd进入它。 进入后,我将创建一个新的app.js文件,运行npm init以使用默认设置生成一个package.json文件,然后打开 Visual Studio Code。
mkdir command-line-weather-app && cd command-line-weather-app touch app.js npm init code . 此后,我将下载 Axios,确认它已添加到我的package.json文件中,并注意node_modules文件夹已成功创建。
在浏览器中,您可以看到我们通过在 URL 栏中手动输入正确的 URL 手动发出了 GET 请求。 Axios 可以让我在 Node.js 中做到这一点。
从现在开始,以下所有代码都将位于app.js文件中,每个片段一个接一个地放置。
我要做的第一件事是需要我们之前安装的 Axios 包
const axios = require('axios'); 我们现在可以访问 Axios,并且可以通过axios常量发出相关的 HTTP 请求。
通常,我们的 API 调用将是动态的——在这种情况下,我们可能希望将不同的邮政编码和国家/地区代码注入我们的 URL。 因此,我将为 URL 的每个部分创建常量变量,然后将它们与 ES6 模板字符串放在一起。 首先,我们拥有永远不会改变的 URL 部分以及我们的 API 密钥:
const API_URL = 'https://api.openweathermap.org/data/2.5/weather?zip='; const API_KEY = 'Your API Key Here'; 我还将分配我们的邮政编码和国家/地区代码。 由于我们不期望用户输入并且对数据进行了相当硬的编码,因此我也会将这些设置为常量,尽管在许多情况下,使用let会更有用。
const LOCATION_ZIP_CODE = '90001'; const COUNTRY_CODE = 'us';我们现在需要将这些变量放在一个 URL 中,我们可以使用 Axios 向其发出 GET 请求:
const ENTIRE_API_URL = `${API_URL}${LOCATION_ZIP_CODE},${COUNTRY_CODE}&appid=${API_KEY}`; 到目前为止,我们的app.js文件的内容如下:
const axios = require('axios'); // API specific settings. const API_URL = 'https://api.openweathermap.org/data/2.5/weather?zip='; const API_KEY = 'Your API Key Here'; const LOCATION_ZIP_CODE = '90001'; const COUNTRY_CODE = 'us'; const ENTIRE_API_URL = `${API_URL}${LOCATION_ZIP_CODE},${COUNTRY_CODE}&appid=${API_KEY}`; 剩下要做的就是实际使用axios向该 URL 发出 GET 请求。 为此,我们将使用axios提供的get(url)方法。
axios.get(ENTIRE_API_URL) axios.get(...)实际上返回一个 Promise,并且成功回调函数将接受一个响应参数,这将允许我们访问来自 API 的响应——与您在浏览器中看到的一样。 我还将添加一个.catch()子句来捕获任何错误。
axios.get(ENTIRE_API_URL) .then(response => console.log(response)) .catch(error => console.log('Error', error)); 如果我们现在在终端中使用node app.js运行此代码,您将能够看到我们返回的完整响应。 但是,假设您只想查看该邮政编码的温度 - 那么响应中的大部分数据对您没有用处。 axios实际上是在数据对象中返回来自API的响应,这是响应的一个属性。 这意味着来自服务器的响应实际上位于response.data ,所以让我们在回调函数中打印它: console.log(response.data) 。
现在,我们说过 Web 服务器总是将 JSON 作为字符串处理,这是真的。 但是,您可能会注意到response.data已经是一个对象(通过运行console.log(typeof response.data)可以看出)——我们不必使用JSON.parse()解析它。 那是因为 Axios 已经在幕后为我们解决了这个问题。
通过运行console.log(JSON.stringify(response.data, undefined, 2))终端中运行console.log(response.data)的输出可以被格式化——“漂亮打印”。 JSON.stringify()将 JSON 对象转换为字符串,并获取对象、过滤器以及打印时缩进的字符数。 您可以看到它提供的响应:
{ "coord": { "lon": -118.24, "lat": 33.97 }, "weather": [ { "id": 800, "main": "Clear", "description": "clear sky", "icon": "01d" } ], "base": "stations", "main": { "temp": 288.21, "pressure": 1022, "humidity": 15, "temp_min": 286.15, "temp_max": 289.75 }, "visibility": 16093, "wind": { "speed": 2.1, "deg": 110 }, "clouds": { "all": 1 }, "dt": 1546459080, "sys": { "type": 1, "id": 4361, "message": 0.0072, "country": "US", "sunrise": 1546441120, "sunset": 1546476978 }, "id": 420003677, "name": "Lynwood", "cod": 200 } 现在,很明显我们要查找的温度位于response.data对象的main属性上,因此我们可以通过调用response.data.main.temp来访问它。 让我们看看到目前为止的应用程序代码:
const axios = require('axios'); // API specific settings. const API_URL = 'https://api.openweathermap.org/data/2.5/weather?zip='; const API_KEY = 'Your API Key Here'; const LOCATION_ZIP_CODE = '90001'; const COUNTRY_CODE = 'us'; const ENTIRE_API_URL = `${API_URL}${LOCATION_ZIP_CODE},${COUNTRY_CODE}&appid=${API_KEY}`; axios.get(ENTIRE_API_URL) .then(response => console.log(response.data.main.temp)) .catch(error => console.log('Error', error));我们得到的温度实际上是以开尔文为单位的,这是物理学、化学和热力学中普遍使用的温度标度,因为它提供了一个“绝对零”点,即所有内部所有热运动的温度。粒子停止。 我们只需使用以下公式将其转换为华氏温度或摄氏度:
F = K * 9/5 - 459.67
C = K - 273.15
让我们更新我们的成功回调以使用此转换打印新数据。 出于用户体验的目的,我们还将添加一个适当的句子:
axios.get(ENTIRE_API_URL) .then(response => { // Getting the current temperature and the city from the response object. const kelvinTemperature = response.data.main.temp; const cityName = response.data.name; const countryName = response.data.sys.country; // Making K to F and K to C conversions. const fahrenheitTemperature = (kelvinTemperature * 9/5) — 459.67; const celciusTemperature = kelvinTemperature — 273.15; // Building the final message. const message = ( `Right now, in \ ${cityName}, ${countryName} the current temperature is \ ${fahrenheitTemperature.toFixed(2)} deg F or \ ${celciusTemperature.toFixed(2)} deg C.`.replace(/\s+/g, ' ') ); console.log(message); }) .catch(error => console.log('Error', error)); message变量周围的括号不是必需的,它们只是看起来不错——类似于在 React 中使用 JSX 时。 反斜杠阻止模板字符串格式化新行,并且replace()字符串原型方法使用正则表达式 (RegEx) 去除空格。 toFixed() Number 原型方法将浮点数舍入到特定的小数位数——在本例中为两位。
这样,我们最终的app.js如下所示:
const axios = require('axios'); // API specific settings. const API_URL = 'https://api.openweathermap.org/data/2.5/weather?zip='; const API_KEY = 'Your API Key Here'; const LOCATION_ZIP_CODE = '90001'; const COUNTRY_CODE = 'us'; const ENTIRE_API_URL = `${API_URL}${LOCATION_ZIP_CODE},${COUNTRY_CODE}&appid=${API_KEY}`; axios.get(ENTIRE_API_URL) .then(response => { // Getting the current temperature and the city from the response object. const kelvinTemperature = response.data.main.temp; const cityName = response.data.name; const countryName = response.data.sys.country; // Making K to F and K to C conversions. const fahrenheitTemperature = (kelvinTemperature * 9/5) — 459.67; const celciusTemperature = kelvinTemperature — 273.15; // Building the final message. const message = ( `Right now, in \ ${cityName}, ${countryName} the current temperature is \ ${fahrenheitTemperature.toFixed(2)} deg F or \ ${celciusTemperature.toFixed(2)} deg C.`.replace(/\s+/g, ' ') ); console.log(message); }) .catch(error => console.log('Error', error));结论
我们在本文中学到了很多关于 Node 工作原理的知识,从同步请求和异步请求之间的区别,到回调函数,再到新的 ES6 特性、事件、包管理器、API、JSON 和超文本传输协议、非关系数据库,我们甚至利用大部分新发现的知识构建了自己的命令行应用程序。
在本系列的后续文章中,我们将深入了解调用堆栈、事件循环和节点 API,我们将讨论跨域资源共享 (CORS),我们将构建一个完整的Stack Bookshelf API 利用数据库、端点、用户身份验证、令牌、服务器端模板呈现等。
从这里开始,开始构建您自己的 Node 应用程序,阅读 Node 文档,寻找有趣的 API 或 Node 模块并自己实现它们。 世界就是你的牡蛎,你可以触手可及地访问地球上最大的知识网络——互联网。 使用它来发挥你的优势。
关于 SmashingMag 的进一步阅读:
- 了解和使用 REST API
- 新的 JavaScript 功能将改变您编写正则表达式的方式
- 保持 Node.js 快速:制作高性能 Node.js 服务器的工具、技术和技巧
- 使用 Web Speech API 和 Node.js 构建一个简单的 AI 聊天机器人
