
无头 WordPress:创建解耦 WordPress 的起起落落
已发表: 2022-03-10WordPress 从一开始就作为一个简单的博客写作工具走过了漫长的道路。 15 年后,它成为开发人员和非开发人员的首选 CMS。 WordPress 现在为网络上前 1000 万个站点中的大约 30% 提供支持。
自从 REST API 被捆绑在 WordPress 核心中以来,开发人员可以以一种解耦的方式进行试验和使用,即使用 JavaScript 框架或库编写前端部分。 在 Infinum,我们曾经(现在仍然)以“经典”方式使用 WordPress:前端和后端都使用 PHP。 过了一段时间,我们想尝试一下解耦方法。 在本文中,我将概述我们想要实现的目标以及在尝试实现目标时遇到的问题。
有几种类型的项目可以从这种方法中受益。 例如,简单的展示网站或使用 WordPress 作为后端的网站是解耦方法的主要候选者。
近年来,值得庆幸的是,该行业开始更加关注性能。 然而,作为一个易于使用的包容性和多功能的软件,WordPress 提供了大量的选项,这些选项不一定在每个项目中都使用。 因此,网站性能可能会受到影响。
推荐阅读:如何使用热图来跟踪 WordPress 网站上的点击次数
如果长时间的网站响应时间让您彻夜难眠,那么这就是您的指南。 我将介绍创建解耦 WordPress 的基础知识和一些经验教训,包括:
- “解耦 WordPress”的含义
- 使用默认的 WordPress REST API
- 使用解耦 JSON 方法提高性能
- 安全问题
那么,解耦的 WordPress 到底是什么?
当谈到WordPress的编程方式时,有一件事是肯定的:它不遵循许多开发人员熟悉的模型-视图-控制器( MVC ) 设计模式。 由于它的历史和作为一个叫做“b2”的旧博客平台的一个分支(更多细节在这里),它主要是以程序方式编写的(使用基于函数的代码)。 WordPress 核心开发人员使用了一个钩子系统,允许其他开发人员修改或扩展某些功能。
这是一个配备工作管理界面的一体化系统; 它管理数据库连接,并公开了一堆有用的 API,用于处理用户身份验证、路由等。
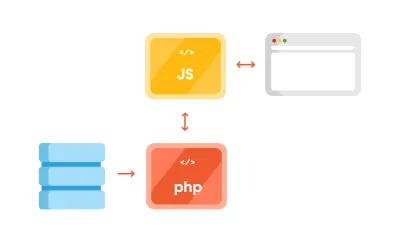
但是由于 REST API,您可以将 WordPress 后端分离为一种捆绑在一起的模型和控制器,用于处理数据操作和数据库交互,并使用 REST API 控制器使用各种 API 端点与单独的视图层进行交互。 除了 MVC 分离之外,我们还可以(出于安全原因或提高速度)将 JS 应用程序放在单独的服务器上,如下面的架构所示:
使用解耦方法的优势
您可能想要使用这种方法的一件事是确保关注点分离。 前端和后端通过端点进行交互; 每个都可以在其单独的服务器上,可以专门针对每个任务进行优化,即分别运行 PHP 应用程序和运行 Node.js 应用程序。
通过将前端与后端分离,将来可以更轻松地重新设计它,而无需更改 CMS。 此外,前端开发人员只需要关心如何处理后端提供给他们的数据。 这让他们能够发挥创造力并使用 ReactJS、Vue 或 Angular 等现代库来交付高度动态的 Web 应用程序。 例如,使用上述库时,构建渐进式 Web 应用程序会更容易。
另一个优势体现在网站的安全性上。 通过后端利用网站变得更加困难,因为它在很大程度上对公众隐藏。
推荐阅读: WordPress 安全作为一个进程
使用解耦方法的缺点
首先,拥有一个解耦的 WordPress 意味着维护两个独立的实例:
- 用于后端的 WordPress;
- 一个单独的前端应用程序,包括及时的安全更新。
其次,一些前端库确实有更陡峭的学习曲线。 学习一门新语言需要花费大量时间(如果您只习惯于 HTML 和 CSS 进行模板化),或者需要将额外的 JavaScript 专家带入该项目。
第三,通过分离前端,您将失去所见即所得编辑器的功能,并且 WordPress 中的“实时预览”按钮也不起作用。
使用 WordPress REST API
在我们深入研究代码之前,还有一些关于 WordPress REST API 的内容。 WordPress 中 REST API 的全部功能于 2016 年 12 月 6 日发布 4.7 版。
WordPress REST API 允许您通过发送和接收 JSON 对象与您的 WordPress 安装进行远程交互。
设置项目
由于它与最新的 WordPress 安装捆绑在一起,我们将致力于 27 岁主题。 我正在研究 Varying Vagrant Vagrants,并建立了一个带有 URL https://dev.wordpress.test/的测试站点。 此 URL 将在整篇文章中使用。 我们还将从 wordpress.org Theme Review Teams 存储库中导入帖子,以便我们可以使用一些测试数据。 但首先,我们将熟悉使用默认端点,然后我们将创建自己的自定义端点。
访问默认 REST 端点
如前所述,WordPress 带有几个内置端点,您可以通过/wp-json/路由来检查它们:
https://dev.wordpress.test/wp-json/通过将此 URL 直接放在浏览器中,或将其添加到邮递员应用程序中,您将从 WordPress REST API 中获得如下所示的 JSON 响应:
{ "name": "Test dev site", "description": "Just another WordPress site", "url": "https://dev.wordpress.test", "home": "https://dev.wordpress.test", "gmt_offset": "0", "timezone_string": "", "namespaces": [ "oembed/1.0", "wp/v2" ], "authentication": [], "routes": { "/": { "namespace": "", "methods": [ "GET" ], "endpoints": [ { "methods": [ "GET" ], "args": { "context": { "required": false, "default": "view" } } } ], "_links": { "self": "https://dev.wordpress.test/wp-json/" } }, "/oembed/1.0": { "namespace": "oembed/1.0", "methods": [ "GET" ], "endpoints": [ { "methods": [ "GET" ], "args": { "namespace": { "required": false, "default": "oembed/1.0" }, "context": { "required": false, "default": "view" } } } ], "_links": { "self": "https://dev.wordpress.test/wp-json/oembed/1.0" } }, ... "wp/v2": { ... 因此,为了使用 REST 获取我们网站中的所有帖子,我们需要访问https://dev.wordpress.test/wp-json/wp/v2/posts 。 请注意, wp/v2/标记了保留的核心端点,如帖子、页面、媒体、分类法、类别等。
那么,我们如何添加自定义端点?
创建自定义 REST 端点
假设我们要向现有端点添加一个新端点或附加字段。 我们有几种方法可以做到这一点。 首先,可以在创建自定义帖子类型时自动完成。 例如,我们想创建一个文档端点。 让我们创建一个小型测试插件。 在wp-content/plugins文件夹中创建一个test-documentation文件夹,并添加如下所示的documentation.php文件:
<?php /** * Test plugin * * @since 1.0.0 * @package test_plugin * * @wordpress-plugin * Plugin Name: Test Documentation Plugin * Plugin URI: * Description: The test plugin that adds rest functionality * Version: 1.0.0 * Author: Infinum <[email protected]> * Author URI: https://infinum.co/ * License: GPL-2.0+ * License URI: https://www.gnu.org/licenses/gpl-2.0.txt * Text Domain: test-plugin */ namespace Test_Plugin; // If this file is called directly, abort. if ( ! defined( 'WPINC' ) ) { die; } /** * Class that holds all the necessary functionality for the * documentation custom post type * * @since 1.0.0 */ class Documentation { /** * The custom post type slug * * @var string * * @since 1.0.0 */ const PLUGIN_NAME = 'documentation-plugin'; /** * The custom post type slug * * @var string * * @since 1.0.0 */ const POST_TYPE_SLUG = 'documentation'; /** * The custom taxonomy type slug * * @var string * * @since 1.0.0 */ const TAXONOMY_SLUG = 'documentation-category'; /** * Register custom post type * * @since 1.0.0 */ public function register_post_type() { $args = array( 'label' => esc_html( 'Documentation', 'test-plugin' ), 'public' => true, 'menu_position' => 47, 'menu_icon' => 'dashicons-book', 'supports' => array( 'title', 'editor', 'revisions', 'thumbnail' ), 'has_archive' => false, 'show_in_rest' => true, 'publicly_queryable' => false, ); register_post_type( self::POST_TYPE_SLUG, $args ); } /** * Register custom tag taxonomy * * @since 1.0.0 */ public function register_taxonomy() { $args = array( 'hierarchical' => false, 'label' => esc_html( 'Documentation tags', 'test-plugin' ), 'show_ui' => true, 'show_admin_column' => true, 'update_count_callback' => '_update_post_term_count', 'show_in_rest' => true, 'query_var' => true, ); register_taxonomy( self::TAXONOMY_SLUG, [ self::POST_TYPE_SLUG ], $args ); } } $documentation = new Documentation(); add_action( 'init', [ $documentation, 'register_post_type' ] ); add_action( 'init', [ $documentation, 'register_taxonomy' ] ); 通过注册新的帖子类型和分类,并将show_in_rest参数设置为true ,WordPress 自动在/wp/v2/命名空间中创建了一个 REST 路由。 您现在可以使用https://dev.wordpress.test/wp-json/wp/v2/documentation和https://dev.wordpress.test/wp-json/wp/v2/documentation-category端点。 如果我们在新创建的文档自定义帖子中添加一个帖子到https://dev.wordpress.test/?post_type=documentation ,它将给我们一个如下所示的响应:
[ { "id": 4, "date": "2018-06-11T19:48:51", "date_gmt": "2018-06-11T19:48:51", "guid": { "rendered": "https://dev.wordpress.test/?post_type=documentation&p=4" }, "modified": "2018-06-11T19:48:51", "modified_gmt": "2018-06-11T19:48:51", "slug": "test-documentation", "status": "publish", "type": "documentation", "link": "https://dev.wordpress.test/documentation/test-documentation/", "title": { "rendered": "Test documentation" }, "content": { "rendered": "这是一些文档内容
\n", “受保护”:假 }, “特色媒体”:0, “模板”: ””, “文档类别”:[ 2 ], “_链接”:{ “自己”: [ { “href”:“https://dev.wordpress.test/wp-json/wp/v2/documentation/4” } ], “收藏”: [ { “href”:“https://dev.wordpress.test/wp-json/wp/v2/documentation” } ], “关于”: [ { “href”:“https://dev.wordpress.test/wp-json/wp/v2/types/documentation” } ], “版本历史”:[ { “href”:“https://dev.wordpress.test/wp-json/wp/v2/documentation/4/revisions” } ], “wp:附件”:[ { “href”:“https://dev.wordpress.test/wp-json/wp/v2/media?parent=4” } ], “wp:术语”:[ { “分类”:“文档类别”, “可嵌入”:是的, “href”:“https://dev.wordpress.test/wp-json/wp/v2/documentation-category?post=4” } ], “居里”:[ { “名称”:“wp”, "href": "https://api.w.org/{rel}", “模板化”:真 } ] } } ]
这是我们单页应用程序的一个很好的起点。 我们可以添加自定义端点的另一种方法是挂钩到rest_api_init钩子并自己创建一个端点。 让我们添加一个与我们注册的路径有点不同的custom-documentation路径。 仍然在同一个插件中工作,我们可以添加:
/** * Create a custom endpoint * * @since 1.0.0 */ public function create_custom_documentation_endpoint() { register_rest_route( self::PLUGIN_NAME . '/v1', '/custom-documentation', array( 'methods' => 'GET', 'callback' => [ $this, 'get_custom_documentation' ], ) ); } /** * Create a callback for the custom documentation endpoint * * @return string JSON that indicates success/failure of the update, * or JSON that indicates an error occurred. * @since 1.0.0 */ public function get_custom_documentation() { /* Some permission checks can be added here. */ // Return only documentation name and tag name. $doc_args = array( 'post_type' => self::POST_TYPE_SLUG, 'post_status' => 'publish', 'perm' => 'readable' ); $query = new \WP_Query( $doc_args ); $response = []; $counter = 0; // The Loop if ( $query->have_posts() ) { while ( $query->have_posts() ) { $query->the_post(); $post_id = get_the_ID(); $post_tags = get_the_terms( $post_id, self::TAXONOMY_SLUG ); $response[ $counter ]['title'] = get_the_title(); foreach ( $post_tags as $tags_key => $tags_value ) { $response[ $counter ]['tags'][] = $tags_value->name; } $counter++; } } else { $response = esc_html__( 'There are no posts.', 'documentation-plugin' ); } /* Restore original Post Data */ wp_reset_postdata(); return rest_ensure_response( $response ); } 并将create_custom_documentation_endpoint()方法挂钩到rest_api_init挂钩,如下所示:
add_action( 'rest_api_init', [ $documentation, 'create_custom_documentation_endpoint' ] ); 这将在https://dev.wordpress.test/wp-json/documentation-plugin/v1/custom-documentation中添加一个自定义路由,回调返回该路由的响应。
[{ "title": "Another test documentation", "tags": ["Another tag"] }, { "title": "Test documentation", "tags": ["REST API", "test tag"] }]您可以使用 REST API 做很多其他事情(您可以在 REST API 手册中找到更多详细信息)。

在使用默认 REST API 时解决较长的响应时间
对于任何尝试构建解耦 WordPress 站点的人来说,这并不是什么新鲜事——REST API 很慢。
我和我的团队首先在客户端站点(未解耦)上遇到了奇怪的 WordPress 滞后 REST API,我们使用自定义端点获取 Google 地图上的位置列表,以及使用Advanced Custom Fields Pro创建的其他元信息插入。 事实证明,第一个字节 (TTFB) 的时间——用于指示 Web 服务器或其他网络资源的响应能力——花费了超过 3 秒。
经过一番调查,我们意识到默认的 REST API 调用实际上非常慢,尤其是当我们用额外的插件“负担”网站时。 所以,我们做了一个小测试。 我们安装了几个流行的插件并遇到了一些有趣的结果。 邮递员应用程序为 41.9KB 的响应大小提供了 1.97 秒的加载时间。 Chrome 的加载时间为 1.25 秒(TTFB 为 1.25 秒,内容下载时间为 3.96 毫秒)。 只是为了检索一个简单的帖子列表。 没有分类,没有用户数据,没有额外的元字段。
为什么会这样?
事实证明,在默认 WordPress 上访问 REST API 将加载整个 WordPress 核心来为端点提供服务,即使它没有被使用。 此外,您添加的插件越多,情况就越糟糕。 默认的 REST 控制器WP_REST_Controller是一个非常大的类,它在构建一个简单的网页时做了很多不必要的事情。 它处理路由注册、权限检查、创建和删除项目等。
此问题有两种常见的解决方法:
- 拦截插件的加载,并在您需要提供简单的 REST 响应时阻止它们全部加载;
- 仅加载最少的 WordPress 并将数据临时存储,然后我们使用自定义页面从中获取数据。
使用解耦 JSON 方法提高性能
当您使用简单的演示站点时,您不需要 REST API 为您提供的所有功能。 当然,这就是良好的规划至关重要的地方。 您真的不想在没有 REST API 的情况下构建您的网站,然后在几年后说您想连接到您的网站,或者可能创建一个需要使用 REST API 功能的移动应用程序。 你?
出于这个原因,我们利用了两个 WordPress 功能,可以在提供简单的 JSON 数据时为您提供帮助:
- 用于缓存的瞬态 API,
- 使用
SHORTINIT常量加载最少必要的 WordPress。
创建一个简单的解耦页面端点
让我们创建一个小插件来演示我们正在谈论的效果。 首先,在您的json-transient插件中添加一个wp-config-simple.php文件,如下所示:
<?php /** * Create simple wp configuration for the routes * * @since 1.0.0 * @package json-transient */ define( 'SHORTINIT', true ); $parse_uri = explode( 'wp-content', $_SERVER['SCRIPT_FILENAME'] ); require_once filter_var( $parse_uri[0] . 'wp-load.php', FILTER_SANITIZE_STRING ); define( 'SHORTINIT', true ); 将阻止加载大多数 WordPress 核心文件,如wp-settings.php文件所示。
我们可能仍然需要一些 WordPress 功能,因此我们可以手动请求该文件(如wp-load.php )。 由于wp-load.php位于 WordPress 安装的根目录中,我们将通过使用$_SERVER['SCRIPT_FILENAME']获取文件路径来获取它,然后通过wp-content字符串分解该字符串。 这将返回一个包含两个值的数组:
- 我们安装的根目录;
- 文件路径的其余部分(我们不感兴趣)。
请记住,我们使用的是 WordPress 的默认安装,而不是修改后的安装,例如在 Bedrock 样板中,它将 WordPress 拆分为不同的文件组织。
最后,为了安全,我们需要wp-load.php文件,并进行一些清理。
在我们的init.php文件中,我们将添加以下内容:
* Author URI: https://infinum.co/ * License: GPL-2.0+ * License URI: https://www.gnu.org/licenses/gpl-2.0.txt * Text Domain: json-transient */ namespace Json_Transient; // If this file is called directly, abort. if ( ! defined( 'WPINC' ) ) { die; } class Init { /** * Get the array of allowed types to do operations on. * * @return array * * @since 1.0.0 */ public function get_allowed_post_types() { return array( 'post', 'page' ); } /** * Check if post type is allowed to be save in transient. * * @param string $post_type Get post type. * @return boolean * * @since 1.0.0 */ public function is_post_type_allowed_to_save( $post_type = null ) { if( ! $post_type ) { return false; } $allowed_types = $this->get_allowed_post_types(); if ( in_array( $post_type, $allowed_types, true ) ) { return true; } return false; } /** * Get Page cache name for transient by post slug and type. * * @param string $post_slug Page Slug to save. * @param string $post_type Page Type to save. * @return string * * @since 1.0.0 */ public function get_page_cache_name_by_slug( $post_slug = null, $post_type = null ) { if( ! $post_slug || ! $post_type ) { return false; } $post_slug = str_replace( '__trashed', '', $post_slug ); return 'jt_data_' . $post_type . '_' . $post_slug; } /** * Get full post data by post slug and type. * * @param string $post_slug Page Slug to do Query by. * @param string $post_type Page Type to do Query by. * @return array * * @since 1.0.0 */ public function get_page_data_by_slug( $post_slug = null, $post_type = null ) { if( ! $post_slug || ! $post_type ) { return false; } $page_output = ''; $args = array( 'name' => $post_slug, 'post_type' => $post_type, 'posts_per_page' => 1, 'no_found_rows' => true ); $the_query = new \WP_Query( $args ); if ( $the_query->have_posts() ) { while ( $the_query->have_posts() ) { $the_query->the_post(); $page_output = $the_query->post; } wp_reset_postdata(); } return $page_output; } /** * Return Page in JSON format * * @param string $post_slug Page Slug. * @param string $post_type Page Type. * @return json * * @since 1.0.0 */ public function get_json_page( $post_slug = null, $post_type = null ) { if( ! $post_slug || ! $post_type ) { return false; } return wp_json_encode( $this->get_page_data_by_slug( $post_slug, $post_type ) ); } /** * Update Page to transient for caching on action hooks save_post. * * @param int $post_id Saved Post ID provided by action hook. * * @since 1.0.0 */ public function update_page_transient( $post_id ) { $post_status = get_post_status( $post_id ); $post = get_post( $post_id ); $post_slug = $post->post_name; $post_type = $post->post_type; $cache_name = $this->get_page_cache_name_by_slug( $post_slug, $post_type ); if( ! $cache_name ) { return false; } if( $post_status === 'auto-draft' || $post_status === 'inherit' ) { return false; } else if( $post_status === 'trash' ) { delete_transient( $cache_name ); } else { if( $this->is_post_type_allowed_to_save( $post_type ) ) { $cache = $this->get_json_page( $post_slug, $post_type ); set_transient( $cache_name, $cache, 0 ); } } } } $init = new Init(); add_action( 'save_post', [ $init, 'update_page_transient' ] );上面代码中的辅助方法将使我们能够做一些缓存:
-
get_allowed_post_types()
此方法让帖子类型知道我们希望在我们的自定义“端点”中启用显示。 你可以扩展它,我们实际上使这个方法可过滤的插件,这样你就可以使用过滤器来添加额外的项目。 -
is_post_type_allowed_to_save()
这个方法只是检查我们试图从中获取数据的帖子类型是否在前一个方法指定的允许数组中。 -
get_page_cache_name_by_slug()
此方法将返回从中获取数据的瞬态名称。 -
get_page_data_by_slug()
此方法将通过其 slug 和 post 类型对 post 执行WP_Query并返回我们将使用get_json_page()方法与 JSON 转换的 post 数组的内容。 -
update_page_transient()
这将在save_post钩子上运行,并将用我们帖子的 JSON 数据覆盖数据库中的瞬态。 最后一种方法称为“密钥缓存方法”。
让我们更深入地解释瞬变。
瞬态 API
Transients API 用于在 WordPress 数据库的选项表中存储特定时间段的数据。 它是一个持久对象缓存,这意味着您正在存储一些对象,例如,大而慢的查询的结果或可以跨页面加载持久的完整页面。 它类似于常规的 WordPress 对象缓存,但与WP_Cache不同,瞬态将在页面加载期间持久保存数据,其中WP_Cache (将数据存储在内存中)只会在请求期间保存数据。
它是一个键值存储,这意味着我们可以轻松快速地获取所需的数据,类似于 Memcached 或 Redis 等in-memory caching systems事情。 不同之处在于您通常需要在服务器上单独安装它们(这在共享服务器上可能是一个问题),而瞬态是 WordPress 内置的。
正如其 Codex 页面所指出的 - 瞬态本质上是通过缓存插件加速的。 因为它们可以将瞬态存储在内存中而不是数据库中。 一般规则是您不应该假设数据库中始终存在瞬态 - 这就是为什么在获取它之前检查它的存在是一个好习惯
$transient_name = get_transient( 'transient_name' ); if ( $transient_name === false ) { set_transient( 'transient_name', $transient_data, $transient_expiry ); }您可以在没有过期的情况下使用它(就像我们正在做的那样),这就是我们在保存后实现一种“缓存清除”的原因。 除了它们提供的所有强大功能之外,它们还可以容纳多达 4GB 的数据,但我们不建议在单个数据库字段中存储任何大的数据。
推荐阅读:当心:可能使您的网站不安全的 PHP 和 WordPress 函数
最终端点:测试和验证
我们需要的最后一块拼图是“端点”。 我在这里使用术语端点,即使它不是端点,因为我们直接调用特定文件来获取我们的结果。 所以我们可以创建一个如下所示的test.php文件:
get_page_cache_name_by_slug( $post_slug, $post_type ) ); // Return error on false. if ( $cache === false ) { wp_send_json( 'Error, the page does not exist or it is not cached correctly. Please try rebuilding cache and try again!' ); } // Decode json for output. wp_send_json( json_decode( $cache ) ); 如果我们去https://dev.wordpress.test/wp-content/plugins/json-transient/test.php ,我们会看到这条消息:
错误,页面 slug 或类型丢失!
因此,我们需要指定帖子类型和帖子 slug。 当我们现在去https://dev.wordpress.test/wp-content/plugins/json-transient/test.php?slug=hello-world&type=post我们会看到:
错误,页面不存在或未正确缓存。 请尝试重建缓存并重试!
等一下! 我们需要先重新保存我们的页面和帖子。 因此,当您开始时,这很容易。 但是,如果您已经有 100 多个页面或帖子,这可能是一项具有挑战性的任务。 这就是为什么我们实现了一种方法来清除 Decoupled JSON Content 插件中的瞬态,并批量重建它们。
但是请继续并重新保存Hello World帖子,然后再次打开链接。 您现在应该拥有的是如下所示的内容:
{ "ID": 1, "post_author": "1", "post_date": "2018-06-26 18:28:57", "post_date_gmt": "2018-06-26 18:28:57", "post_content": "Welcome to WordPress. This is your first post. Edit or delete it, then start writing!", "post_title": "Hello world!", "post_excerpt": "", "post_status": "publish", "comment_status": "open", "ping_status": "open", "post_password": "", "post_name": "hello-world", "to_ping": "", "pinged": "", "post_modified": "2018-06-30 08:34:52", "post_modified_gmt": "2018-06-30 08:34:52", "post_content_filtered": "", "post_parent": 0, "guid": "http:\/\/dev.wordpress.test\/?p=1", "menu_order": 0, "post_type": "post", "post_mime_type": "", "comment_count": "1", "filter": "raw" }就是这样。 我们制作的插件有一些额外的功能可供您使用,但简而言之,这就是您从 WordPress 获取 JSON 数据的方式,比使用 REST API 更快。
之前和之后:改进的响应时间
我们在 Chrome 中进行了测试,我们可以分别看到总响应时间和 TTFB。 我们连续测试了十次响应时间:首先没有插件,然后添加了插件。 此外,我们测试了帖子列表和单个帖子的响应。
测试结果如下表所示:
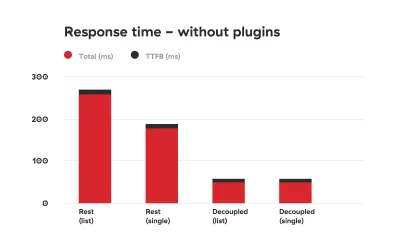
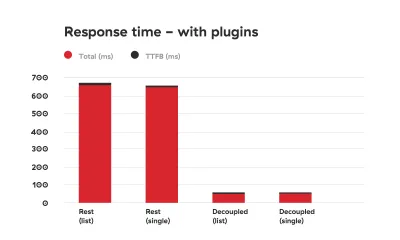
如您所见,差异是巨大的。
安全问题
您需要仔细查看一些注意事项。 首先,我们手动加载 WordPress 核心文件,这在 WordPress 世界中是一个很大的禁忌。 为什么? 好吧,除了手动获取核心文件可能很棘手(特别是如果您使用非标准安装,例如 Bedrock 时)这一事实之外,它可能会带来一些安全问题。
如果您决定使用本文中描述的方法,请确保您知道如何加强服务器安全性。
首先,在test.php文件中添加 HTML 标头:
header( 'Access-Control-Allow-Origin: your-front-end-app.url' ); header( 'Content-Type: application/json' );第一个标头是一种绕过 CORS 安全措施的方法,以便只有您的前端应用程序可以在转到指定文件时获取内容。
其次,禁用应用程序的目录遍历。 您可以通过修改nginx设置来做到这一点,或者如果您在 Apache 服务器上,则将Options -Indexes添加到您的.htaccess文件中。
在响应中添加令牌检查也是一个很好的措施,可以防止不必要的访问。 我们实际上正在研究一种方法来修改我们的 Decoupled JSON 插件,以便我们可以默认包含这些安全措施。
前端应用发送的 Authorization 标头检查可能如下所示:
if ( ! isset( $_SERVER['HTTP_AUTHORIZATION'] ) ) { return; } $auth_header = $_SERVER['HTTP_AUTHORIZATION'];然后,您可以检查是否提供了特定令牌(仅由前端和后端应用程序共享的秘密)并且正确。
结论
REST API 很棒,因为它可以用来创建成熟的应用程序——创建、检索、更新和删除数据。 使用它的缺点是它的速度。
显然,创建应用程序与创建经典网站不同。 您可能不需要我们安装的所有插件。 但是,如果您只需要数据用于演示目的,那么在使用解耦站点时,缓存数据并将其提供在自定义文件中似乎是目前完美的解决方案。
您可能会认为创建自定义插件来加快网站响应时间有点过头了,但我们生活在一个分秒必争的世界。 每个人都知道,如果一个网站速度慢,用户就会放弃它。 有许多研究证明了网站性能和转化率之间的联系。 但如果你仍然需要说服力,谷歌会惩罚速度慢的网站。
本文介绍的方法解决了 WordPress REST API 遇到的速度问题,并且在处理解耦的 WordPress 项目时会给您额外的提升。 由于我们一直在努力从每个请求和响应中挤出最后一毫秒,因此我们计划进一步优化插件。 同时,请分享您对加速解耦 WordPress 的想法!