Nuxt 入门
已发表: 2022-03-10Web 开发人员使用 JavaScript 框架(Angular、React、Vue)构建了许多单页应用程序。 SPA 会在加载时动态填充其页面的内容,这意味着当谷歌抓取他们的网站时,重要的内容尚未注入网站。 这个问题的一部分可以通过预渲染应用程序的内容来解决。 这就是服务器端应用程序的用武之地,对于 Vuejs 开发人员,我们可以使用 Nuxt.js 构建服务器端应用程序。
我们将假设您以前没有使用过它,因此它将从头开始 - 向您介绍 Nuxt.js、它的文件结构以及路由的工作原理。 同时还涉及如何让它与 Vuex 一起工作。
在本教程结束时,您应该能够继续在 Nuxt.js 中构建基本的 Web 应用程序,如果您一直想知道如何开始使用 Nuxt.js,那么这将是正确的。
本文面向对 Vue.js 相当熟悉的人,它是一个概念,对于没有 Vue.js 知识的人,可以考虑从 Vuejs 官方文档和 The Net Ninja 的 Vuejs 播放列表开始。
什么是 Nuxt.js?
根据他们的官方页面:
“Nuxt 是一个基于 Vue.js 的渐进式框架,用于创建现代 Web 应用程序。 它基于 Vue.js 官方库(vue、vue-router 和 vuex)和强大的开发工具(webpack、Babel 和 PostCSS)。 Nuxt 的目标是让 Web 开发功能强大且性能卓越,同时考虑到出色的开发人员体验。”
它允许您创建三种类型的应用程序,具体取决于它的用途:
静态生成页面(预渲染)
静态生成的应用程序不需要 API 请求来获取页面内容,即内容已经包含在 HTML 文件中。 静态网站的一个示例是产品组合网站或产品登录页面。单页应用
大多数 JavaScript 框架(React、Angular、Emberjs、Vue 等)都是单页应用程序,其内容通过更快的转换动态填充。 大多数 SPA 使用 HTML5 历史 API 或位置哈希进行路由。服务器端呈现的应用程序 (SSR)
服务器端渲染是一种用于在服务器上获取和显示客户端数据以将完全渲染的页面发送到客户端的技术。 这是为您的应用程序获得良好 SEO 的好方法。
创建您的第一个 Nuxt.js 应用程序
您可以通过两种方式创建 Nuxt.js 应用程序:
- 使用脚手架工具
create-nuxt-app。 - 从头开始。
如果您只想查看我们将要构建的已完成的应用程序,这里是 GitHub 存储库的链接。
在本教程中,我们将专注于使用create-nuxt-app ,所以让我们开始吧。 如果您安装了 npx,请打开终端并运行以下命令:
$ npx create-nuxt-app nuxt-tutorial-app要么
$ yarn create nuxt-app nuxt-tutorial-app 就本教程而言, nuxt-tutorial-app是应用程序的名称,但您可以随意命名。
接下来是一个选项列表,这些选项有助于根据您的开发可能需要配置您的应用程序。
这是我的配置:

就本教程而言,我们不需要 axios、linting 和 Prettier 配置。
完成后,我们将在终端中运行以下命令:
$ cd nuxt-tutorial-app $ npm run dev您的应用程序现在应该在 https://localhost:3000 上运行,这是您应该看到的:

此时,您的应用程序已准备好进行开发。
了解 Nuxt 文件夹结构
像我们一样为应用程序搭建脚手架会创建不同的文件和文件夹,我们可以开始使用这些文件和文件夹。 对于以前没有使用过 Nuxt 的人来说,这可能会让你失去平衡。 因此,我们将查看文件夹,了解它们的重要性。
- 资产
此文件夹用于存放未编译的文件,例如图像、字体文件、SASS、LESS 或 JavaScript 文件。 让我们添加创建一个styles文件夹和一个main.css文件,然后将以下内容复制并粘贴到其中。
a { text-decoration: none; color: inherit; cursor: pointer; } .header { width: 100%; max-width: 500px; margin-left: auto; margin-right: auto; height: 60px; top: 0; position: sticky; background-color: #fff; display: flex; justify-content: space-between; align-items: center; } .logo { width: 40%; max-width: 200px; height: 40px; } .logo .NuxtLogo { max-width: 30px; margin-left: 10px; max-height: 40px; } .nav { width: 60%; height: 40px; display: flex; justify-content: space-between; padding-right: 10px; max-width: 300px; } .nav__link { width: 80px; display: flex; align-items: center; border-radius: 4px; justify-content: center; height: 100%; border: 1px solid #00c58e; cursor: pointer; } .nav__link:active { background-color: #00c58e; border: 1px solid #00c58e; color: #fff; box-shadow: 5px 3px 5px 2px #3f41468c; } .home { padding-top: 30px; } .home__heading { text-align: center; } .directories { display: flex; box-sizing: border-box; padding: 10px; max-width: 1000px; margin: 0 auto; flex-wrap: wrap; justify-content: center; } @media (min-width: 768px) { .directories { justify-content: space-between; } } .directory__container { width: 100%; max-width: 220px; cursor: pointer; border-radius: 4px; border: 1px solid #00c58e; display: flex; height: 60px; margin: 10px 5px; margin-right: 0; justify-content: center; align-items: center; } .directory__name { text-align: center; } .directory { width: 100%; margin: 50px auto; max-width: 450px; border-radius: 4px; border: 1px solid #00c58e; box-sizing: border-box; padding: 10px 0; } .directory__info { padding-left: 10px; line-height: 22px; padding-right: 10px; }上面的样式将在我们将要构建的应用程序中使用。 如您所见,我们有导航和其他方面的样式,随着我们的进展,我们将插入应用程序中。
- 成分
这个文件夹是我们熟悉的 Vue.js 文件夹,它包含您的可重用组件。
现在,让我们创建我们的第一个组件并将其命名为navBar.vue ,并向其中添加以下代码。 我们希望站点的导航栏显示徽标并链接到我们将在未来创建的主页和关于页面。 此导航栏将在整个应用程序中可见。 它还将利用我们在上面添加的一些样式。
<template> <header class="header"> <div class="logo"> <nuxt-link to="/"> <Logo /> </nuxt-link> </div> <nav class="nav"> <div class="nav__link"> <nuxt-link to="/">Home</nuxt-link> </div> <div class="nav__link"> <nuxt-link to="/About">About</nuxt-link> </div> </nav> </header> </template> <script> import Logo from "@/components/Logo"; export default { name: "nav-bar", components: { Logo } }; </script> <style> </style> 模板部分包含用户可见的内容。 我们有一个header元素,其中包含我们的徽标和导航链接。 为了链接到页面,我们使用了nuxt-link ,它提供了组件页面之间的导航。
在脚本部分,我们使用 Nuxt 别名@导入logo组件,并通过将其添加为组件在我们的组件中声明它以供使用。 这使我们可以在模板中渲染它。
- 布局
在这里,我们将存储我们的应用程序布局。 如果您的应用程序的设计需要两种或多种布局,例如,一种用于经过身份验证的用户,另一种用于访客或管理员,这将特别有用。 出于本教程的目的,我们将坚持使用默认布局。
让我们打开我们的default.vue文件并将我们的navBar组件添加到我们应用程序的布局中。
<template> <div> <Nav /> <nuxt /> </div> </template> <script> import Nav from "~/components/navBar.vue"; export default { components: { Nav } }; </script> 在模板部分中,我们在布局容器中添加了Nav组件,以便在将其导入文件并在脚本部分中声明后始终显示在顶部。
我们的Nav组件之后的下一件事是<nuxt /> ,它告诉 Nuxt 在哪里渲染它的所有路由。
这个Nav组件就是我们在上面创建的。 通过在此处添加它, Nav组件将在整个应用程序中使用。
中间件
创建此文件夹是为了存放在呈现页面之前需要运行的 JavaScript 文件。 如果你曾经使用过 Vuejs 导航守卫,那么这个文件夹就是为这样的文件创建的。页面
这是另一个有 Vuejs 背景的开发者不熟悉的文件夹。 它的工作方式是,每个*.vue文件都被创建为应用程序中的路由,因此它同时用作视图和路由器文件夹,我们将在下一节中详细讨论这一点。插件
这是您在安装根 Vue.js 应用程序之前存储要运行的文件的位置。 它不是必需的文件夹,因此可以将其删除。nuxt.config.js
此文件用于配置您的应用程序,通常在创建应用程序时根据配置预先填充。 默认情况下,理想的nuxt.config.js文件应如下所示:
export default { mode: 'universal', /* ** Headers of the page */ head: { title: process.env.npm_package_name || '', meta: [ { charset: 'utf-8' }, { name: 'viewport', content: 'width=device-width, initial-scale=1' }, { hid: 'description', name: 'description', content: process.env.npm_package_description || '' } ], link: [ { rel: 'icon', type: 'image/x-icon', href: '/favicon.ico' } ] }, /* ** Customize the progress-bar color */ loading: { color: '#fff' }, /* ** Global CSS */ css: [ ], /* ** Plugins to load before mounting the App */ plugins: [ ], /* ** Nuxt.js dev-modules */ buildModules: [ ], /* ** Nuxt.js modules */ modules: [ ], /* ** Build configuration */ build: { /* ** You can extend webpack config here */ extend (config, ctx) { } } }每次对此文件进行更改时,您的应用程序都会自动重新启动以反映更改。 让我们回顾一下文件中使用的属性的含义。
- 模式
申请类型;universal或spa。 通过选择通用,您是在告诉 Nuxt 您希望您的应用程序能够在服务器端和客户端上运行。 - 头
在您的应用程序的head标记内找到的所有默认元标记属性和网站图标链接都可以在此处找到。 这是因为 Nuxt.js 没有默认的index.html文件,这与 Vue.js 不同。 - 加载
所有 Nuxt 应用程序都带有一个默认的加载器组件,并且可以在此处自定义color。 - css
您需要输入所有全局 CSS 文件的链接,以便您的应用程序在挂载应用程序时将其考虑在内。 我们将添加指向我们的 css 文件的链接并重新启动我们的应用程序。
/* ** Global CSS */ css: ["~/assets/styles/main.css"]- 插件
这是您将插件文件夹中的所有插件连接到应用程序的地方。 它接受一个具有属性的对象,例如src,它接受插件的文件路径和一个配置应用程序如何处理此类插件的mode; 作为服务器端插件或客户端插件。 例如:
{ src: '~/plugins/universal-plugin.js' }, // for server and client plugins { src: '~/plugins/client-side.js', mode: 'client' }, // for client only plugins { src: '~/plugins/server-side.js', mode: 'server' }, // for server side only plugins 这对于避免服务器端或客户端的错误很重要,特别是如果您的插件需要诸如在服务器端不可用的localStorage之类的东西。
有关nuxt.config.js文件的更多信息,请查看官方文档。
Nuxt 页面和路由系统
Nuxt 应用程序中的 pages 文件夹用于配置应用程序的路由,即您的路由名称取决于该文件夹中每个文件的名称,例如,如果您的 pages 文件中有一个about.vue文件,这意味着您现在有了应用程序中的/about路由,但这还不是全部。 如果您想要应用程序的动态路由会发生什么? 还是嵌套路由? 你怎么做? 让我们找出答案。
基本路线
基本路由可以归类为不需要额外配置即可工作的路由。 例如,直接路由/work或/contact路由。 因此,如果您的 pages 文件夹如下所示:
pages/ --| me/ -----| index.vue -----| about.vue --| work.vue --| contact.vue --| index.vueNuxt 会自动生成如下所示的路由器配置:
router: { routes: [ { name: 'index', path: '/', component: 'pages/index.vue' }, { name: 'work', path: '/work', component: 'pages/work' }, { name: 'contact', path: '/contact', component: 'pages/contact' }, { name: 'me', path: '/me', component: 'pages/me/index.vue' }, { name: 'me-about', path: '/me/about', component: 'pages/me/about.vue' } ] } 然后可以使用这些路径来访问与其关联的组件。 您可以看到该路径不包含pages 。 Nuxt 处理名为index.vue的组件,无需额外配置。
嵌套路由
要创建嵌套路由,请在pages文件夹内创建一个名为dashboard的文件夹。 此文件夹应包含您要嵌套在其中的所有文件。 例如, user.vue和settings.vue 。 然后在pages文件夹的根目录下,创建一个名为dashboard.vue的文件。
pages/ --| me/ -----| index.vue -----| about.vue --| dashboard/ -----| user.vue -----| settings.vue --| dashboard.vue --| work.vue --| contact.vue --| index.vue这将自动生成一个路由如下所示的路由器:
router: { routes: [ { name: 'index', path: '/', component: 'pages/index.vue' }, { name: 'work', path: '/work', component: 'pages/work' }, { name: 'contact', path: '/contact', component: 'pages/contact' }, { name: 'me', path: '/me', component: 'pages/me/index.vue' }, { name: 'me-about', path: '/me/about', component: 'pages/me/about.vue' }, { name: 'dashboard', path: '/dashboard', component: 'pages/dashboard.vue', children: [ { name: 'dashboard-user', path: '/dashboard/user', component: 'pages/dashboard/user.vue' }, { name: 'dashboard-settings', path: '/dashboard/settings', component: 'pages/dashboard/settings.vue' } ] } ] }请注意,路由名称始终遵循常规模式:
name of the folder + '-' + name of the file有了这个,您可以确定每条路线都有一个唯一的名称。
动态路线
动态路由是由变量定义的路由,该变量可以是名称、数字或从应用程序上的客户端数据获取的id 。 这在使用 API 时会派上用场,其中id可能是来自数据库的项目的id 。
在 Nuxt 中,动态路由是通过将_附加到 pages 文件夹中的文件名或文件夹名来定义的。 例如,如果您想要一个变量名为id的动态路由,您只需将文件命名为_id.vue ,Nuxt 就会自动为您创建一个动态路由。 例如:
pages/ --| me/ -----| index.vue -----| about.vue -----| _routeName -------| index.vue -------| info.vue --| dashboard/ -----| user.vue -----| settings.vue --| dashboard.vue --| work.vue --| _id.vue --| contact.vue --| index.vue这将自动创建具有以下路由的路由器文件,

{ name: 'work', path: '/work', component: 'pages/work' }, { name: 'contact', path: '/contact', component: 'pages/contact' }, { name: 'id', path: '/:id', component: 'pages/_id.vue' } { name: 'me', path: '/me', component: 'pages/me/index.vue' }, { name: 'me-about', path: '/me/about', component: 'pages/me/about.vue' }, { name: 'me-routeName', path: '/me/:routeName', component: 'pages/me/_routeName/index.vue' }, { name: 'me-routeName-info', path: '/me/:routeName/info', component: 'pages/me/route.vue' }, { name: 'dashboard', path: '/dashboard', component: 'pages/dashboard.vue', children: [ { name: 'dashboard-user', path: '/dashboard/user', component: 'pages/dashboard/user.vue' }, { name: 'dashboard-settings', path: '/dashboard/settings', component: 'pages/dashboard/settings.vue' } ] } ] }虽然一些 Vue.js 路由标签在 Nuxt 中工作并且可以互换使用,但还是建议我们使用 Nuxt 路由组件。 以下是 Nuxt 路由器标签和 Vue.js 路由器标签之间的一些区别。
| VueJs | NuxtJS |
|---|---|
| 路由器链接 | nuxt-链接 |
| 路由器视图(用于嵌套路由) | nuxt-child |
| 路由器视图(默认) | nuxt |
vue.js 路由器和 nuxt.js 路由器的区别
此时,您的应用应如下所示,顶部显示导航。

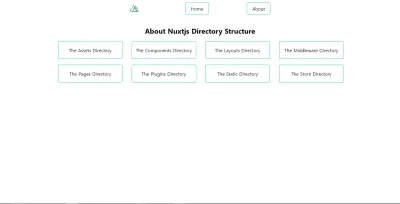
现在我们了解了 Nuxt 页面和路由的工作原理,让我们添加我们的第一个页面和路由about.vue 。 此页面将列出应用程序中的一些目录,并带有指向显示有关此类目录的更多信息的新页面的链接。
让我们在其中添加以下代码:
<template> <section class="home"> <h1 class="home__heading">About Nuxtjs Directory Structure</h1> <div class="directories"> <div class="directory__container" v-for="directory in directories" :key="directory.id"> <p class="directory__name"> <nuxt-link :to="{ name: 'id', params: { id: directory.id, dir: directory } }" >{{ directory.name }}</nuxt-link> </p> </div> </div> </section> </template> <script> export default { name: "about-nuxt", data() { return { directories: [ { id: 0, name: "The Assets Directory", info: "By default, Nuxt uses vue-loader, file-loader and url-loader webpack loaders for strong assets serving. You can also use the static directory for static assets. This folder is for un-compiled files such as images, font files, SASS, LESS or JavaScript files" }, { id: 1, name: "The Components Directory", info: "The components directory contains your Vue.js Components. You can't use asyncData in these components." }, { id: 2, name: "The Layouts Directory", info: "The layouts directory includes your application layouts. Layouts are used to change the look and feel of your page (for example by including a sidebar). Layouts are a great help when you want to change the look and feel of your Nuxt.js app. Whether you want to include a sidebar or having distinct layouts for mobile and desktop" }, { id: 3, name: "The Middleware Directory", info: "The middleware directory contains your Application Middleware. Middleware lets you define custom functions that can be run before rendering either a page or a group of pages (layouts)." }, { id: 4, name: "The Pages Directory", info: "The pages directory contains your Application Views and Routes. The framework reads all the .vue files inside this directory and creates the application router. Every Page component is a Vue component but Nuxt.js adds special attributes and functions to make the development of your universal application as easy as possible" }, { id: 5, name: "The Plugins Directory", info: "The plugins directory contains your Javascript plugins that you want to run before instantiating the root Vue.js Application. This is the place to register components globally and to inject functions or constants. Nuxt.js allows you to define JavaScript plugins to be run before instantiating the root Vue.js Application. This is especially helpful when using your own libraries or external modules." }, { id: 6, name: "The Static Directory", info: "The static directory is directly mapped to the server root (/static/robots.txt is accessible under https://localhost:3000/robots.txt) and contains files that likely won't be changed (eg the favicon). If you don't want to use Webpack assets from the assets directory, you can create and use the static directory (in your project root folder)." }, { id: 7, name: "The Store Directory", info: "The store directory contains your Vuex Store files. The Vuex Store comes with Nuxt.js out of the box but is disabled by default. Creating an index.js file in this directory enables the store. Using a store to manage the state is important for every big application. That's why Nuxt.js implements Vuex in its core." } ] }; } }; </script> <style> </style> 从script部分开始,我们创建了一个存储在directories变量中的数组。 每个数组都包含一个具有id 、 name和info的对象。 这是打开此页面时我们将向用户显示的数据。 我们希望将其显示给用户,以便名称是可点击的。
我们在template部分执行此操作,使用v-for循环遍历数组。 这使得获取数组中的每个项目成为可能,我们可以使用directory访问它们。 在循环中,我们使用nuxt-link来处理每次的链接。 使用nuxt-link ,我们通过 nuxt 路由器传递每个目录项的详细信息( id 、 name和info )。 我们这样做是因为我们希望能够在用户单击项目时在显示页面上显示它。
如果您使用浏览器导航到/about路由,您应该会看到如下内容:

现在,让我们创建一个新文件并将其命名为_id.vue. 这将自动创建一个动态路由,该路由从链接中获取id参数,显示有关从“关于”页面单击的任何目录的一些信息。
让我们将其添加到我们的文件中:
<template> <section class="directory"> <h1 class="directory__name">{{ directory.name }}</h1> <p class="directory__info">{{ directory.info }}</p> </section> </template> <script> export default { name: "directory-info", data() { return { directory: this.$route.params.dir }; } }; </script> <style> </style> 我们所做的是创建一个页面,该页面使用this.$route.params从路由参数dir中获取数据。 这为我们提供了单击目录的name和info ,然后我们将其显示给用户。
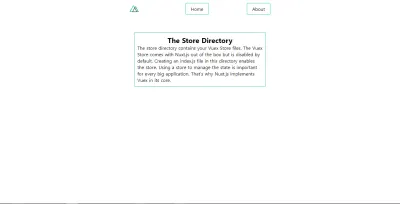
因此,如果您单击任何目录链接(例如商店目录),您应该会看到这一点。

但是有一个问题,如果你刷新这个页面,你的目录信息会丢失并且你会得到一个错误。 这将使用我们的 Vuex Store 解决,所以让我们深入研究它。
在 Nuxt 中使用 Vuex Store
可以使用两种模式在 Nuxt 中访问 Vuex:
- 经典模式(已弃用)。
- 模块模式。
模块模式
Nuxt 在您的应用程序创建时自动创建一个 Store 文件夹。 在 Modules 模式下,Nuxt 会将此文件夹中的每个文件视为一个模块,但要在您的应用程序中激活 Vuex 商店,需要index.js 。 因此,让我们在 store 文件夹中创建一个index.js文件并设置它以供使用。 让我们将以下内容添加到我们的文件中。
index.js
export const state = () => ({ }) export const getters = { } export const mutations = { } export const actions = { } 我们所做的就是为我们的文件设置我们可能需要的存储; 用于存储数据的state ,用于对我们的state执行额外操作的getters ,用于修改我们的state的mutations以及用于提交突变的actions 。
Nuxt 还允许用户将每个核心概念分成不同的文件,这意味着我们可以拥有store.js 、 getters.js 、 mutation.js和action.js ,这很好,因为它易于维护。 现在,我们修复了刷新时目录消失的问题,我们将使用 store,但首先,我们需要为我们的 store 安装和设置Vuex persist 。
根据您的偏好,使用以下任一命令从 npm 安装Vuex persist 。
$ npm install --save vuex-persist要么
$ yarn add vuex-persist 安装后,我们将在 plugins 文件夹中创建一个vuex-persist.js文件并添加以下内容:
import VuexPersistence from 'vuex-persist' export default ({ store }) => { window.onNuxtReady(() => { new VuexPersistence({ storage: window.localStorage }).plugin(store); }); } 在这里,我们从node-modules导入我们的插件并将其配置为将您的商店保存在localStorage中。 该插件允许您选择其他存储选项,例如sessionStorage ,因此请随意浏览他们的文档以获取更多信息。
请记住将其添加到您的nuxt.config.js文件中。
/* ** Plugins to load before mounting the App */ plugins: [{ src: '~/plugins/vuex-persist', mode: 'client' }], 在这里,我们将文件路径添加到我们的插件中,并告诉 Nuxt 仅在此应用程序的client端运行此插件。
现在,我们可以将我们的商店设置为接受和存储目录信息。 更新您的商店以处理如下目录信息:
export const state = () => ({ directory: '' }) export const getters = { } export const mutations = { saveInfo(state, payload) { state.directory = payload.directory } } export const actions = { } 我们所做的是将directory状态添加到我们的存储和一个突变函数saveInfo修改我们添加到存储中的directory状态的值,以预期我们将很快传递它的数据。
接下来,在您的about.vue文件中,将其更新为如下所示。
<template> <section class="home"> <h1 class="home__heading">About Nuxtjs Directory Structure</h1> <div class="directories"> <div class="directory__container" v-for="directory in directories" :key="directory.id" @click.prevent="storeDirectoryInfo(directory)" > <p class="directory__name"> <nuxt-link :to="{ name: 'id', params: { id: directory.id, dir: directory } }" >{{ directory.name }}</nuxt-link> </p> </div> </div> </section> </template> <script> export default { name: "about-nuxt", data() { return { directories: [ //remains the same ] }; }, methods: { storeDirectoryInfo(dir) { this.$store.commit("saveInfo", { directory: dir }); } } }; </script> <style> </style> 现在,我们为每个将目录信息作为参数传递给storeDirectoryInfo的目录容器添加了一个点击事件。 在这个函数中,我们将目录对象提交到我们的存储中。
最后,我们将返回到我们的_id.vue文件并将目录变量替换为存储中的数据,如下所示:
<template> <section class="directory" v-if="directory"> <h1 class="directory__name">{{ directory.name }}</h1> <p class="directory__info">{{ directory.info }}</p> </section> </template> <script> import { mapState } from "vuex"; export default { name: "directory-info", computed: { ...mapState(["directory"]) } }; </script> <style></style> 在这里,我们通过首先从 Vuex 导入mapState来重构我们的代码以直接从我们的 store 中使用目录对象。
import { mapState } from 'vuex'; 我们决定通过读取存储中的数据来使用我们的存储,而不是首先检查this.$route.params.dir是否undefined 。
<script> import { mapState } from "vuex"; export default { name: "directory-info", computed: { ...mapState(["directory"]) } }; </script> 然后我们更新我们的模板以确保它在directory未定义时不会呈现。
<template> <section class="directory" v-if="directory"> <h1 class="directory__name">{{ directory.name }}</h1> <p class="directory__info">{{ directory.info }}</p> </section> </template> 这样做时,无论我们刷新应用程序多少次,我们的目录对象在我们的存储中都是安全的,并且可以使用…mapState(['stateVariable'])方法轻松访问。
部署到 Heroku
现在我们的nuxt-tutorial-app应用程序已经完成,下一步是什么? 将我们闪亮的新应用部署到生产环境。
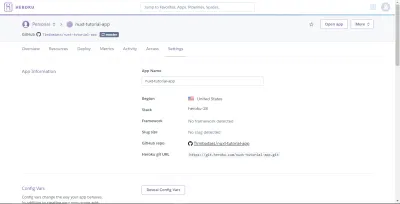
我们将使用 Github 将我们的 Nuxt.js 应用程序部署到 Heroku,以便于部署,所以如果您还没有为您的应用程序设置存储库,现在是时候这样做了。 接下来是打开 Heroku 并创建一个新应用程序,选择一个名称并将其连接到 GitHub 和上面创建的存储库。 接下来,转到您的设置,您应该会看到类似这样的内容。

现在,添加以下配置变量。
NPM_CONFIG_PRODUCTION=false HOST=0.0.0.0 NODE_ENV=production 接下来我们要做的是在我们的应用程序的根文件夹(与nuxt.config.js相同的级别)中创建一个Procfile并输入以下命令:
web: nuxt start 这将运行nuxt start命令并告诉 Heroku 将外部 HTTP 流量定向到它。
将Procfile添加到您的应用程序后,提交您的更改并将其推送到您的存储库。 如果您为您的应用启用了自动部署,您的应用应该是活动的并且可以从其 URL 访问。 如果您可以看到您的应用上线,恭喜! 您已经成功构建并部署了您的第一个 Nuxt.js 应用程序。
结论
现在我们知道了如何创建一个基本的 Nuxt 应用程序并部署到 Heroku,接下来是什么? 这里有一些资源,涵盖了在 Nuxt 中使用 Axios 以及在您的应用中实现身份验证等内容。
- 使用 axios 模块。
- 在 Nuxt 中实现身份验证。
- Nuxt.js 官方文档。
-
nuxt-tutorial-appGithub 存储库。
