Ionic React 中的表单和验证
已发表: 2022-03-10Ionic Framework 是一个 UI 工具包,用于使用 HTML、CSS 和 JavaScript 构建跨平台移动应用程序。 2020 年初发布的 Ionic 5 附带了对 React 的官方支持,使 React 开发人员能够使用他们喜欢的工具轻松构建移动应用程序。 但是,对使用表单的支持并不多,而且在 React 生态系统中可用于构建表单的许多现有库不能很好地与 Ionic Framework 的组件配合使用。
您将在本教程中学习如何使用 Ionic React 的 UI 输入组件构建表单。 您还将学习如何使用库来帮助检测表单输入更改和响应验证规则。 最后,您将学习通过向输入的 ARIA 属性添加有用的文本,使屏幕阅读器可以访问您的表单。
Ionic 的表单组件
表单是当今大多数 Web 和移动应用程序的重要组成部分。 无论您是通过用户注册和登录表单启用对应用程序受限部分的访问,还是从用户那里收集反馈,您都必须在应用程序生命周期的某个时刻构建一个表单。
Ionic 提供了用于处理表单的预构建组件——其中一些包括IonItem 、 IonLabel 、 IonInput 、 IonCheckbox和IonRadio 。 我们可以组合这些组件来构建标准外观的表单,而无需自己添加任何样式。
例如,下面的代码:
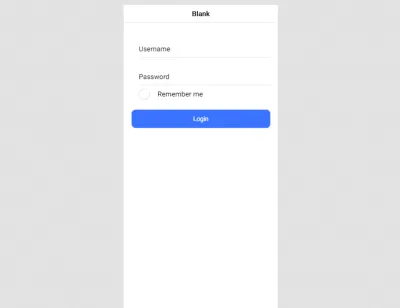
<form className="ion-padding"> <IonItem> <IonLabel position="floating">Username</IonLabel> <IonInput /> </IonItem> <IonItem> <IonLabel position="floating">Password</IonLabel> <IonInput type="password" /> </IonItem> <IonItem lines="none"> <IonLabel>Remember me</IonLabel> <IonCheckbox defaultChecked={true} slot="start" /> </IonItem> <IonButton className="ion-margin-top" type="submit" expand="block"> Login </IonButton> </form>会给我们一个如下所示的登录表单:

开箱即用,Ionic 的表单组件在 iOS 或 Android 上看起来很棒,但如果您使用 React,它们可能会有点笨拙。 与 React 生态系统中的大多数工具一样,当涉及到功能和可访问性时,您必须决定如何构建表单——这两者与设计同样重要。
虽然已经有很多 React 表单助手可供选择,但它们中的大多数都不适用于 Ionic 的表单组件。 我怀疑造成这种情况的主要原因是,当 Ionic 中的字段值更改时触发的事件是onIonChange ,而大多数现有表单库都在监听onChange 。

React Hook Form:小型快速的 React 表单库
值得庆幸的是,这并不全是厄运和悲观。 我最近遇到了 React Hook Form (RHF),这是一个用于在 React 项目中处理表单的库。 它提供对受控或不受控组件和输入验证的支持,并且 API 是基于钩子的,因此它仅适用于功能组件。
在我看来,对 Ionic React 开发人员最有吸引力的特性是它提供的用于处理受控组件的包装器<Controller />组件。 该组件有一个onChangeName属性,可用于为您传递给它的任何组件实例指定更改事件名称。 在接下来的部分中,我将向您展示这如何使在 Ionic 中使用表单变得非常容易。
建立一个注册表单
让我们看看当我们在 Ionic 中构建注册表单时,RHF 如何帮助我们实现表单功能。 如果您正在运行最新版本的 Ionic CLI(运行npm i -g @ionic/cli进行确认),请通过运行以下命令使用 React 启动新的 Ionic 应用程序:
ionic start myApp blank --type=react我在这里使用了一个空白模板。 您应该能够轻松地重写现有表单以使用 React Hook Form 库,尤其是当您的组件被编写为功能组件时。
注意:在继续本教程之前,您应该删除ExploreContainer组件及其在 Home.tsx 中的导入。
要开始使用您的表单,请通过在项目的根目录中运行以下命令来安装 React Hook Form 包:
yarn add react-hook-form这将使 React Hook Form 库在您的项目中可用。 让我们使用库创建一个表单输入字段。 打开Home.tsx文件并将其内容替换为以下内容:
import { IonContent, IonPage, IonText, IonItem, IonLabel, IonInput, IonButton } from "@ionic/react"; import React from "react"; import "./Home.css"; import { Controller, useForm } from 'react-hook-form'; const Home: React.FC = () => { const { control, handleSubmit } = useForm(); const registerUser = (data) => { console.log('creating a new user account with: ', data); } return ( <IonPage> <IonContent className="ion-padding"> <IonText color="muted"> <h2>Create Account</h2> </IonText> <form onSubmit={handleSubmit(registerUser)}> <IonItem> <IonLabel position="floating">Email</IonLabel> <Controller as={<IonInput type="email" />} name="email" control={control} onChangeName="onIonChange" /> </IonItem> <IonButton expand="block" type="submit" className="ion-margin-top"> Register </IonButton> </form> </IonContent> </IonPage> ); }; export default Home;这为您提供了一个包含单个字段的表单来收集电子邮件地址。 让我们分解重要的部分(在代码块中突出显示)。
首先,我们从 RHF 中useForm()钩子的返回值。 当表单通过验证时, handleSubmit将您的输入值传递给您指定的处理函数。 control是一个对象,其中包含用于将受控组件注册到 RHF 中的方法。
接下来,我们有一个标准的表单项块,但与登录表单的示例不同,我们将IonInput组件传递给 RHF 的<Controller />组件,通过将<Controller />的onChangeName属性设置为 Ionic 的更改事件来注册更改事件名称,并通过调用useForm()将控件属性设置为control对象。
到目前为止这很好,但是您可能会发现自己一遍又一遍地重复几乎相同的代码。 您可以尝试制作一个可重用的Input组件,该组件构建具有给定属性的输入字段。
在src/components目录中创建一个名为Input.tsx的文件,并将以下代码添加到该文件中:
import React, { FC } from "react"; import { IonItem, IonLabel, IonInput } from "@ionic/react"; import { Controller, Control } from "react-hook-form"; export interface InputProps { name: string; control?: Control; label?: string; component?: JSX.Element; } const Input: FC<InputProps> = ({ name, control, component, label, }) => { return ( <> <IonItem> {label && ( <IonLabel position="floating">{label}</IonLabel> )} <Controller as={component ?? <IonInput />} name={name} control={control} onChangeName="onIonChange" /> </IonItem> </> ); }; export default Input; 这个组件接收一个name prop 和可选的control 、 component和label props,并使用前面介绍的 Ionic 表单组件呈现一个输入字段。 这减少了创建表单输入字段时必须编写的代码量。 您可以使用此组件完成表单的其余部分。 使用以下更改编辑 Home.tsx 文件:

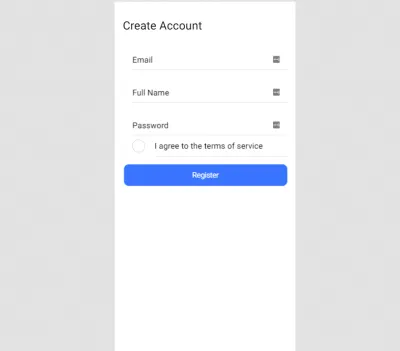
import { IonContent, IonPage, IonText, IonInput, IonButton, IonCheckbox, IonItem, IonLabel } from "@ionic/react"; import React from "react"; import "./Home.css"; import { useForm } from "react-hook-form"; import Input, { InputProps } from "../components/Input"; const Home: React.FC = () => { const { control, handleSubmit } = useForm(); const formFields: InputProps[] = [ { name: "email", component: <IonInput type="email" />, label: "Email", }, { name: "fullName", label: "Full Name", }, { name: "password", component: <IonInput type="password" clearOnEdit={false} />, label: "Password", }, ]; const registerUser = (data) => { console.log("creating a new user account with: ", data); }; return ( <IonPage> <IonContent> <div className="ion-padding"> <IonText color="muted"> <h2>Create Account</h2> </IonText> <form onSubmit={handleSubmit(registerUser)}> {formFields.map((field, index) => ( <Input {...field} control={control} key={index} /> ))} <IonItem> <IonLabel>I agree to the terms of service</IonLabel> <IonCheckbox slot="start" /> </IonItem> <IonButton expand="block" type="submit" className="ion-margin-top"> Register </IonButton> </form> </div> </IonContent> </IonPage> ); }; export default Home; 到目前为止,通过您的设置,您有一个表单输入字段数组( name是唯一必需的属性),每个字段都使用之前的Input组件呈现。 您可以更进一步,将您的字段数据保存在 JSON 文件中,从而使组件中的代码保持整洁。 此时,您的应用程序(使用ionic serve命令在 https://localhost:8100 运行)应如下所示:

字段验证怎么样?
您可能已经注意到我们表单的输入字段还没有任何验证逻辑。 如果这是一个供实际使用的应用程序,则可能会导致许多不良影响,除非您的 API 设置为验证传入数据。 顺便说一句,您的 API 必须始终验证传入数据。
RHF 带有与内置表单验证的 HTML 标准一致的验证。 这非常适用于简单的验证,例如使字段成为必填字段或设置最小和最大字段长度。 如果你想使用复杂的验证逻辑,我会推荐使用 Yup。 虽然您可以使用任何对象模式验证库,但 RHF 开箱即用地支持 Yup。
运行以下命令来安装库(和类型):
yarn add yup @types/yup接下来,将其添加到组件的导入中:
import { object, string } from 'yup'; const Home: React.FC = () => { ... }然后,在组件顶部添加以下代码:
const Home: React.FC = () => { const validationSchema = object().shape({ email: string().required().email(), fullName: string().required().min(5).max(32), password: string().required().min(8), }); // ... } 在这里,我们创建了一个对象模式并使用yup为每个属性添加了验证规则。 对象中的名称必须与表单输入标签中的名称匹配,否则不会触发您的规则。
最后,更新您的useForm()钩子以使用我们通过设置validationSchema属性定义的模式,如下所示:
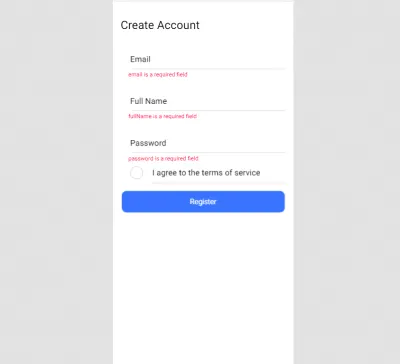
const { control, handleSubmit } = useForm({ validationSchema, }); 现在,当您单击提交按钮时,不会调用handleSubmit处理程序,也不会提交表单数据。 虽然这正是我们想要的,但用户似乎无法知道发生了什么。 让我们通过在未正确填写字段时显示文本提示来解决此问题。
首先,将Input组件更新为如下所示:
import React, { FC } from "react"; import { IonItem, IonLabel, IonInput, IonText } from "@ionic/react"; import { Controller, Control, NestDataObject, FieldError } from "react-hook-form"; export interface InputProps { name: string; control?: Control; label?: string; component?: JSX.Element; errors?: NestDataObject<Record<string, any>, FieldError>; } const Input: FC<InputProps> = ({ name, control, component, label, errors, }) => { return ( <> <IonItem> {label && <IonLabel position="floating">{label}</IonLabel>} <Controller as={component ?? <IonInput />} name={name} control={control} onChangeName="onIonChange" /> </IonItem> {errors && errors[name] && ( <IonText color="danger" className="ion-padding-start"> <small>{errors[name].message}</small> </IonText> )} </> ); }; export default Input;在这里,我们更新了我们的组件以接收一个额外的可选属性,即来自 RHF 的错误对象,并且每当出现错误时,我们都会在返回的输入字段中显示错误消息。 最后一件事,将错误对象添加到您的解构对象并更新循环中的组件:
const { control, handleSubmit, errors } = useForm({ validationSchema, }); {formFields.map((field, index) => ( <Input {...field} control={control} key={index} errors={errors} /> ))}
现在,当用户做错事时,您的表单会提供视觉提示。 是的,允许您更改错误消息。 您可以通过将字符串传递给您正在使用的验证方法来做到这一点。 例如,对于电子邮件,您可以执行以下操作:
{ email: string() .email('Please provide a valid email address') .required('This is a required field'), }提高可访问性
Ionic 的组件通常是对应本机元素的包装器,这意味着它们接受该元素的大部分(如果不是全部)现有属性。 您可以通过使用相关文本设置 ARIA 属性来改进您的输入字段并使视障用户更容易访问它们。
要继续我们的示例注册表单,请打开 Input.tsx 文件并进行以下更改:
import React, { FC } from "react"; import { IonItem, IonLabel, IonInput, IonText } from "@ionic/react"; import { Controller, Control, NestDataObject, FieldError } from "react-hook-form"; export interface InputProps { name: string; control?: Control; label?: string; component?: JSX.Element; errors?: NestDataObject<Record<string, any>, FieldError>; } const Input: FC<InputProps> = ({ name, control, component, label, errors, }) => { return ( <> <IonItem> {label && <IonLabel position="floating">{label}</IonLabel>} <Controller as={ component ?? ( <IonInput aria-invalid={errors && errors[name] ? "true" : "false"} aria-describedby={`${name}Error`} /> ) } name={name} control={control} onChangeName="onIonChange" /> </IonItem> {errors && errors[name] && ( <IonText color="danger" className="ion-padding-start"> <small> <span role="alert" id={`${name}Error`}> {errors[name].message} </span> </small> </IonText> )} </> ); }; export default Input; 我们传递给Controller的默认IonInput组件现在包含一个aria-invalid属性来指示该字段是否有错误,以及一个aria-describedby属性来指向相应的错误消息。 错误消息现在用一个将 ARIA 角色设置为“error”的span包装起来。 现在,当您的字段出现错误时,屏幕阅读器将突出显示该字段并读出错误消息。
- 你会在这里找到 GitHub 存储库。
结论
恭喜! 您已经学习了如何在使用 Ionic 构建跨平台应用程序时构建和验证表单。 您还看到让有视觉障碍的用户可以访问您的输入字段是多么容易。 希望本教程提供了一个可靠的平台,供您在 Ionic React 应用程序中构建表单时使用。 还有其他用于构建表单的组件(例如 select 和 radios)我们没有在本教程中探讨,但您可以在官方文档中找到并阅读有关它们的更多信息。
参考
- 离子框架文档
- 反应钩子形式
- 是的文档
- Phil Haack 谈验证电子邮件地址
- MDN Web 文档的可访问性
