
向所见即所得编辑器添加评论系统
已发表: 2022-03-10近年来,我们已经看到协作渗透到许多行业的许多数字工作流程和用例中。 就在设计和软件工程社区中,我们看到设计师使用 Figma 等工具在设计工件上进行协作,团队使用 Mural 等工具进行 Sprint 和项目规划,以及使用 CoderPad 进行采访。 所有这些工具一直致力于弥合执行这些工作流程的在线和物理世界体验之间的差距,并使协作体验尽可能丰富和无缝。
对于像这样的大多数协作工具,相互分享意见并就相同内容进行讨论的能力是必不可少的。 使协作者能够注释文档的某些部分并就它们进行对话的评论系统是这个概念的核心。 除了在 WYSIWYG 编辑器中构建文本之外,本文还试图让读者参与我们如何尝试权衡利弊,并在为 WYSIWYG 编辑器或构建功能时尝试在应用程序复杂性和用户体验之间找到平衡点。一般的文字处理器。
在文档结构中表示注释
为了找到一种在富文本文档的数据结构中表示注释的方法,让我们看一些可以在编辑器中创建注释的场景。
- 在没有样式的文本上创建的评论(基本场景);
- 在可能是粗体/斜体/下划线等的文本上创建的评论;
- 以某种方式相互重叠的评论(部分重叠,即两条评论仅共享几个词或完全包含,即一条评论的文本完全包含在另一条评论的文本中);
- 在链接内的文本上创建的评论(特别是因为链接本身就是我们文档结构中的节点);
- 跨越多个段落的注释(特别是因为段落是我们文档结构中的节点,并且注释应用于作为段落子节点的文本节点)。
查看上述用例,在富文本文档中出现的注释似乎与字符样式(粗体、斜体等)非常相似。 它们可以相互重叠,遍历其他类型节点(如链接)中的文本,甚至跨越多个父节点(如段落)。
出于这个原因,我们使用与字符样式相同的方法来表示注释,即“标记”(因为它们在 SlateJS 术语中被称为)。 标记只是节点上的常规属性——特别是 Slate 的标记 API( Editor.addMark和Editor.removeMark )处理节点层次结构的变化,因为多个标记应用于相同的文本范围。 这对我们来说非常有用,因为我们要处理许多不同的重叠评论组合。
评论线程作为标记
每当用户选择一个文本范围并尝试插入评论时,从技术上讲,他们正在为该文本范围启动一个新的评论线程。 因为我们将允许他们插入评论并稍后回复该评论,所以我们将此事件视为文档中的新评论线程插入。
我们将评论线程表示为标记的方式是,每个评论线程都由一个名为commentThread_threadID的标记表示,其中threadID是我们分配给每个评论线程的唯一 ID。 因此,如果相同的文本范围有两个评论线程,它将有两个属性设置为true —— commentThread_thread1和commentThread_thread2 。 这就是注释线程与字符样式非常相似的地方,因为如果相同的文本是粗体和斜体,那么它的两个属性都会设置为true bold和italic 。
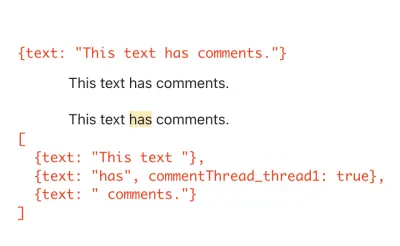
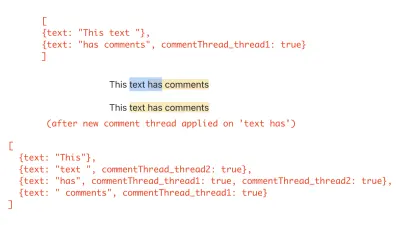
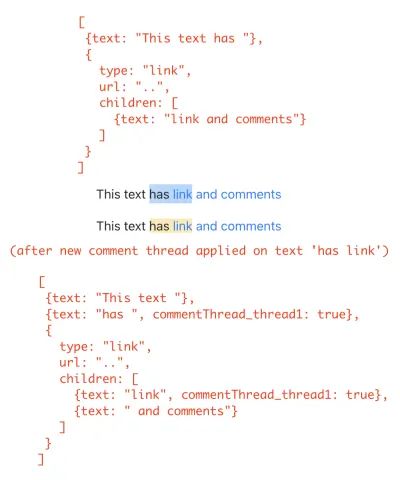
在我们深入实际设置这个结构之前,有必要看看文本节点在评论线程被应用到它们时如何变化。 其工作方式(与任何标记一样)是,当在选定文本上设置标记属性时,Slate 的 Editor.addMark API 将在需要时拆分文本节点,以便在生成的结构中,文本节点以每个文本节点具有完全相同的标记值的方式设置。
为了更好地理解这一点,请查看以下三个示例,这些示例显示了在所选文本上插入注释线程后文本节点的前后状态:
突出显示注释文本
现在我们知道我们将如何在文档结构中表示注释,让我们继续在第一篇文章的示例文档中添加一些内容,并将编辑器配置为实际将它们显示为突出显示。 由于在本文中我们将有很多实用程序函数来处理评论,因此我们创建了一个EditorCommentUtils模块来容纳所有这些实用程序。 首先,我们创建一个函数,为给定的评论线程 ID 创建一个标记。 然后,我们使用它在ExampleDocument中插入一些评论线程。
# src/utils/EditorCommentUtils.js const COMMENT_THREAD_PREFIX = "commentThread_"; export function getMarkForCommentThreadID(threadID) { return `${COMMENT_THREAD_PREFIX}${threadID}`; }下图用红色强调了我们在下一个代码片段中添加的示例注释线程的文本范围。 请注意,文本“Richard McClintock”有两个相互重叠的评论线程。 具体来说,这是一个评论线程完全包含在另一个评论线程中的情况。

# src/utils/ExampleDocument.js import { getMarkForCommentThreadID } from "../utils/EditorCommentUtils"; import { v4 as uuid } from "uuid"; const exampleOverlappingCommentThreadID = uuid(); const ExampleDocument = [ ... { text: "Lorem ipsum", [getMarkForCommentThreadID(uuid())]: true, }, ... { text: "Richard McClintock", // note the two comment threads here. [getMarkForCommentThreadID(uuid())]: true, [getMarkForCommentThreadID(exampleOverlappingCommentThreadID)]: true, }, { text: ", a Latin scholar", [getMarkForCommentThreadID(exampleOverlappingCommentThreadID)]: true, }, ... ];在本文中,我们专注于评论系统的 UI 方面,因此我们在示例文档中直接使用 npm 包 uuid 为其分配 ID。 在编辑器的生产版本中,这些 ID 很可能是由后端服务创建的。
我们现在专注于调整编辑器以突出显示这些文本节点。 为了做到这一点,在渲染文本节点时,我们需要一种方法来判断它是否有评论线程。 我们为此添加了一个 util getCommentThreadsOnTextNode 。 我们建立在第一篇文章中创建的StyledText组件的基础上,以处理它可能试图呈现带有注释的文本节点的情况。 由于我们有更多功能将在稍后添加到注释文本节点,因此我们创建了一个组件CommentedText来呈现注释文本。 StyledText将检查它试图呈现的文本节点是否有任何评论。 如果是,它会呈现CommentedText 。 它使用 util getCommentThreadsOnTextNode来推断。
# src/utils/EditorCommentUtils.js export function getCommentThreadsOnTextNode(textNode) { return new Set( // Because marks are just properties on nodes, // we can simply use Object.keys() here. Object.keys(textNode) .filter(isCommentThreadIDMark) .map(getCommentThreadIDFromMark) ); } export function getCommentThreadIDFromMark(mark) { if (!isCommentThreadIDMark(mark)) { throw new Error("Expected mark to be of a comment thread"); } return mark.replace(COMMENT_THREAD_PREFIX, ""); } function isCommentThreadIDMark(mayBeCommentThread) { return mayBeCommentThread.indexOf(COMMENT_THREAD_PREFIX) === 0; } 第一篇文章构建了一个组件StyledText ,用于渲染文本节点(处理字符样式等)。 我们扩展该组件以使用上述实用程序并在节点上有评论时呈现CommentedText组件。
# src/components/StyledText.js import { getCommentThreadsOnTextNode } from "../utils/EditorCommentUtils"; export default function StyledText({ attributes, children, leaf }) { ... const commentThreads = getCommentThreadsOnTextNode(leaf); if (commentThreads.size > 0) { return ( <CommentedText {...attributes} // We use commentThreads and textNode props later in the article. commentThreads={commentThreads} textNode={leaf} > {children} </CommentedText> ); } return <span {...attributes}>{children}</span>; } 下面是CommentedText的实现,它呈现文本节点并附加将其显示为突出显示的 CSS。
# src/components/CommentedText.js import "./CommentedText.css"; import classNames from "classnames"; export default function CommentedText(props) { const { commentThreads, ...otherProps } = props; return ( <span {...otherProps} className={classNames({ comment: true, })} > {props.children} </span> ); } # src/components/CommentedText.css .comment { background-color: #feeab5; }将上述所有代码组合在一起后,我们现在可以在编辑器中看到带有注释线程的文本节点。

注意:用户目前无法判断某些文本是否有重叠评论。 整个突出显示的文本范围看起来像一个单独的评论线程。 我们稍后会在文章中介绍活动评论线程的概念,它允许用户选择特定的评论线程并能够在编辑器中查看其范围。
用于评论的 UI 存储
在我们添加允许用户插入新评论的功能之前,我们首先设置一个 UI 状态来保存我们的评论线程。 在本文中,我们使用 RecoilJS 作为我们的状态管理库来存储评论线程、线程中包含的评论以及其他元数据,如创建时间、状态、评论作者等。让我们将 Recoil 添加到我们的应用程序中:
> yarn add recoil 我们使用 Recoil atom 来存储这两个数据结构。 如果你不熟悉 Recoil,那么原子就是保持应用程序状态的东西。 对于不同的应用程序状态,您通常需要设置不同的原子。 Atom Family 是原子的集合——它可以被认为是从标识原子的唯一键到原子本身的Map 。 在这一点上,值得通过 Recoil 的核心概念并熟悉它们。
对于我们的用例,我们将评论线程存储为 Atom 系列,然后将我们的应用程序包装在RecoilRoot组件中。 RecoilRoot用于提供将要使用原子值的上下文。 我们创建一个单独的模块CommentState来保存我们的 Recoil 原子定义,因为我们将在本文后面添加更多原子定义。
# src/utils/CommentState.js import { atom, atomFamily } from "recoil"; export const commentThreadsState = atomFamily({ key: "commentThreads", default: [], }); export const commentThreadIDsState = atom({ key: "commentThreadIDs", default: new Set([]), });值得一提的是关于这些原子定义的一些事情:
- 每个原子/原子族都由一个
key唯一标识,并且可以设置一个默认值。 - 随着我们在本文中进一步构建,我们将需要一种方法来迭代所有评论线程,这基本上意味着需要一种方法来迭代
commentThreadsStateatom 系列。 在撰写本文时,使用 Recoil 的方法是设置另一个原子来保存原子族的所有 ID。 我们使用上面的commentThreadIDsState做到这一点。 每当我们添加/删除评论线程时,这两个原子都必须保持同步。
我们在根App组件中添加了一个RecoilRoot包装器,以便我们以后可以使用这些原子。 Recoil 的文档还提供了一个有用的 Debugger 组件,我们将其按原样放入我们的编辑器中。 当 Recoil atom 实时更新时,该组件会将console.debug日志留给我们的开发控制台。
# src/components/App.js import { RecoilRoot } from "recoil"; export default function App() { ... return ( <RecoilRoot> > ... <Editor document={document} onChange={updateDocument} /> </RecoilRoot> ); } # src/components/Editor.js export default function Editor({ ... }): JSX.Element { ..... return ( <> <Slate> ..... </Slate> <DebugObserver /> </> ); function DebugObserver(): React.Node { // see API link above for implementation. }我们还需要添加代码,使用文档中已经存在的注释线程(例如,我们在上一节中添加到示例文档中的注释线程)初始化我们的原子。 我们稍后会在构建需要读取文档中所有评论线程的评论侧边栏时这样做。
此时,我们加载我们的应用程序,确保没有指向我们的 Recoil 设置的错误并继续前进。
添加新评论
在本节中,我们向工具栏添加一个按钮,允许用户为选定的文本范围添加评论(即创建新的评论线程)。 当用户选择文本范围并单击此按钮时,我们需要执行以下操作:
- 为要插入的新评论线程分配一个唯一 ID。
- 使用 ID 向 Slate 文档结构添加新标记,以便用户看到突出显示的文本。
- 将新的评论线程添加到我们在上一节中创建的 Recoil atom。
让我们向EditorCommentUtils添加一个 util 函数来执行 #1 和 #2。
# src/utils/EditorCommentUtils.js import { Editor } from "slate"; import { v4 as uuidv4 } from "uuid"; export function insertCommentThread(editor, addCommentThreadToState) { const threadID = uuidv4(); const newCommentThread = { // comments as added would be appended to the thread here. comments: [], creationTime: new Date(), // Newly created comment threads are OPEN. We deal with statuses // later in the article. status: "open", }; addCommentThreadToState(threadID, newCommentThread); Editor.addMark(editor, getMarkForCommentThreadID(threadID), true); return threadID; } 通过使用标记的概念将每个评论线程存储为自己的标记,我们可以简单地使用Editor.addMark API 在选定的文本范围上添加一个新的评论线程。 这个调用单独处理添加评论的所有不同情况——我们在前面的部分中描述了其中一些——部分重叠的评论、内部/重叠链接的评论、粗体/斜体文本上的评论、跨段落的评论等等。 此 API 调用调整节点层次结构,以根据需要创建尽可能多的新文本节点来处理这些情况。
addCommentThreadToState是处理第 3 步的回调函数——将新的评论线程添加到 Recoil atom 。 我们接下来将其实现为自定义回调钩子,以便它可以重用。 这个回调需要将新的评论线程添加到两个原子commentThreadsState和commentThreadIDsState 。 为了能够做到这一点,我们使用了useRecoilCallback钩子。 这个钩子可以用来构造一个回调,它可以获取一些可以用来读取/设置原子数据的东西。 我们现在感兴趣的是set函数,它可用于将 atom 值更新为set(atom, newValueOrUpdaterFunction) 。
# src/hooks/useAddCommentThreadToState.js import { commentThreadIDsState, commentThreadsState, } from "../utils/CommentState"; import { useRecoilCallback } from "recoil"; export default function useAddCommentThreadToState() { return useRecoilCallback( ({ set }) => (id, threadData) => { set(commentThreadIDsState, (ids) => new Set([...Array.from(ids), id])); set(commentThreadsState(id), threadData); }, [] ); } 第一次调用set将新 ID 添加到现有的评论线程 ID 集中并返回新的Set (它成为原子的新值)。
在第二次调用中,我们从原子族中获取 ID 的原子commentThreadsState作为commentThreadsState(id) ,然后将threadData设置为它的值。 atomFamilyName(atomID)是 Recoil 让我们使用唯一键从其原子族访问原子的方式。 粗略地说,如果commentThreadsState是一个javascript Map,那么这个调用基本上就是commentThreadsState.set(id, threadData) 。
现在我们已经设置了所有这些代码来处理向文档和 Recoil atom 插入新的注释线程,让我们在工具栏上添加一个按钮,并将其与对这些函数的调用连接起来。
# src/components/Toolbar.js import { insertCommentThread } from "../utils/EditorCommentUtils"; import useAddCommentThreadToState from "../hooks/useAddCommentThreadToState"; export default function Toolbar({ selection, previousSelection }) { const editor = useEditor(); ... const addCommentThread = useAddCommentThreadToState(); const onInsertComment = useCallback(() => { const newCommentThreadID = insertCommentThread(editor, addCommentThread); }, [editor, addCommentThread]); return ( <div className="toolbar"> ... <ToolBarButton isActive={false} label={<i className={`bi ${getIconForButton("comment")}`} />} onMouseDown={onInsertComment} /> </div> ); } 注意:我们使用onMouseDown而不是onClick会使编辑器失去焦点和选择变为null 。 我们已经在第一篇文章的链接插入部分更详细地讨论了这一点。
在下面的示例中,我们看到了一个简单评论线程和一个带有链接的重叠评论线程的插入操作。 请注意我们如何从 Recoil Debugger 获取更新以确认我们的状态正在正确更新。 我们还验证了在将线程添加到文档时是否创建了新的文本节点。
重叠评论
在继续向评论系统添加更多功能之前,我们需要就如何处理重叠评论及其在编辑器中的不同组合做出一些决定。 为了了解我们为什么需要它,让我们先来看看评论弹出框是如何工作的——我们将在本文后面构建一个功能。 当用户单击带有评论线程的特定文本时,我们“选择”一个评论线程并显示一个弹出框,用户可以在其中向该线程添加评论。
从上面的视频可以看出,“设计师”这个词现在是三个评论线程的一部分。 所以我们有两个评论线程,它们在一个词上相互重叠。 并且这两个评论线程(#1和#2)都完全包含在更长的评论线程文本范围(#3)中。 这提出了几个问题:
- 当用户点击“设计师”这个词时,我们应该选择并显示哪个评论线程?
- 根据我们决定如何解决上述问题,我们是否会遇到重叠的情况,即单击任何单词都不会激活某个评论线程并且根本无法访问该线程?
这意味着在评论重叠的情况下,要考虑的最重要的事情是——一旦用户插入了评论线程,他们将来是否可以通过单击其中的一些文本来选择该评论线程它? 如果没有,我们可能不想让他们首先插入它。 为了确保在我们的编辑器中大部分时间都遵守这一原则,我们引入了两条关于重叠注释的规则并在我们的编辑器中实施它们。
在我们定义这些规则之前,值得一提的是,不同的编辑器和文字处理器在处理重叠评论时有不同的方法。 为简单起见,一些编辑器不允许任何重叠评论。 在我们的案例中,我们试图通过不允许过于复杂的重叠案例但仍然允许重叠评论来找到中间立场,以便用户可以获得更丰富的协作和审查体验。
最短评论范围规则
此规则帮助我们回答上面的问题 #1,即如果用户单击具有多个评论线程的文本节点,则选择哪个评论线程。 规则是:
“如果用户点击有多个评论线程的文本,我们会找到最短文本范围的评论线程并选择它。”
直观地说,这样做是有意义的,这样用户总是有办法到达完全包含在另一个评论线程中的最里面的评论线程。 对于其他条件(部分重叠或不重叠),应该有一些文本上只有一个评论线程,因此应该很容易使用该文本来选择该评论线程。 这是线程完全(或密集)重叠的情况,也是我们需要这条规则的原因。
让我们看一个相当复杂的重叠案例,它允许我们在选择评论线程时使用此规则并“做正确的事”。
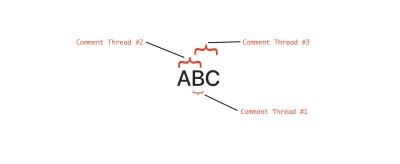
在上面的示例中,用户按该顺序插入以下评论线程:
- 在字符“B”(长度 = 1)上注释线程 #1。
- 在“AB”上评论线程 #2(长度 = 2)。
- 评论线程#3 over 'BC'(长度 = 2)。
在这些插入结束时,由于 Slate 使用标记分割文本节点的方式,我们将拥有三个文本节点 - 每个字符一个。 现在,如果用户点击“B”,按照最短长度规则,我们选择线程#1,因为它是三个长度中最短的。 如果我们不这样做,我们将无法选择评论线程#1,因为它只有一个字符的长度,并且也是另外两个线程的一部分。
尽管这条规则可以很容易地显示较短的评论线程,但我们可能会遇到较长的评论线程变得不可访问的情况,因为其中包含的所有字符都是其他较短评论线程的一部分。 让我们看一个例子。
假设我们有 100 个字符(例如,字符“A”输入了 100 次)并且用户按以下顺序插入评论线程:
- 评论线程#1,范围为 20,80
- 评论线程#2,范围为 0,50
- 评论线程#3,范围为 51,100
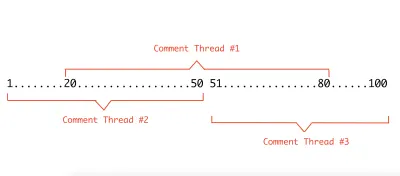
正如您在上面的示例中所看到的,如果我们遵循我们刚刚在此处描述的规则,单击 #20 和 #80 之间的任何字符,将始终选择线程 #2 或 #3,因为它们比 #1 短,因此是 #1将无法选择。 该规则可能使我们无法决定选择哪个评论线程的另一种情况是,当文本节点上有多个相同最短长度的评论线程时。
对于这种重叠评论的组合和许多其他这样的组合,人们可以想到遵循此规则会使某个评论线程无法通过单击文本来访问,我们在本文后面构建了一个评论侧边栏,让用户可以查看所有评论线程出现在文档中,以便他们可以单击侧栏中的这些线程并在编辑器中激活它们以查看评论的范围。 我们仍然希望拥有这条规则并实施它,因为它应该涵盖很多重叠场景,除了我们上面引用的不太可能的例子。 我们围绕这条规则进行了所有这些努力,主要是因为在编辑器中查看突出显示的文本并单击它进行评论是一种访问文本评论的更直观的方式,而不是仅仅使用侧边栏中的评论列表。
插入规则
规则是:
“如果用户选择并尝试评论的文本已经被评论线程完全覆盖,则不允许插入。”
之所以如此,是因为如果我们确实允许这种插入,那么该范围内的每个字符最终都会有至少两个评论线程(一个是现有的,另一个是我们刚刚允许的新的),这使得我们很难确定当用户稍后单击该字符。
看看这个规则,如果我们已经有了允许我们选择最小文本范围的最短评论范围规则,那么我们可能想知道为什么我们首先需要它。 如果我们可以使用第一条规则来推断要显示的正确评论线程,为什么不允许所有重叠组合? 正如我们之前讨论过的一些示例,第一条规则适用于很多场景,但不是所有场景。 使用插入规则,我们尽量减少第一条规则无法帮助我们的场景数量,我们不得不退回到侧边栏作为用户访问该评论线程的唯一方式。 插入规则还可以防止评论线程的精确重叠。 这条规则通常由许多流行的编辑器实施。
下面是一个示例,如果此规则不存在,我们将允许评论线程#3,然后作为第一条规则的结果,#3 将无法访问,因为它将成为最长的长度。
注意:拥有这条规则并不意味着我们永远不会完全包含重叠的评论。 重叠评论的棘手之处在于,尽管有规则,但插入评论的顺序仍然会使我们处于我们不希望重叠的状态。回到我们关于“设计师”一词的评论示例' 早些时候,插入的最长评论线程是最后一个要添加的评论线程,因此插入规则将允许它,我们最终会得到一个完全包含的情况——#1 和 #2 包含在 #3 中。 这很好,因为最短评论范围规则会帮助我们。
我们将在下一节中实现最短评论范围规则,我们将在其中实现评论线程的选择。 由于我们现在有一个工具栏按钮来插入评论,我们可以通过在用户选择了一些文本时检查规则来立即实施插入规则。 如果不满足规则,我们将禁用“评论”按钮,这样用户就无法在所选文本上插入新的评论线程。 让我们开始吧!
# src/utils/EditorCommentUtils.js export function shouldAllowNewCommentThreadAtSelection(editor, selection) { if (selection == null || Range.isCollapsed(selection)) { return false; } const textNodeIterator = Editor.nodes(editor, { at: selection, mode: "lowest", }); let nextTextNodeEntry = textNodeIterator.next().value; const textNodeEntriesInSelection = []; while (nextTextNodeEntry != null) { textNodeEntriesInSelection.push(nextTextNodeEntry); nextTextNodeEntry = textNodeIterator.next().value; } if (textNodeEntriesInSelection.length === 0) { return false; } return textNodeEntriesInSelection.some( ([textNode]) => getCommentThreadsOnTextNode(textNode).size === 0 ); }此函数中的逻辑相对简单。
- 如果用户的选择是一个闪烁的插入符号,我们不允许在那里插入评论,因为没有选择任何文本。
- 如果用户的选择不是折叠的,我们会找到选择中的所有文本节点。 注意
mode: lowest在调用Editor.nodes(SlateJS 的辅助函数)中的最低模式,它帮助我们选择所有文本节点,因为文本节点实际上是文档树的叶子。 - 如果至少有一个文本节点上没有评论线程,我们可以允许插入。 我们使用我们之前在这里编写的 util
getCommentThreadsOnTextNode。
我们现在使用工具栏中的这个 util 函数来控制按钮的禁用状态。
# src/components/Toolbar.js export default function Toolbar({ selection, previousSelection }) { const editor = useEditor(); .... return ( <div className="toolbar"> .... <ToolBarButton isActive={false} disabled={!shouldAllowNewCommentThreadAtSelection( editor, selection )} label={<i className={`bi ${getIconForButton("comment")}`} />} onMouseDown={onInsertComment} /> </div> );让我们通过重新创建上面的示例来测试规则的实现。
此处需要指出的一个很好的用户体验细节是,如果用户在此处选择了整行文本,我们会禁用工具栏按钮,但它并没有完成用户的体验。 用户可能不完全理解为什么该按钮被禁用,并且可能会感到困惑,因为我们没有响应他们在此处插入评论线程的意图。 我们稍后会解决这个问题,因为评论弹出框的构建使得即使工具栏按钮被禁用,其中一个评论线程的弹出框也会出现,并且用户仍然可以留下评论。
让我们也测试一个案例,其中有一些未注释的文本节点并且规则允许插入新的评论线程。
选择评论线程
在本节中,我们启用用户单击评论文本节点的功能,并使用最短评论范围规则来确定应选择哪个评论线程。 该过程的步骤是:
- 在用户单击的评论文本节点上找到最短的评论线程。
- 将该评论线程设置为活动评论线程。 (我们创建了一个新的 Recoil 原子,它将成为这个事实的来源。)
- 被评论的文本节点会监听 Recoil 状态,如果它们是活动评论线程的一部分,它们会以不同的方式突出显示自己。 这样,当用户单击评论线程时,整个文本范围都会突出,因为所有文本节点都会更新它们的突出显示颜色。
第 1 步:实施最短评论范围规则
让我们从第 1 步开始,它基本上是实施最短评论范围规则。 这里的目标是在用户点击的文本节点处找到最短范围的评论线程。 为了找到最短长度的线程,我们需要计算该文本节点处所有评论线程的长度。 执行此操作的步骤是:
- 获取相关文本节点的所有评论线程。
- 从该文本节点沿任一方向遍历并不断更新正在跟踪的线程长度。
- 当我们到达以下边缘之一时,停止沿某个方向的遍历:
- 一个未注释的文本节点(意味着我们已经到达了我们正在跟踪的所有评论线程的最远开始/结束边缘)。
- 我们正在跟踪的所有评论线程都已到达边缘(开始/结束)的文本节点。
- 没有更多的文本节点可以在该方向上遍历(这意味着我们已经到达文档的开头或结尾或非文本节点)。
由于正向和反向的遍历在功能上是相同的,我们将编写一个辅助函数updateCommentThreadLengthMap ,它基本上采用文本节点迭代器。 它将不断调用迭代器并不断更新跟踪线程长度。 我们将调用这个函数两次——一次用于正向,一次用于反向。 Let's write our main utility function that will use this helper function.
# src/utils/EditorCommentUtils.js export function getSmallestCommentThreadAtTextNode(editor, textNode) { const commentThreads = getCommentThreadsOnTextNode(textNode); const commentThreadsAsArray = [...commentThreads]; let shortestCommentThreadID = commentThreadsAsArray[0]; const reverseTextNodeIterator = (slateEditor, nodePath) => Editor.previous(slateEditor, { at: nodePath, mode: "lowest", match: Text.isText, }); const forwardTextNodeIterator = (slateEditor, nodePath) => Editor.next(slateEditor, { at: nodePath, mode: "lowest", match: Text.isText, }); if (commentThreads.size > 1) { // The map here tracks the lengths of the comment threads. // We initialize the lengths with length of current text node // since all the comment threads span over the current text node // at the least. const commentThreadsLengthByID = new Map( commentThreadsAsArray.map((id) => [id, textNode.text.length]) ); // traverse in the reverse direction and update the map updateCommentThreadLengthMap( editor, commentThreads, reverseTextNodeIterator, commentThreadsLengthByID ); // traverse in the forward direction and update the map updateCommentThreadLengthMap( editor, commentThreads, forwardTextNodeIterator, commentThreadsLengthByID ); let minLength = Number.POSITIVE_INFINITY; // Find the thread with the shortest length. for (let [threadID, length] of commentThreadsLengthByID) { if (length < minLength) { shortestCommentThreadID = threadID; minLength = length; } } } return shortestCommentThreadID; }The steps we listed out are all covered in the above code. The comments should help follow how the logic flows there.
One thing worth calling out is how we created the traversal functions. We want to give a traversal function to updateCommentThreadLengthMap such that it can call it while it is iterating text node's path and easily get the previous/next text node. To do that, Slate's traversal utilities Editor.previous and Editor.next (defined in the Editor interface) are very helpful. Our iterators reverseTextNodeIterator and forwardTextNodeIterator call these helpers with two options mode: lowest and the match function Text.isText so we know we're getting a text node from the traversal, if there is one.
Now we implement updateCommentThreadLengthMap which traverses using these iterators and updates the lengths we're tracking.
# src/utils/EditorCommentUtils.js function updateCommentThreadLengthMap( editor, commentThreads, nodeIterator, map ) { let nextNodeEntry = nodeIterator(editor); while (nextNodeEntry != null) { const nextNode = nextNodeEntry[0]; const commentThreadsOnNextNode = getCommentThreadsOnTextNode(nextNode); const intersection = [...commentThreadsOnNextNode].filter((x) => commentThreads.has(x) ); // All comment threads we're looking for have already ended meaning // reached an uncommented text node OR a commented text node which // has none of the comment threads we care about. if (intersection.length === 0) { break; } // update thread lengths for comment threads we did find on this // text node. for (let i = 0; i < intersection.length; i++) { map.set(intersection[i], map.get(intersection[i]) + nextNode.text.length); } // call the iterator to get the next text node to consider nextNodeEntry = nodeIterator(editor, nextNodeEntry[1]); } return map; } One might wonder why do we wait until the intersection becomes 0 to stop iterating in a certain direction. Why can't we just stop if we're reached the edge of at least one comment thread — that would imply we've reached the shortest length in that direction, right? The reason we can't do that is that we know that a comment thread can span over multiple text nodes and we wouldn't know which of those text nodes did the user click on and we started our traversal from. We wouldn't know the range of all comment threads in question without fully traversing to the farthest edges of the union of the text ranges of the comment threads in both the directions.
Check out the below example where we have two comment threads 'A' and 'B' overlapping each other in some way resulting into three text nodes 1,2 and 3 — #2 being the text node with the overlap.

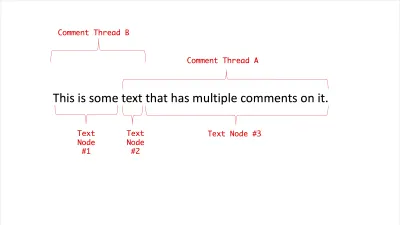
In this example, let's assume we don't wait for intersection to become 0 and just stop when we reach the edge of a comment thread. Now, if the user clicked on #2 and we start traversal in reverse direction, we'd stop at the start of text node #2 itself since that's the start of the comment thread A. As a result, we might not compute the comment thread lengths correctly for A & B. With the implementation above traversing the farthest edges (text nodes 1,2, and 3), we should get B as the shortest comment thread as expected.
To see the implementation visually, below is a walkthrough with a slideshow of the iterations. We have two comment threads A and B that overlap each other over text node #3 and the user clicks on the overlapping text node #3.
Steps 2 & 3: Maintaining State Of The Selected Comment Thread And Highlighting It
Now that we have the logic for the rule fully implemented, let's update the editor code to use it. For that, we first create a Recoil atom that'll store the active comment thread ID for us. We then update the CommentedText component to use our rule's implementation.
# src/utils/CommentState.js import { atom } from "recoil"; export const activeCommentThreadIDAtom = atom({ key: "activeCommentThreadID", default: null, }); # src/components/CommentedText.js import { activeCommentThreadIDAtom } from "../utils/CommentState"; import classNames from "classnames"; import { getSmallestCommentThreadAtTextNode } from "../utils/EditorCommentUtils"; import { useRecoilState } from "recoil"; export default function CommentedText(props) { .... const { commentThreads, textNode, ...otherProps } = props; const [activeCommentThreadID, setActiveCommentThreadID] = useRecoilState( activeCommentThreadIDAtom ); const onClick = () => { setActiveCommentThreadID( getSmallestCommentThreadAtTextNode(editor, textNode) ); }; return ( <span {...otherProps} className={classNames({ comment: true, // a different background color treatment if this text node's // comment threads do contain the comment thread active on the // document right now. "is-active": commentThreads.has(activeCommentThreadID), })} onClick={onClick} > {props.children} ≷/span> ); } 该组件使用useRecoilState ,它允许组件订阅并能够设置 Recoil atom 的值。 我们需要订阅者知道这个文本节点是否是活动评论线程的一部分,以便它可以以不同的方式设置自己的样式。 查看下面的屏幕截图,中间的评论线程处于活动状态,我们可以清楚地看到它的范围。

现在我们已经有了所有代码来选择评论线程,让我们看看它的实际效果。 为了很好地测试我们的遍历代码,我们测试了一些简单的重叠情况和一些边缘情况,例如:
- 单击编辑器开始/结束处的注释文本节点。
- 单击带有跨越多个段落的注释线程的注释文本节点。
- 单击图像节点之前的注释文本节点。
- 单击重叠链接的注释文本节点。
由于我们现在有一个 Recoil atom 来跟踪活动的评论线程 ID,所以需要注意的一个小细节是当用户使用工具栏按钮插入新的评论线程时,将新创建的评论线程设置为活动的。 这使我们在下一节中能够在插入时立即显示评论线程弹出框,以便用户可以立即开始添加评论。
# src/components/Toolbar.js import useAddCommentThreadToState from "../hooks/useAddCommentThreadToState"; import { useSetRecoilState } from "recoil"; export default function Toolbar({ selection, previousSelection }) { ... const setActiveCommentThreadID = useSetRecoilState(activeCommentThreadIDAtom); ..... const onInsertComment = useCallback(() => { const newCommentThreadID = insertCommentThread(editor, addCommentThread); setActiveCommentThreadID(newCommentThreadID); }, [editor, addCommentThread, setActiveCommentThreadID]); return <div className='toolbar'> .... </div>; }; 注意:这里使用useSetRecoilState (一个 Recoil 钩子,它公开了 atom 的 setter,但不订阅组件的值)是我们在这种情况下工具栏所需要的。
添加评论线程弹出框
在本节中,我们构建了一个评论弹出框,它利用了选定/活动评论线程的概念,并显示了一个弹出框,允许用户向该评论线程添加评论。 在我们构建它之前,让我们快速看看它是如何工作的。
当尝试在活动的评论线程附近呈现评论弹出框时,我们遇到了我们在第一篇文章中使用链接编辑器菜单时遇到的一些问题。 在这一点上,鼓励通读第一篇文章中构建链接编辑器的部分以及我们遇到的选择问题。
让我们首先根据活跃的评论线程在正确的位置渲染一个空的弹出框组件。 popover 的工作方式是:
- 仅当存在活动的评论线程 ID 时才会呈现评论线程弹出框。 为了获得这些信息,我们聆听我们在上一节中创建的 Recoil atom。
- 当它渲染时,我们在编辑器的选择处找到文本节点,并在它附近渲染弹出框。
- 当用户点击弹出框外的任何位置时,我们将活动评论线程设置为
null,从而停用评论线程并使弹出框消失。
# src/components/CommentThreadPopover.js import NodePopover from "./NodePopover"; import { getFirstTextNodeAtSelection } from "../utils/EditorUtils"; import { useEditor } from "slate-react"; import { useSetRecoilState} from "recoil"; import {activeCommentThreadIDAtom} from "../utils/CommentState"; export default function CommentThreadPopover({ editorOffsets, selection, threadID }) { const editor = useEditor(); const textNode = getFirstTextNodeAtSelection(editor, selection); const setActiveCommentThreadID = useSetRecoilState( activeCommentThreadIDAtom ); const onClickOutside = useCallback( () => {}, [] ); return ( <NodePopover editorOffsets={editorOffsets} isBodyFullWidth={true} node={textNode} className={"comment-thread-popover"} onClickOutside={onClickOutside} > {`Comment Thread Popover for threadID:${threadID}`} </NodePopover> ); }对于 popover 组件的这个实现,应该调用几件事:
- 它采用
editorOffsets和Editor组件中的selection,它将被渲染。editorOffsets是 Editor 组件的边界,因此我们可以计算弹出框的位置,并且selection可以是当前或以前的选择,以防用户使用工具栏按钮导致selection变为null。 上面链接的第一篇文章中的链接编辑器部分详细介绍了这些内容。 - 由于第一篇文章中的
LinkEditor和此处的CommentThreadPopover都在文本节点周围呈现了一个弹出框,因此我们已将该通用逻辑移动到一个组件NodePopover中,该组件处理与相关文本节点对齐的组件的呈现。 它的实现细节是第一篇文章中的LinkEditor组件。 -
NodePopover将onClickOutside方法作为道具,如果用户单击弹出框之外的某个位置,则会调用该方法。 我们通过将mousedown事件侦听器附加到document来实现这一点——正如这篇关于这个想法的 Smashing 文章中详细解释的那样。 -
getFirstTextNodeAtSelection获取用户选择中的第一个文本节点,我们使用它来呈现弹出窗口。 此函数的实现使用 Slate 的帮助器来查找文本节点。
# src/utils/EditorUtils.js export function getFirstTextNodeAtSelection(editor, selection) { const selectionForNode = selection ?? editor.selection; if (selectionForNode == null) { return null; } const textNodeEntry = Editor.nodes(editor, { at: selectionForNode, mode: "lowest", match: Text.isText, }).next().value; return textNodeEntry != null ? textNodeEntry[0] : null; } 让我们实现应该清除活动评论线程的onClickOutside回调。 但是,当评论线程弹出窗口打开并且某个线程处于活动状态并且用户碰巧单击另一个评论线程时,我们必须考虑这种情况。 在这种情况下,我们不希望onClickOutside重置活动评论线程,因为其他CommentedText组件上的单击事件应该将其他评论线程设置为活动状态。 我们不想在弹出窗口中干扰它。
我们这样做的方法是,我们找到最接近单击事件发生的 DOM 节点的 Slate 节点。 如果那个 Slate 节点是一个文本节点并且上面有评论,我们跳过重置活动评论线程 Recoil atom。 让我们实现它!
# src/components/CommentThreadPopover.js const setActiveCommentThreadID = useSetRecoilState(activeCommentThreadIDAtom); const onClickOutside = useCallback( (event) => { const slateDOMNode = event.target.hasAttribute("data-slate-node") ? event.target : event.target.closest('[data-slate-node]'); // The click event was somewhere outside the Slate hierarchy. if (slateDOMNode == null) { setActiveCommentThreadID(null); return; } const slateNode = ReactEditor.toSlateNode(editor, slateDOMNode); // Click is on another commented text node => do nothing. if ( Text.isText(slateNode) && getCommentThreadsOnTextNode(slateNode).size > 0 ) { return; } setActiveCommentThreadID(null); }, [editor, setActiveCommentThreadID] ); Slate 有一个辅助方法toSlateNode ,如果它不是 Slate 节点,它返回映射到 DOM 节点或其最近祖先的 Slate 节点。 如果此帮助程序的当前实现找不到 Slate 节点而不是返回null ,则会引发错误。 我们通过自己检查null情况来处理上述问题,如果用户单击编辑器外部不存在 Slate 节点的某个位置,这很可能发生这种情况。
我们现在可以更新Editor组件以侦听activeCommentThreadIDAtom并仅在评论线程处于活动状态时才呈现弹出框。
# src/components/Editor.js import { useRecoilValue } from "recoil"; import { activeCommentThreadIDAtom } from "../utils/CommentState"; export default function Editor({ document, onChange }): JSX.Element { const activeCommentThreadID = useRecoilValue(activeCommentThreadIDAtom); // This hook is described in detail in the first article const [previousSelection, selection, setSelection] = useSelection(editor); return ( <> ... <div className="editor" ref={editorRef}> ... {activeCommentThreadID != null ? ( <CommentThreadPopover editorOffsets={editorOffsets} selection={selection ?? previousSelection} threadID={activeCommentThreadID} /> ) : null} </div> ... </> ); }让我们验证弹出框是否在正确的评论线程的正确位置加载,并在我们单击外部时清除活动的评论线程。
我们现在继续让用户向评论线程添加评论并在弹出窗口中查看该线程的所有评论。 我们将使用 Recoil atom 系列——我们在本文前面为此创建的commentThreadsState 。
评论线程中的评论存储在comments数组中。 为了能够添加新评论,我们呈现一个允许用户输入新评论的表单输入。 当用户输入评论时,我们将其保存在本地状态变量commentText中。 单击按钮时,我们将评论文本作为新评论附加到comments数组中。
# src/components/CommentThreadPopover.js import { commentThreadsState } from "../utils/CommentState"; import { useRecoilState } from "recoil"; import Button from "react-bootstrap/Button"; import Form from "react-bootstrap/Form"; export default function CommentThreadPopover({ editorOffsets, selection, threadID, }) { const [threadData, setCommentThreadData] = useRecoilState( commentThreadsState(threadID) ); const [commentText, setCommentText] = useState(""); const onClick = useCallback(() => { setCommentThreadData((threadData) => ({ ...threadData, comments: [ ...threadData.comments, // append comment to the comments on the thread. { text: commentText, author: "Jane Doe", creationTime: new Date() }, ], })); // clear the input setCommentText(""); }, [commentText, setCommentThreadData]); const onCommentTextChange = useCallback( (event) => setCommentText(event.target.value), [setCommentText] ); return ( <NodePopover ... > <div className={"comment-input-wrapper"}> <Form.Control bsPrefix={"comment-input form-control"} placeholder={"Type a comment"} type="text" value={commentText} onChange={onCommentTextChange} /> <Button size="sm" variant="primary" disabled={commentText.length === 0} onClick={onClick} > Comment </Button> </div> </NodePopover> ); }注意:虽然我们为用户呈现一个输入以输入评论,但当弹出框安装时,我们不一定让它成为焦点。 这是一个用户体验决定,可能因编辑而异。 一些编辑器不允许用户在评论线程弹出框打开时编辑文本。 在我们的例子中,我们希望能够让用户在点击评论文本时对其进行编辑。
值得一提的是,我们如何从 Recoil 原子家族中访问特定评论线程的数据——通过将原子调用为commentThreadsState(threadID) 。 这给了我们原子的值和一个只更新族中那个原子的设置器。 如果评论是从服务器延迟加载的,Recoil 还提供了一个useRecoilStateLoadable钩子,它返回一个 Loadable 对象,告诉我们原子数据的加载状态。 如果还在加载,我们可以选择在弹窗中显示一个加载状态。
现在,我们访问threadData并呈现评论列表。 每条评论都由CommentRow组件呈现。
# src/components/CommentThreadPopover.js return ( <NodePopover ... > <div className={"comment-list"}> {threadData.comments.map((comment, index) => ( <CommentRow key={`comment_${index}`} comment={comment} /> ))} </div> ... </NodePopover> ); 下面是CommentRow的实现,它呈现评论文本和其他元数据,如作者姓名和创建时间。 我们使用date-fns模块来显示格式化的创建时间。
# src/components/CommentRow.js import { format } from "date-fns"; export default function CommentRow({ comment: { author, text, creationTime }, }) { return ( <div className={"comment-row"}> <div className="comment-author-photo"> <i className="bi bi-person-circle comment-author-photo"></i> </div> <div> <span className="comment-author-name">{author}</span> <span className="comment-creation-time"> {format(creationTime, "eee MM/dd H:mm")} </span> <div className="comment-text">{text}</div> </div> </div> ); }我们已经将其提取为它自己的组件,以便稍后在我们实现评论侧边栏时重新使用它。
至此,我们的评论弹出框已经拥有了允许插入新评论和更新 Recoil 状态所需的所有代码。 让我们验证一下。 在浏览器控制台上,使用我们之前添加的 Recoil Debug Observer,我们能够验证评论线程的 Recoil 原子是否在我们向线程添加新评论时正确更新。
添加评论侧边栏
在本文的前面,我们已经指出了为什么偶尔会发生这样的情况,即我们实施的规则会阻止某个评论线程无法通过单独单击其文本节点来访问——这取决于重叠的组合。 对于这种情况,我们需要一个评论侧边栏,让用户可以访问文档中的任何和所有评论线程。
评论侧边栏也是一个很好的补充,它融入了建议和审查工作流程,审阅者可以在其中一个接一个地浏览所有评论线程,并能够在他们认为需要的任何地方留下评论/回复。 在我们开始实现侧边栏之前,我们在下面处理了一项未完成的任务。
初始化评论线程的 Recoil 状态
当文档在编辑器中加载时,我们需要扫描文档以找到所有注释线程并将它们添加到我们在上面创建的 Recoil atom 作为初始化过程的一部分。 让我们在EditorCommentUtils中编写一个实用函数来扫描文本节点,找到所有评论线程并将它们添加到 Recoil atom。
# src/utils/EditorCommentUtils.js export async function initializeStateWithAllCommentThreads( editor, addCommentThread ) { const textNodesWithComments = Editor.nodes(editor, { at: [], mode: "lowest", match: (n) => Text.isText(n) && getCommentThreadsOnTextNode(n).size > 0, }); const commentThreads = new Set(); let textNodeEntry = textNodesWithComments.next().value; while (textNodeEntry != null) { [...getCommentThreadsOnTextNode(textNodeEntry[0])].forEach((threadID) => { commentThreads.add(threadID); }); textNodeEntry = textNodesWithComments.next().value; } Array.from(commentThreads).forEach((id) => addCommentThread(id, { comments: [ { author: "Jane Doe", text: "Comment Thread Loaded from Server", creationTime: new Date(), }, ], status: "open", }) ); }与后端存储同步和性能考虑
对于本文的上下文,由于我们完全专注于 UI 实现,我们只是使用一些数据来初始化它们,这些数据可以让我们确认初始化代码正在工作。
在评论系统的实际使用中,评论线程可能与文档内容本身分开存储。 在这种情况下,需要更新上述代码以进行 API 调用,以获取commentThreads中所有评论线程 ID 上的所有元数据和评论。 一旦评论线程被加载,它们很可能会随着多个用户实时向他们添加更多评论、更改他们的状态等而更新。 评论系统的生产版本需要以一种我们可以保持与服务器同步的方式来构建 Recoil 存储。 如果您选择使用 Recoil 进行状态管理,那么 Atom Effects API 上的一些示例(在撰写本文时是实验性的)可以做类似的事情。
如果一个文档真的很长,并且有很多用户在很多评论线程上协作,我们可能需要优化初始化代码,只加载文档前几页的评论线程。 或者,我们可以选择只加载所有评论线程的轻量级元数据,而不是加载整个评论列表,这可能是负载中较重的部分。
现在,让我们继续在Editor组件与文档一起安装时调用此函数,以便正确初始化 Recoil 状态。
# src/components/Editor.js import { initializeStateWithAllCommentThreads } from "../utils/EditorCommentUtils"; import useAddCommentThreadToState from "../hooks/useAddCommentThreadToState"; export default function Editor({ document, onChange }): JSX.Element { ... const addCommentThread = useAddCommentThreadToState(); useEffect(() => { initializeStateWithAllCommentThreads(editor, addCommentThread); }, [editor, addCommentThread]); return ( <> ... </> ); } 我们使用与 Toolbar Comment Button 实现一起使用的相同自定义钩子 - useAddCommentThreadToState来添加新的评论线程。 由于弹出框工作正常,我们可以单击文档中预先存在的评论线程之一,并验证它是否显示了我们用于初始化上述线程的数据。

现在我们的状态已经正确初始化,我们可以开始实现侧边栏了。 我们在 UI 中的所有评论线程都存储在 Recoil 原子家族 - commentThreadsState中。 如前所述,我们遍历 Recoil atom 系列中所有项目的方式是跟踪另一个 atom 中的 atom 键/id。 我们一直在用commentThreadIDsState做到这一点。 让我们添加CommentSidebar组件,该组件遍历该 atom 中的一组 id 并为每个组件呈现一个CommentThread组件。
# src/components/CommentsSidebar.js import "./CommentSidebar.css"; import {commentThreadIDsState,} from "../utils/CommentState"; import { useRecoilValue } from "recoil"; export default function CommentsSidebar(params) { const allCommentThreadIDs = useRecoilValue(commentThreadIDsState); return ( <Card className={"comments-sidebar"}> <Card.Header>Comments</Card.Header> <Card.Body> {Array.from(allCommentThreadIDs).map((id) => ( <Row key={id}> <Col> <CommentThread id={id} /> </Col> </Row> ))} </Card.Body> </Card> ); } 现在,我们实现CommentThread组件,该组件侦听与它正在呈现的评论线程对应的系列中的 Recoil 原子。 这样,当用户在编辑器中对线程添加更多评论或更改任何其他元数据时,我们可以更新侧边栏以反映这一点。
由于侧边栏对于包含大量评论的文档可能会变得非常大,因此我们在渲染侧边栏时隐藏所有评论,但第一个评论除外。 用户可以使用“显示/隐藏回复”按钮来显示/隐藏整个评论线程。
# src/components/CommentSidebar.js function CommentThread({ id }) { const { comments } = useRecoilValue(commentThreadsState(id)); const [shouldShowReplies, setShouldShowReplies] = useState(false); const onBtnClick = useCallback(() => { setShouldShowReplies(!shouldShowReplies); }, [shouldShowReplies, setShouldShowReplies]); if (comments.length === 0) { return null; } const [firstComment, ...otherComments] = comments; return ( <Card body={true} className={classNames({ "comment-thread-container": true, })} > <CommentRow comment={firstComment} showConnector={false} /> {shouldShowReplies ? otherComments.map((comment, index) => ( <CommentRow key={`comment-${index}`} comment={comment} showConnector={true} /> )) : null} {comments.length > 1 ? ( <Button className={"show-replies-btn"} size="sm" variant="outline-primary" onClick={onBtnClick} > {shouldShowReplies ? "Hide Replies" : "Show Replies"} </Button> ) : null} </Card> ); } 尽管我们使用showConnector添加了一个设计处理,但我们已经重用了弹出框中的CommentRow组件,该属性基本上使所有评论看起来都与侧边栏中的线程相连。
现在,我们在Editor中渲染CommentSidebar并验证它是否显示了我们在文档中的所有线程,并在我们向现有线程添加新线程或新评论时正确更新。
# src/components/Editor.js return ( <> <Slate ... > ..... <div className={"sidebar-wrapper"}> <CommentsSidebar /> </div> </Slate> </> ); 我们现在继续实现编辑器中流行的评论侧边栏交互:
单击边栏中的评论线程应选择/激活该评论线程。 如果评论线程在编辑器中处于活动状态,我们还添加了差异化设计处理以突出显示侧栏中的评论线程。 为此,我们使用了 Recoil 原子activeCommentThreadIDAtom 。 让我们更新CommentThread组件以支持这一点。
# src/components/CommentsSidebar.js function CommentThread({ id }) { const [activeCommentThreadID, setActiveCommentThreadID] = useRecoilState( activeCommentThreadIDAtom ); const onClick = useCallback(() => { setActiveCommentThreadID(id); }, [id, setActiveCommentThreadID]); ... return ( <Card body={true} className={classNames({ "comment-thread-container": true, "is-active": activeCommentThreadID === id, })} onClick={onClick} > .... </Card> ); 如果我们仔细观察,我们在将活动评论线程与侧边栏同步的实现中存在一个错误。 当我们点击侧边栏中的不同评论线程时,正确的评论线程确实在编辑器中突出显示。 但是,评论弹出框实际上并没有移动到已更改的活动评论线程。 它停留在第一次渲染的位置。 如果我们看一下 Comment Popover 的实现,它会根据编辑器选择的第一个文本节点呈现自己。 在实现中,选择评论线程的唯一方法是单击文本节点,因此我们可以方便地依赖编辑器的选择,因为单击事件会由 Slate 更新它。 在上面的onClick事件中,我们不更新选择,而只是更新 Recoil atom 值,导致 Slate 的选择保持不变,因此 Comment Popover 不会移动。
解决此问题的方法是在用户单击侧边栏中的评论线程时更新编辑器的选择以及更新 Recoil atom。 这样做的步骤是:
- 找到所有具有此评论线程的文本节点,我们将其设置为新的活动线程。
- 按照它们在文档中出现的顺序对这些文本节点进行排序(我们为此使用 Slate 的
Path.compareAPI)。 - 计算从第一个文本节点开始到最后一个文本节点结束的选择范围。
- 将选择范围设置为编辑器的新选择(使用 Slate 的
Transforms.selectAPI)。
如果我们只是想修复错误,我们可以在步骤#1 中找到第一个具有注释线程的文本节点,并将其设置为编辑器的选择。 但是,选择整个评论范围感觉像是一种更简洁的方法,因为我们实际上是在选择评论线程。
让我们更新onClick回调实现以包含上述步骤。
const onClick = useCallback(() => { const textNodesWithThread = Editor.nodes(editor, { at: [], mode: "lowest", match: (n) => Text.isText(n) && getCommentThreadsOnTextNode(n).has(id), }); let textNodeEntry = textNodesWithThread.next().value; const allTextNodePaths = []; while (textNodeEntry != null) { allTextNodePaths.push(textNodeEntry[1]); textNodeEntry = textNodesWithThread.next().value; } // sort the text nodes allTextNodePaths.sort((p1, p2) => Path.compare(p1, p2)); // set the selection on the editor Transforms.select(editor, { anchor: Editor.point(editor, allTextNodePaths[0], { edge: "start" }), focus: Editor.point( editor, allTextNodePaths[allTextNodePaths.length - 1], { edge: "end" } ), }); // Update the Recoil atom value. setActiveCommentThreadID(id); }, [editor, id, setActiveCommentThreadID]); 注意: allTextNodePaths包含所有文本节点的路径。 我们使用Editor.point API 来获取该路径的起点和终点。 第一篇文章介绍了 Slate 的位置概念。 它们在 Slate 的文档中也有详细记录。
让我们验证此实现是否修复了错误,并且评论弹出框正确移动到活动评论线程。 这一次,我们还测试了一个重叠线程的情况,以确保它不会在那里中断。
通过错误修复,我们启用了另一个尚未讨论的侧边栏交互。 如果我们有一个非常长的文档,并且用户单击了位于视口之外的侧边栏中的评论线程,我们希望滚动到文档的该部分,以便用户可以专注于编辑器中的评论线程。 通过使用 Slate 的 API 设置上面的选择,我们可以免费获得。 让我们在下面看看它的实际效果。
有了这个,我们包装了侧边栏的实现。 在文章的最后,我们列出了一些不错的功能添加和增强功能,我们可以对评论侧边栏进行改进,以帮助提升编辑器的评论和审阅体验。
解决和重新打开评论
在本节中,我们专注于使用户能够将评论线程标记为“已解决”,或者能够在需要时重新打开它们进行讨论。 从实现细节的角度来看,这是评论线程上的status元数据,当用户执行此操作时我们会更改它。 从用户的角度来看,这是一个非常有用的功能,因为它为他们提供了一种方式来确认关于文档中某些内容的讨论已经结束或需要重新打开,因为有一些更新/新观点等等。
为了启用切换状态,我们向CommentPopover添加了一个按钮,允许用户在两种状态之间切换: open和已resolved 。
# src/components/CommentThreadPopover.js export default function CommentThreadPopover({ editorOffsets, selection, threadID, }) { … const [threadData, setCommentThreadData] = useRecoilState( commentThreadsState(threadID) ); ... const onToggleStatus = useCallback(() => { const currentStatus = threadData.status; setCommentThreadData((threadData) => ({ ...threadData, status: currentStatus === "open" ? "resolved" : "open", })); }, [setCommentThreadData, threadData.status]); return ( <NodePopover ... header={ <Header status={threadData.status} shouldAllowStatusChange={threadData.comments.length > 0} onToggleStatus={onToggleStatus} /> } > <div className={"comment-list"}> ... </div> </NodePopover> ); } function Header({ onToggleStatus, shouldAllowStatusChange, status }) { return ( <div className={"comment-thread-popover-header"}> {shouldAllowStatusChange && status != null ? ( <Button size="sm" variant="primary" onClick={onToggleStatus}> {status === "open" ? "Resolve" : "Re-Open"} </Button> ) : null} </div> ); }在我们对此进行测试之前,让我们还为评论侧边栏提供针对已解决评论的差异化设计处理,以便用户可以轻松检测哪些评论线程未解决或打开,并在他们愿意时关注那些。
# src/components/CommentsSidebar.js function CommentThread({ id }) { ... const { comments, status } = useRecoilValue(commentThreadsState(id)); ... return ( <Card body={true} className={classNames({ "comment-thread-container": true, "is-resolved": status === "resolved", "is-active": activeCommentThreadID === id, })} onClick={onClick} > ... </Card> ); } 结论
在本文中,我们为富文本编辑器上的评论系统构建了核心 UI 基础架构。 我们在此处添加的一组功能作为在编辑器上构建更丰富的协作体验的基础,协作者可以在其中注释文档的某些部分并就它们进行对话。 添加评论侧边栏为我们提供了一个空间,可以在产品上启用更多对话或基于评论的功能。
沿着这些思路,以下是富文本编辑器可以考虑在我们在本文中构建的内容之上添加的一些功能:
- 支持
@提及,以便合作者可以在评论中相互标记; - 支持将图像和视频等媒体类型添加到评论线程;
- 文档级别的建议模式,允许审阅者对显示为更改建议的文档进行编辑。 可以参考 Google Docs 中的此功能或 Microsoft Word 中的更改跟踪作为示例;
- 侧边栏的增强功能可按关键字搜索对话,按状态或评论作者过滤线程等。