通过 PoP 向 WordPress 网站添加代码拆分功能
已发表: 2022-03-10速度是当今任何网站的首要任务之一。 使网站加载速度更快的一种方法是代码拆分:将应用程序拆分为可以按需加载的块 - 仅加载所需的 JavaScript,而不加载其他任何内容。 基于 JavaScript 框架的网站可以通过流行的 JavaScript 捆绑器 Webpack 立即实现代码拆分。 但是,对于 WordPress 网站来说,这并不容易。 首先,Webpack 并不是有意为与 WordPress 一起工作而构建的,因此设置它需要相当多的变通方法; 其次,似乎没有任何工具可以为 WordPress 提供本地按需资产加载功能。
鉴于 WordPress 缺乏合适的解决方案,我决定为 PoP 实现我自己的代码拆分版本,这是一个用于构建我创建的 WordPress 网站的开源框架。 安装了 PoP 的 WordPress 网站将具有原生的代码拆分功能,因此它不需要依赖 Webpack 或任何其他捆绑器。 在本文中,我将向您展示它是如何完成的,并解释基于框架架构的各个方面做出的决策。 最后,我将分析使用和不使用代码拆分的网站的性能,以及使用自定义实现相对于外部捆绑程序的优缺点。 我希望你喜欢这个旅程!
定义策略
代码拆分大致可以分为以下两个步骤:
- 计算每条路线必须加载哪些资产,
- 按需动态加载这些资产。
为了解决第一步,我们需要生成一个资产依赖图,包括我们应用程序中的所有资产。 资产必须递归地添加到这个映射中——还必须添加依赖项的依赖项,直到不需要更多资产。 然后,我们可以通过遍历资产依赖映射来计算特定路由所需的所有依赖关系,从路由的入口点(即开始执行的文件或代码段)一直到最后一级。
为了解决第二步,我们可以在服务器端计算请求的 URL 需要哪些资产,然后在响应中发送所需资产的列表,应用程序需要加载它们,或者直接 HTTP/ 2 将资源与响应一起推送。
然而,这些解决方案并不是最优的。 在第一种情况下,应用程序必须在响应返回后请求所有资产,因此会有一系列额外的往返请求来获取资产,并且在所有资产加载之前无法生成视图,导致用户必须等待(通过服务工作者预先缓存所有资产可以缓解此问题,因此减少了等待时间,但我们无法避免仅在响应返回后才解析资产)。 在第二种情况下,我们可能会重复推送相同的资产(除非我们添加一些额外的逻辑,例如通过 cookie 指示我们已经加载了哪些资源,但这确实增加了不希望的复杂性并阻止了响应被缓存),并且我们无法从 CDN 提供资产。
因此,我决定在客户端处理这个逻辑。 客户端上的应用程序可以使用每个路由需要哪些资产的列表,因此它已经知道请求的 URL 需要哪些资产。 这解决了上述问题:
- 资产可以立即加载,无需等待服务器响应。 (当我们将它与服务工作者结合起来时,我们可以非常确定,在响应返回时,所有资源都已被加载和解析,因此没有额外的等待时间。)
- 应用程序知道哪些资产已经加载; 因此,它不会请求该路线所需的所有资产,而只会请求那些尚未加载的资产。
将此列表传递到前端的不利方面是它可能会变得很重,这取决于网站的大小(例如它提供了多少可用路由)。 我们需要找到一种在不增加应用程序感知加载时间的情况下加载它的方法。 稍后再谈。
做出这些决定后,我们可以继续设计,然后在应用程序中实现代码拆分。 为了便于理解,该过程分为以下几个步骤:
- 了解应用程序的架构,
- 映射资产依赖关系,
- 列出所有申请路线,
- 生成一个列表,定义每条路线需要哪些资产,
- 动态加载资产,
- 应用优化。
让我们开始吧!
0. 了解应用程序的架构
我们需要映射所有资产的相互关系。 让我们回顾一下 PoP 架构的特殊性,以便设计出最合适的解决方案来实现这一目标。
PoP 是围绕 WordPress 的一层,使我们能够将 WordPress 用作为应用程序提供动力的 CMS,同时提供自定义 JavaScript 框架来在客户端呈现内容以构建动态网站。 它重新定义了网页的构建组件:而 WordPress 目前基于生成 HTML 的分层模板的概念(例如single.php 、 home.php和archive.php ),而 PoP 基于“模块、 ”,它们要么是原子功能,要么是其他模块的组合。 构建 PoP 应用程序类似于玩乐高积木——将模块堆叠在一起或相互包装,最终创建一个更复杂的结构。 它也可以被认为是 Brad Frost 原子设计的实现,它看起来像这样:
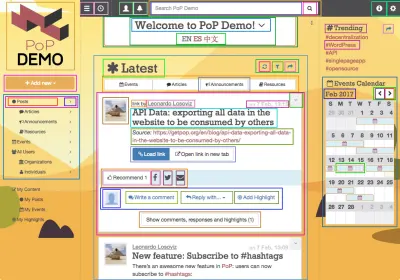
模块可以分组为更高阶的实体,即:blocks、blockGroups、pageSections 和 topLevels。 这些实体也是模块,只是具有额外的属性和职责,并且它们按照严格的自上而下的架构相互包含,其中每个模块都可以查看和更改其所有内部模块的属性。 模块之间的关系是这样的:
- 1 个 topLevel 包含 N 个 pageSections,
- 1 pageSection 包含 N 个块或块组,
- 1个blockGroup包含N个blocks或blockGroups,
- 1块包含N个模块,
- 1 个模块包含 N 个模块,无穷无尽。
在 PoP 中执行 JavaScript 代码
PoP 动态创建 HTML,从 pageSection 级别开始,遍历所有模块,通过模块预定义的 Handlebars 模板渲染每个模块,最后将模块对应的新创建元素添加到 DOM 中。 完成此操作后,它会在它们上执行 JavaScript 函数,这些函数是逐个模块预定义的。
PoP 与 JavaScript 框架(例如 React 和 AngularJS)的不同之处在于应用程序的流程并非源自客户端,但它仍然在后端配置,在模块的配置内部(编码在 PHP 对象中)。 受 WordPress 动作挂钩的影响,PoP 实现了发布-订阅模式:
- 每个模块都定义了必须在其对应的新创建的 DOM 元素上执行哪些 JavaScript 函数,而不必事先知道将执行此代码的内容或代码的来源。
- JavaScript 对象必须注册它们实现的 JavaScript 函数。
- 最后,在运行时,PoP 计算哪些 JavaScript 对象必须执行哪些 JavaScript 函数,并适当地调用它们。
例如,通过其对应的 PHP 对象,日历模块指示它需要在其 DOM 元素上执行calendar函数,如下所示:
class CalendarModule { function get_jsmethods() { $methods = parent::get_jsmethods(); $this->add_jsmethod($methods, 'calendar'); return $methods; } ... } 然后,一个 JavaScript 对象(在本例中为popFullCalendar )宣布它已实现calendar功能。 这是通过调用popJSLibraryManager.register来完成的:
window.popFullCalendar = { calendar : function(elements) { ... } }; popJSLibraryManager.register(popFullCalendar, ['calendar', ...]); 最后, popJSLibraryManager对执行什么代码进行匹配。 它允许 JavaScript 对象注册它们实现的功能,并提供一种方法来从所有订阅的 JavaScript 对象中执行特定功能:
window.popJSLibraryManager = { libraries: [], methods: {}, register : function(library, methods) { this.libraries.push(library); for (var i = 0; i < methods.length; i++) { var method = methods[i]; this.methods[method] = this.methods[method] || []; this.methods[method].push(library); } }, execute : function(method, elements) { var libraries = this.methods[method] || []; for (var i = 0; i < libraries.length; i++) { var library = libraries[i]; library[method](elements); } } } 在将 ID 为calendar-293的新日历元素添加到 DOM 后,PoP 将简单地执行以下函数:
popJSLibraryManager.execute("calendar", document.getElementById("calendar-293"));入口点
对于 PoP,执行 JavaScript 代码的入口点是 HTML 输出末尾的这一行:
<script type="text/javascript">popManager.init();</script> popManager.init()首先初始化前端框架,然后执行所有渲染模块定义的JavaScript函数,如上所述。 下面是这个函数的一个非常简化的形式(原始代码在 GitHub 上)。 通过调用popJSLibraryManager.execute('pageSectionInitialized', pageSection)和popJSLibraryManager.execute('documentInitialized') ,所有实现这些函数( pageSectionInitialized和documentInitialized )的 JavaScript 对象都将执行它们。
(function($){ window.popManager = { // The configuration for all the modules (including pageSections and blocks) in the application configuration : {...}, init : function() { var that = this; $.each(this.configuration, function(pageSectionId, configuration) { // Obtain the pageSection element in the DOM from the ID var pageSection = $('#'+pageSectionId); // Run all required JavaScript methods on it this.runJSMethods(pageSection, configuration); // Trigger an event marking the block as initialized popJSLibraryManager.execute('pageSectionInitialized', pageSection); }); // Trigger an event marking the document as initialized popJSLibraryManager.execute('documentInitialized'); }, ... }; })(jQuery); runJSMethods函数执行为每个模块定义的 JavaScript 方法,从最顶层的模块 pageSection 开始,然后是其所有内部块及其内部模块:
(function($){ window.popManager = { ... runJSMethods : function(pageSection, configuration) { // Initialize the heap with "modules", starting from the top one, and recursively iterate over its inner modules var heap = [pageSection.data('module')], i; while (heap.length > 0) { // Get the first element of the heap var module = heap.pop(); // The configuration for that module contains which JavaScript methods to execute, and which are the module's inner modules var moduleConfiguration = configuration[module]; // The list of all JavaScript functions that must be executed on the module's newly created DOM elements var jsMethods = moduleConfiguration['js-methods']; // Get all of the elements added to the DOM for that module, which have been stored in JavaScript object `popJSRuntimeManager` upon creation var elements = popJSRuntimeManager.getDOMElements(module); // Iterate through all of the JavaScript methods and execute them, passing the elements as argument for (i = 0; i < jsMethods.length; i++) { popJSLibraryManager.execute(jsMethods[i], elements); } // Finally, add the inner-modules to the heap heap = heap.concat(moduleConfiguration['inner-modules']); } }, }; })(jQuery);总之,PoP 中的 JavaScript 执行是松耦合的:我们没有硬固定的依赖关系,而是通过任何 JavaScript 对象都可以订阅的钩子来执行 JavaScript 函数。
网页和 API
PoP 网站是一个自用的 API。 在 PoP 中,网页和 API 没有区别:每个 URL 默认返回网页,只需添加参数output=json ,它就会返回其 API(例如 getpop.org/en/ 是网页,getpop.org/en/?output=json 是它的 API)。 该 API 用于在 PoP 中动态呈现内容; 因此,当单击指向另一个页面的链接时,会请求 API,因为届时网站的框架将已加载(例如顶部和侧面导航) - 然后 API 模式所需的资源集将是网页中的一个子集。 在计算路由的依赖关系时,我们需要考虑到这一点:在首次加载网站时加载路由或通过单击某个链接动态加载它会产生不同的所需资产集。
这些是 PoP 最重要的方面,将定义代码拆分的设计和实现。 让我们继续下一步。
1. 映射资产依赖
我们可以为每个 JavaScript 文件添加一个配置文件,详细说明它们的显式依赖关系。 但是,这会重复代码并且难以保持一致。 更简洁的解决方案是将 JavaScript 文件作为唯一的真实来源,从其中提取代码,然后分析此代码以重新创建依赖关系。
为了能够重新创建映射,我们在 JavaScript 源文件中寻找的元数据如下:
- 内部方法调用,例如
this.runJSMethods(...); - 外部方法调用,例如
popJSRuntimeManager.getDOMElements(...); - 所有出现的
popJSLibraryManager.execute(...),它在所有实现它的对象中执行 JavaScript 函数; - 所有出现的
popJSLibraryManager.register(...),以获取哪些 JavaScript 对象实现了哪些 JavaScript 方法。
我们将使用 jParser 和 jTokenizer 在 PHP 中标记我们的 JavaScript 源文件并提取元数据,如下所示:
- 找到以下序列时会推断出内部方法调用(例如
this.runJSMethods):标记this或that+.+ 其他一些标记,它是内部方法的名称(runJSMethods)。 - 外部方法调用(例如
popJSRuntimeManager.getDOMElements)在找到以下序列时被推导出:包含在我们应用程序中所有 JavaScript 对象列表中的令牌(我们将提前需要此列表;在这种情况下,它将包含对象popJSRuntimeManager) +.+ 其他一些标记,它是外部方法的名称(getDOMElements)。 - 每当我们发现
popJSLibraryManager.execute("someFunctionName")我们推断 Javascript 方法是someFunctionName。 - 每当我们找到
popJSLibraryManager.register(someJSObject, ["someFunctionName1", "someFunctionName2"])我们推导出 Javascript 对象someJSObject来实现方法someFunctionName1,someFunctionName2。
我已经实现了脚本,但不会在这里描述它。 (它太长并没有增加多少价值,但可以在 PoP 的存储库中找到)。 该脚本在请求网站开发服务器上的内部页面时运行(我在之前关于服务工作者的文章中已经写过该方法),它将生成映射文件并将其存储在服务器上。 我准备了一个生成映射文件的示例。 它是一个简单的 JSON 文件,包含以下属性:
-
internalMethodCalls
对于每个 JavaScript 对象,列出它们之间内部函数的依赖关系。 -
externalMethodCalls
对于每个 JavaScript 对象,列出从内部函数到来自其他 JavaScript 对象的函数的依赖关系。 -
publicMethods
列出所有已注册的方法,以及对于每个方法,哪些 JavaScript 对象实现了它。 -
methodExecutions
对于每个 JavaScript 对象和每个内部函数,列出通过popJSLibraryManager.execute('someMethodName')执行的所有方法。
请注意,结果还不是资产依赖映射,而是 JavaScript 对象依赖映射。 从这个映射中,我们可以确定,每当执行某个对象的函数时,还需要哪些其他对象。 我们仍然需要配置每个资产中包含哪些 JavaScript 对象,对于所有资产(在 jTokenizer 脚本中,JavaScript 对象是我们正在寻找的用于识别外部方法调用的标记,因此这些信息是脚本的输入,可以'不能从源文件本身获得)。 这是通过ResourceLoaderProcessor PHP 对象完成的,例如 resourceloader-processor.php。
最后,通过结合地图和配置,我们将能够计算应用程序中每条路线所需的所有资产。
2. 列出所有申请路线
我们需要识别应用程序中可用的所有路由。 对于 WordPress 网站,此列表将从每个模板层次结构的 URL 开始。 为 PoP 实现的那些是:
- 主页:https://getpop.org/en/
- 作者:https://getpop.org/en/u/leo/
- 单:https://getpop.org/en/blog/new-feature-code-splitting/
- 标签:https://getpop.org/en/tags/internet/
- 页面:https://getpop.org/en/philosophy/
- 类别:https://getpop.org/en/blog/(类别实际上是作为一个页面实现的,从URL路径中删除
category/) - 404:https://getpop.org/en/this-page-does-not-exist/
对于这些层次结构中的每一个,我们必须获得产生独特配置的所有路由(即,这将需要一组独特的资产)。 在 PoP 的情况下,我们有以下内容:
- 主页和404是唯一的。
- 任何标签的标签页始终具有相同的配置。 因此,任何标签的单个 URL 就足够了。
- 单个帖子取决于帖子类型(如“事件”或“帖子”)和帖子的主要类别(如“博客”或“文章”)的组合。 然后,我们需要每个组合的 URL。
- 类别页面的配置取决于类别。 因此,我们需要每个帖子类别的 URL。
- 作者页面取决于作者的角色(“个人”、“组织”或“社区”)。 因此,我们需要三个作者的 URL,每个作者都具有这些角色之一。
- 每个页面都可以有自己的配置(“登录”、“联系我们”、“我们的使命”等)。 因此,必须将所有页面 URL 添加到列表中。
正如我们所看到的,这个列表已经很长了。 此外,我们的应用程序可能会向 URL 添加参数来更改配置,可能还会更改所需的资产。 例如,PoP 提供添加以下 URL 参数:
- 选项卡(
?tab=…),显示相关信息:https://getpop.org/en/blog/new-feature-code-splitting/?tab=authors; - 格式(
?format=…),更改数据的显示方式:https://getpop.org/en/blog/?format=list; - target (
?target=…),在不同的 pageSection 中打开页面:https://getpop.org/en/add-post/?target=addons。
一些初始路由可以具有上述参数中的一个、两个甚至三个,从而创建多种组合:
- 单个帖子:https://getpop.org/en/blog/new-feature-code-splitting/
- 单个帖子的作者:https://getpop.org/en/blog/new-feature-code-splitting/?tab=authors
- 单个帖子的作者列表:https://getpop.org/en/blog/new-feature-code-splitting/?tab=authors&format=list
- 单个帖子的作者作为模式窗口中的列表:https://getpop.org/en/blog/new-feature-code-splitting/?tab=authors&format=list&target=modals
综上所述,对于PoP来说,所有可能的路由都是以下几项的组合:
- 所有初始模板层次结构路由;
- 层次结构将产生不同配置的所有不同值;
- 每个层次结构的所有可能选项卡(不同的层次结构可能具有不同的选项卡值:单个帖子可以具有选项卡“作者”和“响应”,而作者可以具有选项卡“帖子”和“关注者”);
- 每个选项卡的所有可能格式(不同的选项卡可能应用不同的格式:“作者”选项卡可能具有“地图”格式,但“响应”选项卡可能没有);
- 所有可能的目标,指示每个路线可能显示的 pageSections(虽然可以在主要部分或浮动窗口中创建帖子,但可以将“与您的朋友分享”页面设置为在模式窗口中打开)。
因此,对于稍微复杂的应用程序,无法手动生成包含所有路由的列表。 然后,我们必须创建一个脚本来从数据库中提取这些信息,对其进行操作,最后以所需的格式输出。 此脚本将获取所有帖子类别,从中我们可以生成所有不同类别页面 URL 的列表,然后,对于每个类别,查询数据库中相同的任何帖子,这将生成单个 URL在每个类别下发布,依此类推。 完整的脚本是可用的,从function get_resources()开始,它公开了要由每个层次结构案例实现的钩子。
3. 生成定义每个路由所需资产的列表
到目前为止,我们已经有了资产依赖映射和应用程序中所有路由的列表。 现在是时候将这两者结合起来,并生成一个列表,为每条路线指明需要哪些资产。
要创建此列表,我们应用以下过程:
- 生成一个列表,其中包含要为每个路由执行的所有 JavaScript 方法:
计算路由的模块,然后获取每个模块的配置,然后从配置中提取模块需要执行哪些JavaScript函数,并将它们加在一起。 - 接下来,遍历每个 JavaScript 函数的资产依赖关系图,收集其所有必需依赖项的列表,并将它们全部添加在一起。
- 最后,添加渲染该路由内的每个模块所需的 Handlebars 模板。
另外,如前所述,每个 URL 都有网页和 API 模式,所以我们需要将上面的过程运行两次,每个模式一次(即在 URL 中添加一次参数output=json ,表示 API 模式的路由,并且一旦在网页模式下保持 URL 不变)。 然后我们将生成两个列表,它们将有不同的用途:
- 初始加载网站时将使用网页模式列表,以便该路由的相应脚本包含在初始 HTML 响应中。 该列表将存储在服务器上。
- 在网站上动态加载页面时将使用 API 模式列表。 此列表将加载到客户端上,以使应用程序能够计算在单击链接时按需加载哪些额外资产。
大部分逻辑已从function add_resources_from_settingsprocessors($fetching_json, ...)开始实现,(您可以在存储库中找到它)。 参数$fetching_json区分网页 ( false ) 和 API ( true ) 模式。
网页模式的脚本运行时,会输出resourceloader-bundle-mapping.json,这是一个JSON对象,具有以下属性:
-
bundle-ids
这是最多四个资源的集合(它们的名称已针对生产环境进行了修改:eq=>handlebars、er=>handlebars-helpers等),分组在一个捆绑 ID 下。 -
bundlegroup-ids
这是bundle-ids的集合。 每个 bundleGroup 代表一组独特的资源。 -
key-ids
这是路由(由它们的哈希表示,它标识使路由唯一的所有属性的集合)与其对应的 bundleGroup 之间的映射。
可以看出,路由与其资源之间的映射不是直截了当的。 它不是将key-ids映射到资源列表,而是将它们映射到一个唯一的 bundleGroup,它本身就是一个bundles列表,并且只有每个 bundle 是一个resources列表(每个 bundle 最多四个元素)。 为什么会这样? 这有两个目的:
- 它使我们能够识别唯一 bundleGroup 下的所有资源。 因此,我们可以在 HTML 响应中包含一个唯一的 JavaScript 资产,而不是包含所有资源,它是相应的 bundleGroup 文件,它捆绑在所有相应的资源中。 这在为仍然不支持 HTTP/2 的设备提供服务时很有用,并且还会增加加载时间,因为 Gzip 压缩单个捆绑文件比单独压缩其组成文件然后将它们加在一起更有效。 或者,我们也可以加载一系列包而不是唯一的bundleGroup,这是资源和bundleGroups之间的折衷(加载bundles比bundleGroups慢,因为Gzip'ing,但如果经常发生失效,它的性能会更高,所以我们将仅下载更新的捆绑包而不是整个捆绑包组)。 在 filegenerator-bundles.php 和 filegenerator-bundlegroups.php 中可以找到将所有资源捆绑到 bundles 和 bundleGroups 的脚本。
- 将资源集划分为包允许我们识别常见模式(例如,识别在许多路由之间共享的四个资源的集合),从而允许不同的路由链接到同一个包。 结果,生成的列表将具有较小的大小。 这可能对驻留在服务器上的网页列表没有多大用处,但对于将在客户端加载的 API 列表很有用,我们稍后会看到。
当 API 模式的脚本运行时,它将输出 resources.js 文件,具有以下属性:
-
bundles和bundle-groups的作用与网页模式中所述的相同 keys的作用也与网页模式的key-ids相同。 但是,它不是将哈希作为表示路由的键,而是将所有使路由唯一的属性串联起来——在我们的例子中,格式 (f)、制表符 (t) 和目标 (r)。-
sources是每个资源的源文件。 -
types是每个资源的 CSS 或 JavaScript(尽管为了简单起见,我们没有在本文中介绍 JavaScript 资源也可以将 CSS 资源设置为依赖项,并且模块可以加载自己的 CSS 资源,实现渐进式 CSS 加载策略)。 -
resources捕获必须为每个层次结构加载哪些 bundleGroup。 -
ordered-load-resources包含必须按顺序加载的资源,以防止脚本在其依赖的脚本之前加载(默认情况下,它们是异步的)。
我们将在下一节探讨如何使用这个文件。
4.动态加载资产
如前所述,API 列表将加载到客户端,以便我们可以在用户单击链接后立即开始加载路由所需的资产。
加载映射脚本
生成的带有应用程序中所有路由资源列表的 JavaScript 文件并不简单——在这种情况下,它达到了 85 KB(它本身已经过优化,修改了资源名称并生成了包以识别跨路由的常见模式) . 解析时间不应该是一个很大的瓶颈,因为解析 JSON 比解析 JavaScript 对于相同的数据要快 10 倍。 但是,大小是网络传输的问题,因此我们必须以不影响应用程序感知加载时间或让用户等待的方式加载此脚本。

我实现的解决方案是使用服务工作者预缓存此文件,使用defer加载它,以便在执行关键 JavaScript 方法时不会阻塞主线程,然后在用户单击链接时显示回退通知消息在脚本加载之前:“网站仍在加载中,请稍候点击链接。” 这是通过添加一个固定的 div 来实现的,在加载脚本时,在所有内容的顶部放置一个loadingscreen类,然后在 div 内添加通知消息和一个notificationmsg类,以及这几行 CSS:
.loadingscreen > .notificationmsg { display: none; } .loadingscreen:focus > .notificationmsg, .loadingscreen:active > .notificationmsg { display: block; }另一种解决方案是将这个文件分成几个文件并根据需要逐步加载它们(我已经编写了一个策略)。 此外,这个 85 KB 的文件包含应用程序中所有可能的路径,包括诸如“作者的公告,以缩略图形式显示,显示在模态窗口中”之类的路径,如果有的话,可能会在蓝月亮中访问一次。 最常访问的路由很少(主页、单页、作者、标签和所有页面,所有这些都没有额外的属性),这应该会产生一个小得多的文件,大约 30 KB。
从请求的 URL 获取路由
我们必须能够从请求的 URL 中识别路由。 例如:
-
https://getpop.org/en/u/leo/映射到路由“作者”, -
https://getpop.org/en/u/leo/?tab=followers映射到“作者的追随者”路线, -
https://getpop.org/en/tags/internet/映射到路由“tag”, -
https://getpop.org/en/tags/映射到路由“page/tags/”, - 等等。
为此,我们需要评估 URL,并从中推断出使路由唯一的元素:层次结构和所有属性(格式、选项卡和目标)。 识别属性没有问题,因为它们是 URL 中的参数。 唯一的挑战是通过将 URL 与多个模式匹配来从 URL 推断层次结构(主页、作者、单个、页面或标签)。 例如,
- 以
https://getpop.org/en/u/开头的任何内容都是作者。 - 任何以
https://getpop.org/en/tags/开头但不完全是标签的东西都是标签。 如果它恰好是https://getpop.org/en/tags/,那么它就是一个页面。 - 等等。
下面的函数从 resourceloader.js 的第 321 行开始实现,必须为所有这些层次结构的模式提供配置。 它首先检查 URL 中是否没有子路径——在这种情况下,它是“home”。 然后,它会逐一检查以匹配“作者”、“标签”和“单个”的层次结构。 如果其中任何一个都不成功,那么它是默认情况,即“page”:
window.popResourceLoader = { // The config will be populated externally, using a config.js file, generated by a script config : {}, getPath : function(url) { var parser = document.createElement('a'); parser.href = url; return parser.pathname; }, getHierarchy : function(url) { var path = this.getPath(url); if (!path) { return 'home'; } var config = this.config; if (path.startsWith(config.paths.author) && path != config.paths.author) { return 'author'; } if (path.startsWith(config.paths.tag) && path != config.paths.tag) { return 'tag'; } // We must also check that this path is, itself, not a potential page (https://getpop.org/en/posts/articles/ is "page", but https://getpop.org/en/posts/this-is-a-post/ is "single") if (config.paths.single.indexOf(path) === -1 && config.paths.single.some(function(single_path) { return path.startsWith(single_path) && path != single_path;})) { return 'single'; } return 'page'; }, ... };因为所有需要的数据都已经在数据库中(所有类别、所有页面 slug 等),我们将执行一个脚本来在开发或登台环境中自动创建此配置文件。 实现的脚本是 resourceloader-config.php,它生成 config.js,其中包含层次结构“author”、“tag”和“single”的 URL 模式,位于键“paths”下:
popResourceLoader.config = { "paths": { "author": "u/", "tag": "tags/", "single": ["posts/articles/", "posts/announcements/", ...] }, ... };Loading Resources for the Route
Once we have identified the route, we can obtain the required assets from the generated JavaScript file under the key “resources”, which looks like this:
config.resources = { "home": { "1": [1, 110, ...], "2": [2, 111, ...], ... }, "author": { "7": [6, 114, ...], "8": [7, 114, ...], ... }, "tag": { "119": [66, 127, ...], "120": [66, 127, ...], ... }, "single": { "posts/": { "7": [190, 142, ...], "3": [190, 142, ...], ... }, "events/": { "7": [213, 389, ...], "3": [213, 389, ...], ... }, ... }, "page": { "log-in/": { "3": [233, 115, ...] }, "log-out/": { "3": [234, 115, ...] }, "add-post/": { "3": [239, 398, ...] }, "posts/": { "120": [268, 127, ...], "122": [268, 127, ...], ... }, ... } };At the first level, we have the hierarchy (home, author, tag, single or page). Hierarchies are divided into two groups: those that have only one set of resources (home, author and tag), and those that have a specific subpath (page permalink for the pages, custom post type or category for the single). Finally, at the last level, for each key ID (which represents a unique combination of the possible values of “format”, “tab” and “target”, stored under “keys”), we have an array of two elements: [JS bundleGroup ID, CSS bundleGroup ID], plus additional bundleGroup IDs if executing progressive booting (JS bundleGroups to be loaded as "async" or "defer" are bundled separately; this will be explained in the optimizations section below).
Please note: For the single hierarchy, we have different configurations depending on the custom post type. This can be reflected in the subpath indicated above (for example, events and posts ) because this information is in the URL (for example, https://getpop.org/en/posts/the-winners-of-climate-change-techno-fixes/ and https://getpop.org/en/events/debate-post-fork/ ), so that, when clicking on a link, we will know the corresponding post type and can thus infer the corresponding route. However, this is not the case with the author hierarchy. As indicated earlier, an author may have three different configurations, depending on the user role ( individual , organization or community ); however, in this file, we've defined only one configuration for the author hierarchy, not three. That is because we are not able to tell from the URL what is the role of the author: user leo (under https://getpop.org/en/u/leo/ ) is an individual, whereas user pop (under https://getpop.org/en/u/pop/ ) is a community; however, their URLs have the same pattern. If we could instead have the URLs https://getpop.org/en/u/individuals/leo/ and https://getpop.org/en/u/communities/pop/ , then we could add a configuration for each user role. However, I've found no way to achieve this in WordPress. As a consequence, only for the API mode, we must merge the three routes (individuals, organizations and communities) into one, which will have all of the resources for the three cases; and clicking on the link for user leo will also load the resources for organizations and communities, even if we don't need them.
Finally, when a URL is requested, we obtain its route, from which we obtain the bundleGroup IDs (for both JavaScript and CSS assets). From each bundleGroup, we find the corresponding bundles under bundlegroups . Then, for each bundle, we obtain all resources under the key bundles . Finally, we identify which assets have not yet been loaded, and we load them by getting their source, which is stored under the key sources . The whole logic is coded starting from line 472 in resourceloader.js.
And with that, we have implemented code-splitting for our application! From now on, we can get better loading times by applying optimizations. Let's tackle that next.
5. Applying Optimizations
The objective is to load as little code as possible, as delayed as possible, and to cache as much of it as possible. Let's explore how to do this.
Splitting Up the Code Into Smaller Units
A single JavaScript asset may implement several functions (by calling popJSLibraryManager.register ), yet maybe only one of those functions is actually needed by the route. Thus, it makes sense to split up the asset into several subassets, implementing a single function on each of them, and extracting all common code from all of the functions into yet another asset, depended upon by all of them.
For instance, in the past, there was a unique file, waypoints.js , that implemented the functions waypointsFetchMore , waypointsTheater and a few more. However, in most cases, only the function waypointsFetchMore was needed, so I was loading the code for the function waypointsTheater unnecessarily. Then, I split up waypoints.js into the following assets:
- waypoints.js, with all common code and implementing no public functions;
- waypoints-fetchmore.js, which implements just the public function
waypointsFetchMore; - waypoints-theater.js, which implements just the public function
waypointsTheater.
Evaluating how to split the files is a manual job. Luckily, there is a tool that greatly eases the task: Chrome Developer Tools' “Coverage” tab, which displays in red those portions of JavaScript code that have not been invoked:
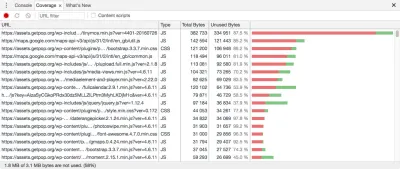
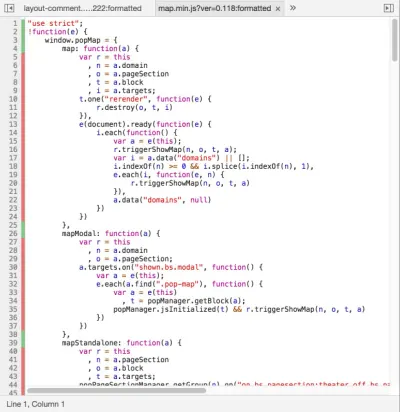
By using this tool, we can better understand how to split our JavaScript files into more granular units, thus reducing the amount of unneeded code that is loaded.
Integration With Service Workers
By precaching all of the resources using service workers, we can be pretty sure that, by the time the response is back from the server, all of the required assets will have been loaded and parsed. I wrote an article on Smashing Magazine on how to accomplish this.
Progressive Booting
PoP's architecture plays very nice with the concept of loading assets in different stages. When defining the JavaScript methods to execute on each module (by doing $this->add_jsmethod($methods, 'calendar') ), these can be set as either critical or non-critical . By default, all methods are set as non-critical, and critical methods must be explicitly defined by the developer, by adding an extra parameter: $this->add_jsmethod($methods, 'calendar', 'critical') . Then, we will be able to load scripts immediately for critical functions, and wait until the page is loaded to load non-critical functions, the JavaScript files of which are loaded using defer .
(function($){ window.popManager = { init : function() { var that = this; $.each(this.configuration, function(pageSectionId, configuration) { ... this.runJSMethods(pageSection, configuration, 'critical'); ... }); window.addEventListener('load', function() { $.each(this.configuration, function(pageSectionId, configuration) { ... this.runJSMethods(pageSection, configuration, 'non-critical'); ... }); }); ... }, ... }; })(jQuery);The gains from progressive booting are major: The JavaScript engine needs not spend time parsing non-critical JavaScript initially, when a quick response to the user is most important, and overall reduces the time to interactive.
Testing And Analizying Performance Gains
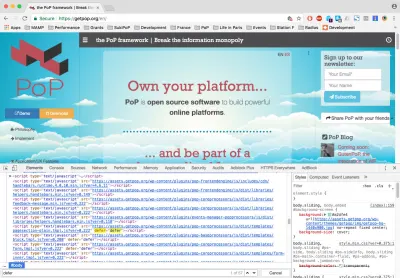
We can use https://getpop.org/en/, a PoP website, for testing purposes. When loading the home page, opening Chrome Developer Tools' “Elements” tab and searching for “defer”, it shows 4 occurrences. Thanks to progressive booting, that is 4 bundleGroup JavaScript files containing the contents of 57 Javascript files with non-critical methods that could wait until the website finished loading to be loaded:
If we now switch to the “Network” tab and click on a link, we can see which assets get loaded. For instance, click on the link “Application/UX Features” on the left side. Filtering by JavaScript, we see it loaded 38 files, including JavaScript libraries and Handlebars templates. Filtering by CSS, we see it loaded 9 files. These 47 files have all been loaded on demand:
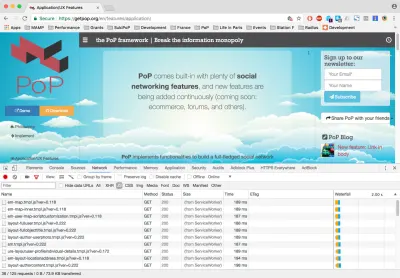
Let's check whether the loading time got boosted. We can use WebPagetest to measure the application with and without code-splitting, and calculate the difference.
- Without code-splitting: testing URL, WebPagetest results

- With code-splitting, loading resources: testing URL, WebPagetest Results

- With code-splitting, loading a bundleGroup: testing URL, WebPagetest Results

We can see that when loading the app bundle with all resources or when doing code-splitting and loading resources, there is not so much gain. However, when doing code-splitting and loading a bundleGroup, the gains are significant: 1.7 seconds in loading time, 500 milliseconds to the first meaningful paint, and 1 second to interactive.
Conclusion: Is It Worth It?
You might be thinking, Is it worth it all this trouble? Let's analyze the advantages and disadvantages of implementing our own code-splitting features.
缺点
- 我们必须维护它。
如果我们只使用 Webpack,我们可以依靠它的社区来使软件保持最新,并可以从它的插件生态系统中受益。 - 脚本需要时间来运行。
PoP 网站 Agenda Urbana 拥有 304 条不同的路线,从中产生 422 套独特的资源。 对于这个网站,使用 2012 年的 MacBook Pro 运行生成资产依赖关系图的脚本大约需要 8 分钟,运行生成包含所有资源的列表并创建 bundle 和 bundleGroup 文件的脚本需要 15 分钟. 去喝杯咖啡的时间已经绰绰有余了! - 它需要一个暂存环境。
如果我们需要等待大约 25 分钟来运行脚本,那么我们就无法在生产环境中运行它。 我们需要一个与生产系统配置完全相同的暂存环境。 - 额外的代码被添加到网站,只是为了管理。
85 KB 的代码本身没有功能,只是用来管理其他代码的代码。 - 增加了复杂性。
如果我们想将资产分成更小的单位,这在任何情况下都是不可避免的。 Webpack 还会增加应用程序的复杂性。
优点
- 它适用于 WordPress。
Webpack 不适用于开箱即用的 WordPress,要使其正常工作需要相当多的解决方法。 这个解决方案确实适用于 WordPress(只要安装了 PoP)。 - 它具有可扩展性和可扩展性。
应用程序的大小和复杂性可以无限增长,因为 JavaScript 文件是按需加载的。 - 它支持古腾堡(又名明天的 WordPress)。
因为它允许我们按需加载 JavaScript 框架,所以它将支持 Gutenberg 的块(称为 Gutenblocks),这些块预计将在开发人员选择的框架中编码,同一应用程序需要不同框架的潜在结果。 - 这很方便。
构建工具负责生成配置文件。 除了等待,我们不需要额外的努力。 - 它使优化变得容易。
目前,如果一个 WordPress 插件想要选择性地加载 JavaScript 资源,它会使用大量的条件来检查页面 ID 是否正确。 有了这个工具,就没有必要了; 这个过程是自动的。 - 应用程序将更快地加载。
这就是我们编写这个工具的全部原因。 - 它需要一个暂存环境。
一个积极的副作用是增加了可靠性:我们不会在生产环境中运行脚本,所以我们不会在那里破坏任何东西; 部署过程不会因意外行为而失败; 并且开发人员将被迫使用与生产中相同的配置来测试应用程序。 - 它是根据我们的应用程序定制的。
没有开销或解决方法。 根据我们正在使用的架构,我们得到的正是我们所需要的。
总之:是的,这是值得的,因为现在我们能够在我们的 WordPress 网站上按需应用加载资产并使其加载速度更快。
更多资源
- Webpack,包括“代码拆分”指南
- “更好的 Webpack 构建”(视频),K. Adam White
Webpack 与 WordPress 的集成 - “古腾堡和明天的 WordPress,” WP Tavern 的 Morten Rand-Hendriksen
- “WordPress 探索了一种与 JavaScript 框架无关的方法来构建 Gutenberg 块,” WP Tavern 的 Sarah Gooding
