在 Mac OS 上为物联网设备构建房间探测器
已发表: 2022-03-10知道你在哪个房间可以启用各种物联网应用程序——从开灯到改变电视频道。 那么,我们如何检测您和您的手机在厨房、卧室或客厅的那一刻呢? 使用今天的商品硬件,有无数种可能性:
一种解决方案是为每个房间配备蓝牙设备。 一旦您的手机在蓝牙设备的范围内,您的手机就会根据蓝牙设备知道它在哪个房间。 然而,维护一系列蓝牙设备的开销很大——从更换电池到更换功能失调的设备。 此外,靠近蓝牙设备并不总是答案:如果你在客厅,靠近与厨房共用的墙壁,你的厨房电器不应该开始生产食物。
另一个虽然不切实际的解决方案是使用 GPS 。 但是,请记住 GPS 在室内效果不佳,其中大量墙壁、其他信号和其他障碍物对 GPS 的精度造成严重破坏。
相反,我们的方法是利用所有范围内的 WiFi 网络——即使是您的手机未连接的网络。 方法如下:考虑厨房 WiFi A 的强度; 说是5。由于厨房和卧室之间有一堵墙,我们可以合理地预计卧室WiFi A的强度会有所不同; 假设是 2。我们可以利用这种差异来预测我们在哪个房间。更重要的是:来自我们邻居的 WiFi 网络 B 只能从客厅检测到,但从厨房实际上是不可见的。 这使得预测更加容易。 总之,所有范围内 WiFi 的列表为我们提供了丰富的信息。
这种方法具有以下明显优点:
- 不需要更多硬件;
- 依靠WiFi等更稳定的信号;
- 在 GPS 等其他技术较弱的情况下运行良好。
墙越多越好,因为 WiFi 网络强度越不同,房间就越容易分类。 您将构建一个简单的桌面应用程序,用于收集数据、从数据中学习并预测您在任何给定时间所处的房间。
关于 SmashingMag 的进一步阅读:
- 智能对话 UI 的兴起
- 机器学习对设计师的应用
- 如何原型物联网体验:构建硬件
- 为情感物联网设计
先决条件
对于本教程,您将需要 Mac OSX。 虽然代码可以适用于任何平台,但我们只会提供 Mac 的依赖项安装说明。
- Mac OSX
- Homebrew,Mac OSX 的包管理器。 要安装,请复制并粘贴 brew.sh 中的命令
- 安装 NodeJS 10.8.0+ 和 npm
- 安装 Python 3.6+ 和 pip。 请参阅“如何安装 virtualenv、使用 pip 安装和管理包”的前 3 部分
步骤 0:设置工作环境
您的桌面应用程序将使用 NodeJS 编写。 然而,为了利用更高效的计算库(如numpy ),训练和预测代码将用 Python 编写。 首先,我们将设置您的环境并安装依赖项。 创建一个新目录来存放您的项目。
mkdir ~/riot导航到目录。
cd ~/riot使用 pip 安装 Python 的默认虚拟环境管理器。
sudo pip install virtualenv 创建一个名为riot的 Python3.6 虚拟环境。
virtualenv riot --python=python3.6激活虚拟环境。
source riot/bin/activate 您的提示现在以(riot) 。 这表明我们已经成功进入虚拟环境。 使用pip安装以下软件包:
-
numpy: 一个高效的线性代数库 scipy:实现流行机器学习模型的科学计算库
pip install numpy==1.14.3 scipy ==1.1.0通过工作目录设置,我们将从记录范围内所有 WiFi 网络的桌面应用程序开始。 这些记录将构成您的机器学习模型的训练数据。 一旦我们手头有数据,您将编写一个最小二乘分类器,在之前收集的 WiFi 信号上进行训练。 最后,我们将根据范围内的 WiFi 网络,使用最小二乘模型来预测您所在的房间。
第 1 步:初始桌面应用程序
在这一步中,我们将使用 Electron JS 创建一个新的桌面应用程序。 首先,我们将改为使用 Node 包管理器npm和下载实用程序wget 。
brew install npm wget首先,我们将创建一个新的 Node 项目。
npm init 这会提示您输入包名称,然后是版本号。 按ENTER接受默认名称riot和默认版本1.0.0 。
package name: (riot) version: (1.0.0) 这会提示您输入项目描述。 添加您想要的任何非空描述。 下面,描述的是room detector
description: room detector 这会提示您输入入口点,或从中运行项目的主文件。 输入app.js 。
entry point: (index.js) app.js 这会提示您输入test command和git repository 。 点击ENTER暂时跳过这些字段。
test command: git repository: 这会提示您输入keywords和author 。 填写您想要的任何值。 下面,我们使用iot , wifi作为关键字,使用John Doe作为作者。
keywords: iot,wifi author: John Doe 这会提示您输入许可证。 按ENTER接受ISC的默认值。
license: (ISC) 此时, npm会提示您到目前为止的信息摘要。 您的输出应类似于以下内容。
{ "name": "riot", "version": "1.0.0", "description": "room detector", "main": "app.js", "scripts": { "test": "echo \"Error: no test specified\" && exit 1" }, "keywords": [ "iot", "wifi" ], "author": "John Doe", "license": "ISC" } 按ENTER接受。 npm然后生成一个package.json 。 列出所有要仔细检查的文件。
ls这将输出此目录中的唯一文件以及虚拟环境文件夹。
package.json riot为我们的项目安装 NodeJS 依赖项。
npm install electron --global # makes electron binary accessible globally npm install node-wifi --save 从 Electron 快速入门中的main.js开始,通过下载文件,使用以下内容。 以下-O参数将main.js重命名为app.js 。
wget https://raw.githubusercontent.com/electron/electron-quick-start/master/main.js -O app.js 在nano或您喜欢的文本编辑器中打开app.js
nano app.js 在第 12 行,将index.html更改为static/index.html ,因为我们将创建一个目录static来包含所有 HTML 模板。
function createWindow () { // Create the browser window. win = new BrowserWindow({width: 1200, height: 800}) // and load the index.html of the app. win.loadFile('static/index.html') // Open the DevTools. 保存更改并退出编辑器。 您的文件应与app.js文件的源代码匹配。 现在创建一个新目录来存放我们的 HTML 模板。
mkdir static下载为此项目创建的样式表。
wget https://raw.githubusercontent.com/alvinwan/riot/master/static/style.css?token=AB-ObfDtD46ANlqrObDanckTQJ2Q1Pyuks5bf79PwA%3D%3D -O static/style.css 在nano或您喜欢的文本编辑器中打开static/index.html 。 从标准的 HTML 结构开始。
<!DOCTYPE html> <html> <head> <meta charset="UTF-8"> <title>Riot | Room Detector</title> </head> <body> <main> </main> </body> </html>在标题之后,链接由 Google 字体和样式表链接的 Montserrat 字体。
<title>Riot | Room Detector</title> <!-- start new code --> <link href="https://fonts.googleapis.com/css?family=Montserrat:400,700" rel="stylesheet"> <link href="style.css" rel="stylesheet"> <!-- end new code --> </head> 在main标签之间,为预测的房间名称添加一个槽。
<main> <!-- start new code --> <p class="text">I believe you're in the</p> <h1 class="title">(I dunno)</h1> <!-- end new code --> </main>您的脚本现在应该与以下内容完全匹配。 退出编辑器。
<!DOCTYPE html> <html> <head> <meta charset="UTF-8"> <title>Riot | Room Detector</title> <link href="https://fonts.googleapis.com/css?family=Montserrat:400,700" rel="stylesheet"> <link href="style.css" rel="stylesheet"> </head> <body> <main> <p class="text">I believe you're in the</p> <h1 class="title">(I dunno)</h1> </main> </body> </html>现在,修改包文件以包含启动命令。
nano package.json 在第 7 行之后,添加一个别名为electron .的start命令。 . 确保在上一行的末尾添加一个逗号。
"scripts": { "test": "echo \"Error: no test specified\" && exit 1", "start": "electron ." }, 保存并退出。 您现在已准备好在 Electron JS 中启动您的桌面应用程序。 使用npm启动您的应用程序。
npm start您的桌面应用程序应符合以下条件。

这样就完成了您的启动桌面应用程序。 要退出,请导航回您的终端并按 CTRL+C。 在下一步中,我们将记录 wifi 网络,并使记录实用程序可通过桌面应用程序 UI 访问。
第 2 步:记录 WiFi 网络
在这一步中,您将编写一个 NodeJS 脚本来记录所有范围内 wifi 网络的强度和频率。 为您的脚本创建一个目录。
mkdir scripts 在nano或您喜欢的文本编辑器中打开scripts/observe.js 。
nano scripts/observe.js导入 NodeJS wifi 实用程序和文件系统对象。
var wifi = require('node-wifi'); var fs = require('fs'); 定义一个接受完成处理程序的record函数。
/** * Uses a recursive function for repeated scans, since scans are asynchronous. */ function record(n, completion, hook) { } 在新函数中,初始化 wifi 实用程序。 将iface设置为 null 以初始化为随机 wifi 接口,因为此值当前无关紧要。
function record(n, completion, hook) { wifi.init({ iface : null }); }定义一个数组来包含您的样本。 样本是我们将用于模型的训练数据。 本特定教程中的示例是范围内 wifi 网络及其相关强度、频率、名称等的列表。
function record(n, completion, hook) { ... samples = [] } 定义一个递归函数startScan ,它将异步启动 wifi 扫描。 完成后,异步 wifi 扫描将递归调用startScan 。
function record(n, completion, hook) { ... function startScan(i) { wifi.scan(function(err, networks) { }); } startScan(n); } 在wifi.scan回调中,检查错误或网络列表是否为空,如果是则重新开始扫描。
wifi.scan(function(err, networks) { if (err || networks.length == 0) { startScan(i); return } });添加递归函数的基本情况,它调用完成处理程序。
wifi.scan(function(err, networks) { ... if (i <= 0) { return completion({samples: samples}); } });输出进度更新,附加到样本列表,并进行递归调用。
wifi.scan(function(err, networks) { ... hook(n-i+1, networks); samples.push(networks); startScan(i-1); }); 在文件末尾,使用回调调用record函数,将样本保存到磁盘上的文件中。
function record(completion) { ... } function cli() { record(1, function(data) { fs.writeFile('samples.json', JSON.stringify(data), 'utf8', function() {}); }, function(i, networks) { console.log(" * [INFO] Collected sample " + (21-i) + " with " + networks.length + " networks"); }) } cli();仔细检查您的文件是否与以下内容匹配:
var wifi = require('node-wifi'); var fs = require('fs'); /** * Uses a recursive function for repeated scans, since scans are asynchronous. */ function record(n, completion, hook) { wifi.init({ iface : null // network interface, choose a random wifi interface if set to null }); samples = [] function startScan(i) { wifi.scan(function(err, networks) { if (err || networks.length == 0) { startScan(i); return } if (i <= 0) { return completion({samples: samples}); } hook(n-i+1, networks); samples.push(networks); startScan(i-1); }); } startScan(n); } function cli() { record(1, function(data) { fs.writeFile('samples.json', JSON.stringify(data), 'utf8', function() {}); }, function(i, networks) { console.log(" * [INFO] Collected sample " + i + " with " + networks.length + " networks"); }) } cli();保存并退出。 运行脚本。
node scripts/observe.js您的输出将与以下内容匹配,具有可变数量的网络。
* [INFO] Collected sample 1 with 39 networks 检查刚刚收集的样本。 管道到json_pp以漂亮地打印 JSON 并管道到 head 查看前 16 行。
cat samples.json | json_pp | head -16以下是 2.4 GHz 网络的示例输出。
{ "samples": [ [ { "mac": "64:0f:28:79:9a:29", "bssid": "64:0f:28:79:9a:29", "ssid": "SMASHINGMAGAZINEROCKS", "channel": 4, "frequency": 2427, "signal_level": "-91", "security": "WPA WPA2", "security_flags": [ "(PSK/AES,TKIP/TKIP)", "(PSK/AES,TKIP/TKIP)" ] },您的 NodeJS wifi 扫描脚本到此结束。 这使我们能够查看所有范围内的 WiFi 网络。 在下一步中,您将使该脚本可从桌面应用程序访问。
第 3 步:将扫描脚本连接到桌面应用程序
在此步骤中,您将首先向桌面应用程序添加一个按钮来触发脚本。 然后,您将使用脚本的进度更新桌面应用程序 UI。
打开static/index.html 。
nano static/index.html插入“添加”按钮,如下图所示。
<h1 class="title">(I dunno)</h1> <!-- start new code --> <div class="buttons"> <a href="add.html" class="button">Add new room</a> </div> <!-- end new code --> </main> 保存并退出。 打开static/add.html 。
nano static/add.html粘贴以下内容。
<!DOCTYPE html> <html> <head> <meta charset="UTF-8"> <title>Riot | Add New Room</title> <link href="https://fonts.googleapis.com/css?family=Montserrat:400,700" rel="stylesheet"> <link href="style.css" rel="stylesheet"> </head> <body> <main> <h1 class="title">0</h1> <p class="subtitle">of <span>20</span> samples needed. Feel free to move around the room.</p> <input type="text" class="text-field" placeholder="(room name)"> <div class="buttons"> <a href="#" class="button">Start recording</a> <a href="index.html" class="button light">Cancel</a> </div> <p class="text"></p> </main> <script> require('../scripts/observe.js') </script> </body> </html> 保存并退出。 重新打开scripts/observe.js 。
nano scripts/observe.js 在cli函数下,定义一个新的ui函数。
function cli() { ... } // start new code function ui() { } // end new code cli();更新桌面应用程序状态以指示该功能已开始运行。
function ui() { var room_name = document.querySelector('#add-room-name').value; var status = document.querySelector('#add-status'); var number = document.querySelector('#add-title'); status.style.display = "block" status.innerHTML = "Listening for wifi..." }将数据划分为训练和验证数据集。
function ui() { ... function completion(data) { train_data = {samples: data['samples'].slice(0, 15)} test_data = {samples: data['samples'].slice(15)} var train_json = JSON.stringify(train_data); var test_json = JSON.stringify(test_data); } } 仍在completion回调中,将两个数据集写入磁盘。
function ui() { ... function completion(data) { ... fs.writeFile('data/' + room_name + '_train.json', train_json, 'utf8', function() {}); fs.writeFile('data/' + room_name + '_test.json', test_json, 'utf8', function() {}); console.log(" * [INFO] Done") status.innerHTML = "Done." } } 使用适当的回调调用record以记录 20 个样本并将样本保存到磁盘。
function ui() { ... function completion(data) { ... } record(20, completion, function(i, networks) { number.innerHTML = i console.log(" * [INFO] Collected sample " + i + " with " + networks.length + " networks") }) } 最后,在适当的地方调用cli和ui函数。 首先删除cli(); 在文件底部调用。
function ui() { ... } cli(); // remove me 检查文档对象是否可全局访问。 如果不是,则脚本正在从命令行运行。 在这种情况下,调用cli函数。 如果是,则从桌面应用程序中加载脚本。 在这种情况下,将点击监听器绑定到ui函数。
if (typeof document == 'undefined') { cli(); } else { document.querySelector('#start-recording').addEventListener('click', ui) }保存并退出。 创建一个目录来保存我们的数据。
mkdir data启动桌面应用程序。
npm start您将看到以下主页。 点击“添加房间”。
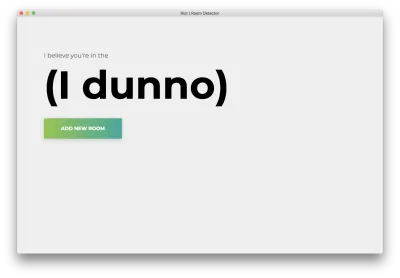
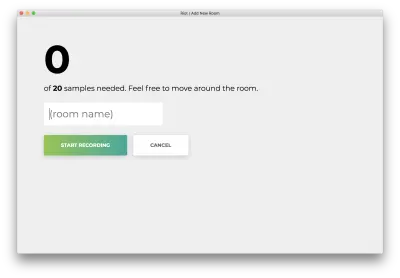
您将看到以下表格。 输入房间的名称。 记住这个名字,因为我们稍后会用到它。 我们的例子是bedroom 。
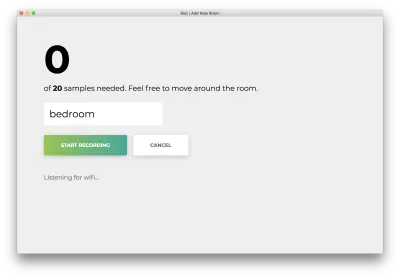
单击“开始录制”,您将看到以下状态“正在侦听 wifi...”。
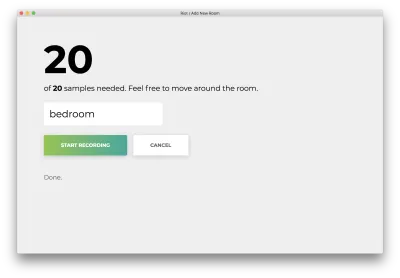
记录所有 20 个样本后,您的应用将匹配以下内容。 状态将显示为“完成”。
点击误命名的“取消”返回首页,与以下内容相符。


我们现在可以从桌面 UI 扫描 wifi 网络,这会将所有记录的样本保存到磁盘上的文件中。 接下来,我们将根据您收集的数据训练一个开箱即用的机器学习算法——最小二乘。
第 4 步:编写 Python 训练脚本
在这一步中,我们将用 Python 编写一个训练脚本。 为您的训练实用程序创建一个目录。
mkdir model 打开model/train.py
nano model/train.py 在文件的顶部,导入numpy计算库和scipy用于其最小二乘模型。
import numpy as np from scipy.linalg import lstsq import json import sys接下来的三个实用程序将处理从磁盘上的文件加载和设置数据。 首先添加一个扁平化嵌套列表的实用程序函数。 您将使用它来展平样本列表。
import sys def flatten(list_of_lists): """Flatten a list of lists to make a list. >>> flatten([[1], [2], [3, 4]]) [1, 2, 3, 4] """ return sum(list_of_lists, []) 添加从指定文件加载样本的第二个实用程序。 此方法抽象出样本分布在多个文件中的事实,只为所有样本返回一个生成器。 对于每个样本,标签是文件的索引。 例如,如果您调用get_all_samples('a.json', 'b.json') , a.json中的所有样本都将具有标签 0,而b.json中的所有样本将具有标签 1。
def get_all_samples(paths): """Load all samples from JSON files.""" for label, path in enumerate(paths): with open(path) as f: for sample in json.load(f)['samples']: signal_levels = [ network['signal_level'].replace('RSSI', '') or 0 for network in sample] yield [network['mac'] for network in sample], signal_levels, label接下来,添加一个使用词袋模型对样本进行编码的实用程序。 这是一个示例:假设我们收集了两个样本。
- wifi 网络 A 强度为 10,wifi 网络 B 强度为 15
- wifi 网络 B 强度为 20,wifi 网络 C 强度为 25。
此函数将为每个样本生成一个包含三个数字的列表:第一个值是 wifi 网络 A 的强度,第二个值是网络 B,第三个值是 C。实际上,格式是 [A, B, C ]。
- [10, 15, 0]
- [0, 20, 25]
def bag_of_words(all_networks, all_strengths, ordering): """Apply bag-of-words encoding to categorical variables. >>> samples = bag_of_words( ... [['a', 'b'], ['b', 'c'], ['a', 'c']], ... [[1, 2], [2, 3], [1, 3]], ... ['a', 'b', 'c']) >>> next(samples) [1, 2, 0] >>> next(samples) [0, 2, 3] """ for networks, strengths in zip(all_networks, all_strengths): yield [strengths[networks.index(network)] if network in networks else 0 for network in ordering] 使用上述所有三个实用程序,我们合成了一组样本及其标签。 使用get_all_samples收集所有样本和标签。 定义一致的格式ordering以对所有样本进行 one-hot 编码,然后将one_hot编码应用于样本。 最后,分别构造数据和标签矩阵X和Y
def create_dataset(classpaths, ordering=None): """Create dataset from a list of paths to JSON files.""" networks, strengths, labels = zip(*get_all_samples(classpaths)) if ordering is None: ordering = list(sorted(set(flatten(networks)))) X = np.array(list(bag_of_words(networks, strengths, ordering))).astype(np.float64) Y = np.array(list(labels)).astype(np.int) return X, Y, ordering这些功能完善了数据管道。 接下来,我们抽象出模型预测和评估。 首先定义预测方法。 第一个函数对我们的模型输出进行归一化,以便所有值的总和为 1,并且所有值都是非负的; 这确保了输出是一个有效的概率分布。 第二个评估模型。
def softmax(x): """Convert one-hotted outputs into probability distribution""" x = np.exp(x) return x / np.sum(x) def predict(X, w): """Predict using model parameters""" return np.argmax(softmax(X.dot(w)), axis=1)接下来,评估模型的准确性。 第一行使用模型运行预测。 第二个计算预测值和真实值一致的次数,然后按样本总数进行归一化。
def evaluate(X, Y, w): """Evaluate model w on samples X and labels Y.""" Y_pred = predict(X, w) accuracy = (Y == Y_pred).sum() / X.shape[0] return accuracy 我们的预测和评估实用程序到此结束。 在这些实用程序之后,定义一个将收集数据集、训练和评估的main函数。 首先从命令行sys.argv读取参数列表; 这些是包含在培训中的房间。 然后从所有指定的房间创建一个大型数据集。
def main(): classes = sys.argv[1:] train_paths = sorted(['data/{}_train.json'.format(name) for name in classes]) test_paths = sorted(['data/{}_test.json'.format(name) for name in classes]) X_train, Y_train, ordering = create_dataset(train_paths) X_test, Y_test, _ = create_dataset(test_paths, ordering=ordering)将 one-hot 编码应用于标签。 one-hot 编码类似于上面的词袋模型。 我们使用这种编码来处理分类变量。 假设我们有 3 个可能的标签。 我们没有标记 1、2 或 3,而是用 [1, 0, 0]、[0, 1, 0] 或 [0, 0, 1] 标记数据。 对于本教程,我们将不解释为什么 one-hot 编码很重要。 训练模型,并在训练集和验证集上进行评估。
def main(): ... X_test, Y_test, _ = create_dataset(test_paths, ordering=ordering) Y_train_oh = np.eye(len(classes))[Y_train] w, _, _, _ = lstsq(X_train, Y_train_oh) train_accuracy = evaluate(X_train, Y_train, w) test_accuracy = evaluate(X_test, Y_test, w)打印两个精度,并将模型保存到磁盘。
def main(): ... print('Train accuracy ({}%), Validation accuracy ({}%)'.format(train_accuracy*100, test_accuracy*100)) np.save('w.npy', w) np.save('ordering.npy', np.array(ordering)) sys.stdout.flush() 在文件末尾,运行main函数。
if __name__ == '__main__': main()保存并退出。 仔细检查您的文件是否与以下内容匹配:
import numpy as np from scipy.linalg import lstsq import json import sys def flatten(list_of_lists): """Flatten a list of lists to make a list. >>> flatten([[1], [2], [3, 4]]) [1, 2, 3, 4] """ return sum(list_of_lists, []) def get_all_samples(paths): """Load all samples from JSON files.""" for label, path in enumerate(paths): with open(path) as f: for sample in json.load(f)['samples']: signal_levels = [ network['signal_level'].replace('RSSI', '') or 0 for network in sample] yield [network['mac'] for network in sample], signal_levels, label def bag_of_words(all_networks, all_strengths, ordering): """Apply bag-of-words encoding to categorical variables. >>> samples = bag_of_words( ... [['a', 'b'], ['b', 'c'], ['a', 'c']], ... [[1, 2], [2, 3], [1, 3]], ... ['a', 'b', 'c']) >>> next(samples) [1, 2, 0] >>> next(samples) [0, 2, 3] """ for networks, strengths in zip(all_networks, all_strengths): yield [int(strengths[networks.index(network)]) if network in networks else 0 for network in ordering] def create_dataset(classpaths, ordering=None): """Create dataset from a list of paths to JSON files.""" networks, strengths, labels = zip(*get_all_samples(classpaths)) if ordering is None: ordering = list(sorted(set(flatten(networks)))) X = np.array(list(bag_of_words(networks, strengths, ordering))).astype(np.float64) Y = np.array(list(labels)).astype(np.int) return X, Y, ordering def softmax(x): """Convert one-hotted outputs into probability distribution""" x = np.exp(x) return x / np.sum(x) def predict(X, w): """Predict using model parameters""" return np.argmax(softmax(X.dot(w)), axis=1) def evaluate(X, Y, w): """Evaluate model w on samples X and labels Y.""" Y_pred = predict(X, w) accuracy = (Y == Y_pred).sum() / X.shape[0] return accuracy def main(): classes = sys.argv[1:] train_paths = sorted(['data/{}_train.json'.format(name) for name in classes]) test_paths = sorted(['data/{}_test.json'.format(name) for name in classes]) X_train, Y_train, ordering = create_dataset(train_paths) X_test, Y_test, _ = create_dataset(test_paths, ordering=ordering) Y_train_oh = np.eye(len(classes))[Y_train] w, _, _, _ = lstsq(X_train, Y_train_oh) train_accuracy = evaluate(X_train, Y_train, w) validation_accuracy = evaluate(X_test, Y_test, w) print('Train accuracy ({}%), Validation accuracy ({}%)'.format(train_accuracy*100, validation_accuracy*100)) np.save('w.npy', w) np.save('ordering.npy', np.array(ordering)) sys.stdout.flush() if __name__ == '__main__': main() 保存并退出。 回忆一下上面记录 20 个样本时使用的房间名称。 使用该名称而不是下面的bedroom 。 我们的例子是bedroom 。 我们使用-W ignore忽略来自 LAPACK 错误的警告。
python -W ignore model/train.py bedroom由于我们只收集了一个房间的训练样本,您应该会看到 100% 的训练和验证准确度。
Train accuracy (100.0%), Validation accuracy (100.0%)接下来,我们将此训练脚本链接到桌面应用程序。
第 5 步:链接训练脚本
在这一步中,每当用户收集到一批新样本时,我们都会自动重新训练模型。 打开scripts/observe.js 。
nano scripts/observe.js 在fs导入之后,立即导入子进程生成器和实用程序。
var fs = require('fs'); // start new code const spawn = require("child_process").spawn; var utils = require('./utils.js'); 在ui函数中,在完成处理程序的末尾添加以下调用以retrain 。
function ui() { ... function completion() { ... retrain((data) => { var status = document.querySelector('#add-status'); accuracies = data.toString().split('\n')[0]; status.innerHTML = "Retraining succeeded: " + accuracies }); } ... } 在ui函数之后,添加以下retrain函数。 这会产生一个将运行 python 脚本的子进程。 完成后,该过程调用完成处理程序。 失败时,它将记录错误消息。
function ui() { .. } function retrain(completion) { var filenames = utils.get_filenames() const pythonProcess = spawn('python', ["./model/train.py"].concat(filenames)); pythonProcess.stdout.on('data', completion); pythonProcess.stderr.on('data', (data) => { console.log(" * [ERROR] " + data.toString()) }) } 保存并退出。 打开scripts/utils.js 。
nano scripts/utils.js 添加以下实用程序以获取data/中的所有数据集。
var fs = require('fs'); module.exports = { get_filenames: get_filenames } function get_filenames() { filenames = new Set([]); fs.readdirSync("data/").forEach(function(filename) { filenames.add(filename.replace('_train', '').replace('_test', '').replace('.json', '' )) }); filenames = Array.from(filenames.values()) filenames.sort(); filenames.splice(filenames.indexOf('.DS_Store'), 1) return filenames }保存并退出。 为了完成此步骤,请物理移动到新位置。 理想情况下,您的原始位置和新位置之间应该有一堵墙。 障碍越多,您的桌面应用程序就会越好。
再次运行您的桌面应用程序。
npm start和以前一样,运行训练脚本。 点击“添加房间”。

输入与您的第一个房间不同的房间名称。 我们将使用living room 。

单击“开始录制”,您将看到以下状态“正在侦听 wifi...”。
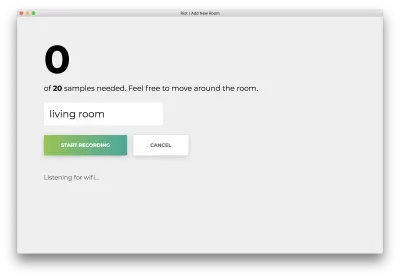
记录所有 20 个样本后,您的应用将匹配以下内容。 状态将显示为“完成。 再训练模型……”
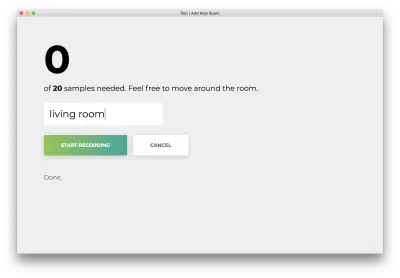
在下一步中,我们将使用这个重新训练的模型来动态预测您所在的房间。
第 6 步:编写 Python 评估脚本
在这一步中,我们将加载预训练的模型参数,扫描 wifi 网络,并根据扫描预测房间。
打开model/eval.py 。
nano model/eval.py导入我们上一个脚本中使用和定义的库。
import numpy as np import sys import json import os import json from train import predict from train import softmax from train import create_dataset from train import evaluate 定义一个实用程序来提取所有数据集的名称。 此函数假定所有数据集都以<dataset>_train.json和<dataset>_test.json的形式存储在data/中。
from train import evaluate def get_datasets(): """Extract dataset names.""" return sorted(list({path.split('_')[0] for path in os.listdir('./data') if '.DS' not in path})) 定义main函数,并首先加载从训练脚本中保存的参数。
def get_datasets(): ... def main(): w = np.load('w.npy') ordering = np.load('ordering.npy')创建数据集并进行预测。
def main(): ... classpaths = [sys.argv[1]] X, _, _ = create_dataset(classpaths, ordering) y = np.asscalar(predict(X, w))根据前两个概率之间的差异计算置信度分数。
def main(): ... sorted_y = sorted(softmax(X.dot(w)).flatten()) confidence = 1 if len(sorted_y) > 1: confidence = round(sorted_y[-1] - sorted_y[-2], 2) 最后,提取类别并打印结果。 要结束脚本,请调用main函数。
def main() ... category = get_datasets()[y] print(json.dumps({"category": category, "confidence": confidence})) if __name__ == '__main__': main()保存并退出。 仔细检查您的代码是否与以下内容(源代码)匹配:
import numpy as np import sys import json import os import json from train import predict from train import softmax from train import create_dataset from train import evaluate def get_datasets(): """Extract dataset names.""" return sorted(list({path.split('_')[0] for path in os.listdir('./data') if '.DS' not in path})) def main(): w = np.load('w.npy') ordering = np.load('ordering.npy') classpaths = [sys.argv[1]] X, _, _ = create_dataset(classpaths, ordering) y = np.asscalar(predict(X, w)) sorted_y = sorted(softmax(X.dot(w)).flatten()) confidence = 1 if len(sorted_y) > 1: confidence = round(sorted_y[-1] - sorted_y[-2], 2) category = get_datasets()[y] print(json.dumps({"category": category, "confidence": confidence})) if __name__ == '__main__': main()接下来,我们将此评估脚本连接到桌面应用程序。 桌面应用程序将持续运行 wifi 扫描并使用预测的房间更新 UI。
第 7 步:将评估连接到桌面应用程序
在这一步中,我们将使用“信心”显示来更新 UI。 然后,相关的 NodeJS 脚本将持续运行扫描和预测,相应地更新 UI。
打开static/index.html 。
nano static/index.html在标题之后和按钮之前添加一条信心线。
<h1 class="title">(I dunno)</h1> <!-- start new code --> <p class="subtitle">with <span>0%</span> confidence</p> <!-- end new code --> <div class="buttons"> 在main之后但在body结束之前,添加一个新脚本predict.js 。
</main> <!-- start new code --> <script> require('../scripts/predict.js') </script> <!-- end new code --> </body> 保存并退出。 打开scripts/predict.js 。
nano scripts/predict.js为文件系统、实用程序和子进程生成器导入所需的 NodeJS 实用程序。
var fs = require('fs'); var utils = require('./utils'); const spawn = require("child_process").spawn; 定义一个predict函数,它调用一个单独的节点进程来检测 wifi 网络和一个单独的 Python 进程来预测房间。
function predict(completion) { const nodeProcess = spawn('node', ["scripts/observe.js"]); const pythonProcess = spawn('python', ["-W", "ignore", "./model/eval.py", "samples.json"]); }在两个进程都生成后,向 Python 进程添加成功和错误的回调。 成功回调记录信息,调用完成回调,并使用预测和置信度更新 UI。 错误回调记录错误。
function predict(completion) { ... pythonProcess.stdout.on('data', (data) => { information = JSON.parse(data.toString()); console.log(" * [INFO] Room '" + information.category + "' with confidence '" + information.confidence + "'") completion() if (typeof document != "undefined") { document.querySelector('#predicted-room-name').innerHTML = information.category document.querySelector('#predicted-confidence').innerHTML = information.confidence } }); pythonProcess.stderr.on('data', (data) => { console.log(data.toString()); }) } 定义一个 main 函数来递归地调用predict函数,永远。
function main() { f = function() { predict(f) } predict(f) } main();最后一次,打开桌面应用程序以查看实时预测。
npm start大约每秒完成一次扫描,界面将更新为最新的置信度和预测空间。 恭喜; 您已经完成了一个基于所有范围内 WiFi 网络的简单房间探测器。

结论
在本教程中,我们创建了一个解决方案,仅使用您的桌面来检测您在建筑物中的位置。 我们使用 Electron JS 构建了一个简单的桌面应用程序,并在所有范围内的 WiFi 网络上应用了一种简单的机器学习方法。 这为物联网应用铺平了道路,无需维护成本高昂的设备阵列(成本不是金钱,而是时间和开发)。
注意:您可以在 Github 上查看完整的源代码。
随着时间的推移,您可能会发现这个最小二乘实际上并没有表现出色。 尝试在一个房间内找到两个位置,或站在门口。 最小二乘将很大,无法区分边缘情况。 我们能做得更好吗? 事实证明,我们可以,并且在未来的课程中,我们将利用其他技术和机器学习的基础知识来提高性能。 本教程可作为即将进行的实验的快速测试平台。
