
使用 Bootstrap 设计 Angular 应用程序
已发表: 2022-03-10如果您已经尝试使用 Angular 7 构建 Web 应用程序,那么是时候将它提升一个档次了。 让我们看看如何将 Bootstrap CSS 样式和 JavaScript 文件与使用 Angular CLI 生成的 Angular 项目集成,以及如何使用表单控件和类来创建漂亮的表单以及如何使用 Table 样式设置 HTML 表格的样式。
对于 Angular 部分,我们将创建一个简单的客户端应用程序来创建和列出联系人。 每个联系人都有一个 ID、姓名、电子邮件和描述,我们将使用一个简单的数据服务,将联系人存储在 TypeScript 数组中。 您可以改用高级内存 API。 (查看“Angular 路由的完整指南”。)
注意:您可以从这个 GitHub 存储库获取本教程的源代码,并在此处查看实时示例。
要求
在我们开始创建演示应用程序之前,让我们看看本教程所需的要求。
基本上,您将需要以下内容:
- 安装了 Node.js 和 NPM(您可以直接前往官方网站并为您的系统下载二进制文件),
- 熟悉 TypeScript,
- Angular的工作经验,
- CSS和HTML的基本知识。
安装 Angular CLI
让我们从安装最新版本的 Angular CLI 开始。 在您的终端中,运行以下命令:
$ npm install -g @angular/cli在撰写本文时,已安装 Angular CLI v7.0.3 。 如果您已经安装了 CLI,则可以使用以下命令确保您拥有最新版本:
$ ng --version创建项目
安装 Angular CLI 后,让我们通过运行以下命令使用它来生成 Angular 7 项目:
$ ng new angular-bootstrap-demo然后 CLI 将询问您:
您想添加 Angular 路由吗?
按Y 。 接下来,它会问你:
您想使用哪种样式表格式?
选择“CSS”。
添加引导程序
创建项目后,您需要安装 Bootstrap 4 并将其与您的 Angular 项目集成。
首先,在项目的根文件夹中导航:
$ cd angular-bootstrap-demo接下来,从 npm 安装 Bootstrap 4 和 jQuery:
$ npm install --save bootstrap jquery(在这种情况下,安装了bootstrap v4.2.1和jquery v3.3.1 。)
最后,打开angular.json文件,将 Bootstrap CSS 和 JS 文件以及 jQuery 的文件路径添加到build目标下的styles和scripts数组中:
"architect": { "build": { [...], "styles": [ "src/styles.css", "node_modules/bootstrap/dist/css/bootstrap.min.css" ], "scripts": [ "node_modules/jquery/dist/jquery.min.js", "node_modules/bootstrap/dist/js/bootstrap.min.js" ] },查看如何将 Bootstrap 添加到 Angular 6 项目中,了解如何将 Bootstrap 与 Angular 集成。
添加数据服务
创建项目并添加 Bootstrap 4 后,我们将创建一个 Angular 服务,该服务将用于提供一些演示数据以显示在我们的应用程序中。
在您的终端中,运行以下命令以生成服务:
$ ng generate service data 这将创建两个src/app/data.service.spec.ts和src/app/data.service.ts文件。
打开src/app/data.service.ts并将其内容替换为以下内容:
import { Injectable } from '@angular/core'; @Injectable({ providedIn: 'root' }) export class DataService { contacts = [ {id: 1, name: "Contact 001", description: "Contact 001 des", email: "[email protected]"}, {id: 2, name: "Contact 002", description: "Contact 002 des", email: "[email protected]"}, {id: 3, name: "Contact 003", description: "Contact 003 des", email: "[email protected]"}, {id: 4, name: "Contact 004", description: "Contact 004 des", email: "[email protected]"} ]; constructor() { } public getContacts():Array<{id, name, description, email}>{ return this.contacts; } public createContact(contact: {id, name, description, email}){ this.contacts.push(contact); } } 我们添加了一个包含一些演示联系人的contacts数组、一个返回联系人的getContacts()方法和一个将新联系人附加到contacts数组的createContact() 。
添加组件
创建数据服务后,接下来我们需要为我们的应用程序创建一些组件。 在您的终端中,运行:
$ ng generate component home $ ng generate component contact-create $ ng generate component contact-list 接下来,我们将这些组件添加到路由模块以在我们的应用程序中启用导航。 打开src/app/app-routing.module.ts文件并将其内容替换为以下内容:
import { NgModule } from '@angular/core'; import { Routes, RouterModule } from '@angular/router'; import { ContactListComponent } from './contact-list/contact-list.component'; import { ContactCreateComponent } from './contact-create/contact-create.component'; import { HomeComponent } from './home/home.component'; const routes: Routes = [ {path: "", pathMatch: "full",redirectTo: "home"}, {path: "home", component: HomeComponent}, {path: "contact-create", component: ContactCreateComponent}, {path: "contact-list", component: ContactListComponent} ]; @NgModule({ imports: [RouterModule.forRoot(routes)], exports: [RouterModule] }) export class AppRoutingModule { } 当用户访问我们的应用程序时,我们使用路由器路径的redirectTo属性将用户重定向到主页。
添加页眉和页脚组件
接下来,让我们创建页眉和页脚组件:
$ ng generate component header $ ng generate component footer 打开src/app/header/header.component.html文件并添加以下代码:
<nav class="navbar navbar-expand-md bg-dark navbar-dark fixed-top"> <a class="navbar-brand" href="#">Angular Bootstrap Demo</a> <button class="navbar-toggler" type="button" data-toggle="collapse" data-target="#navbarCollapse" aria-controls="navbarCollapse" aria-expanded="false" aria-label="Toggle navigation"> <span class="navbar-toggler-icon"></span> </button> <div class="collapse navbar-collapse"> <ul class="navbar-nav mr-auto"> <li class="nav-item"> <a class="nav-link" routerLink="/home">Home</a> </li> <li class="nav-item"> <a class="nav-link" routerLink="/contact-list">Contacts</a> </li> <li class="nav-item"> <a class="nav-link" routerLink="/contact-create">Create</a> </li> </ul> </div> </nav> Bootstrap 4 将创建一个导航栏,我们将使用routerLink指令链接到不同的组件。
使用.navbar 、 .navbar-expand{-sm|-md|-lg|-xl}和.navbar-dark类来创建 Bootstrap 导航栏。 (有关导航栏的更多信息,请查看 Bootstrap 关于“导航栏”的文档。
接下来,打开src/app/header/header.component.css文件并添加:
.nav-item{ padding:2px; margin-left: 7px; } 接下来,打开src/app/footer/footer.component.html文件并添加:
<footer> <p class="text-xs-center">© Copyright 2019. All rights reserved.</p> </footer> 打开src/app/footer/footer.component.css文件并添加:
footer { position: absolute; right: 0; bottom: 0; left: 0; padding: 1rem; text-align: center; } 接下来,打开src/app/app.component.html文件并将其内容替换为以下内容:
<app-header></app-header> <router-outlet></router-outlet> <app-footer></app-footer>我们正在使用页眉和页脚组件创建一个应用程序外壳,这意味着它们将出现在我们应用程序的每个页面上。 唯一需要更改的部分是路由器插座中将插入的内容(查看 Angular 网站上的“应用程序外壳”以获取更多信息)。

添加一个 Bootstrap Jumbotron
根据引导文档:
“Jumbotron 是一种轻量级、灵活的组件,可以选择扩展整个视口,以在您的网站上展示关键营销信息。”
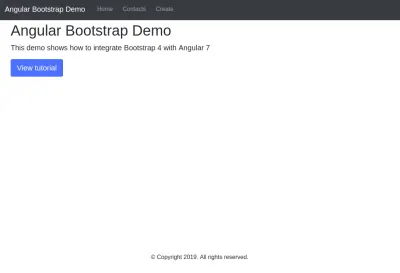
让我们将 Jumbotron 组件添加到我们的主页。 打开src/app/home/home.component.html文件并添加:
<div class="jumbotron"> <h1>Angular Bootstrap Demo</h1> <p class="lead"> This demo shows how to integrate Bootstrap 4 with Angular 7 </p> <a class="btn btn-lg btn-primary" href="" role="button">View tutorial</a> </div> .jumbotron类用于创建 Bootstrap Jumbotron。
添加列表组件:使用引导表
现在让我们从数据服务创建一个组件到列表数据,并使用 Bootstrap 4 表来显示表格数据。
首先,打开src/app/contact-list/contact-list.component.ts文件并注入数据服务,然后在组件初始化时调用getContacts()方法获取数据:
import { Component, OnInit } from '@angular/core'; import { DataService } from '../data.service'; @Component({ selector: 'app-contact-list', templateUrl: './contact-list.component.html', styleUrls: ['./contact-list.component.css'] }) export class ContactListComponent implements OnInit { contacts; selectedContact; constructor(public dataService: DataService) { } ngOnInit() { this.contacts = this.dataService.getContacts(); } public selectContact(contact){ this.selectedContact = contact; } } 我们添加了两个变量contacts和selectedContact ,它们保存了一组联系人和选定的联系人。 还有一个selectContact()方法,它将选定的联系人分配给selectedContact变量。
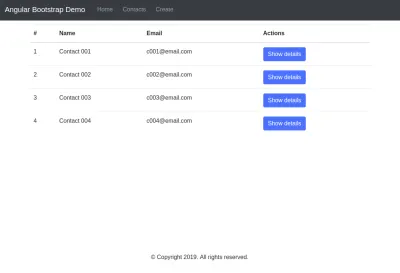
打开src/app/contact-list/contact-list.component.html文件并添加:
<div class="container"> <table class="table table-hover"> <thead> <tr> <th>#</th> <th>Name</th> <th>Email</th> <th>Actions</th> </tr> </thead> <tbody> <tr *ngFor="let contact of contacts"> <td>{{ contact.id }}</td> <td> {{ contact.name }}</td> <td> {{ contact.email }}</td> <td> <button class="btn btn-primary" (click)="selectContact(contact)"> Show details</button> </td> </tr> </tbody> </table> <div class="card text-center" *ngIf="selectedContact"> <div class="card-header"> # {{selectedContact.id}} </div> <div class="card-block"> <h4 class="card-title">{{selectedContact.name}}</h4> <p class="card-text"> {{selectedContact.description}} </p> </div> </div> </div> 我们简单地遍历contacts数组并显示每个联系人的详细信息和一个按钮来选择一个联系人。 如果选择了联系人,将显示带有更多信息的 Bootstrap 4 卡。
这是 Bootstrap 4 文档中卡片的定义:
“卡片是一种灵活且可扩展的内容容器。 它包括页眉和页脚选项、各种内容、上下文背景颜色和强大的显示选项。 如果您熟悉 Bootstrap 3,卡片将取代我们的旧面板、孔和缩略图。 与这些组件类似的功能可用作卡片的修饰符类。”
我们使用.table和.table-hover类来创建 Bootstrap 样式的表格,使用.card 、 .card-block 、 .card-title和.card-text类来创建卡片。 (有关更多信息,请查看表格和卡片。)
添加创建组件:使用引导表单控件和类
现在让我们向我们的contact-create组件添加一个表单。 首先,我们需要在我们的主应用程序模块中导入FormsModule 。 打开src/app/app.module.ts文件,从@angular/forms导入FormsModule ,并将其添加到imports数组中:
import { BrowserModule } from '@angular/platform-browser'; import { NgModule } from '@angular/core'; import { AppRoutingModule } from './app-routing.module'; import { FormsModule } from '@angular/forms'; /* ... */ @NgModule({ declarations: [ /* ... */ ], imports: [ BrowserModule, AppRoutingModule, FormsModule ], providers: [], bootstrap: [AppComponent] }) export class AppModule { } 接下来,打开src/app/contact-create/contact-create.component.ts文件并将其内容替换为以下内容:
import { Component, OnInit } from '@angular/core'; import { DataService } from '../data.service'; @Component({ selector: 'app-contact-create', templateUrl: './contact-create.component.html', styleUrls: ['./contact-create.component.css'] }) export class ContactCreateComponent implements OnInit { contact : {id, name, description, email} = {id: null, name: "", description: "", email: ""}; constructor(public dataService: DataService) { } ngOnInit() { } createContact(){ console.log(this.contact); this.dataService.createContact(this.contact); this.contact = {id: null, name: "", description: "", email: ""}; } } 接下来,打开src/app/contact-create/contact-create.component.html文件并添加以下代码:
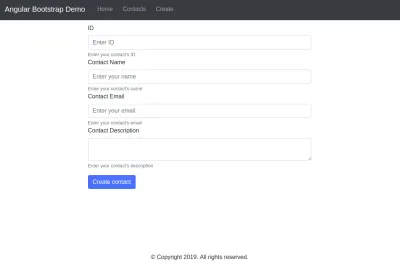
<div class="container"> <div class="row"> <div class="col-sm-8 offset-sm-2"> <div> <form> <div class="form-group"> <label for="id">ID</label> <input [(ngModel)]="contact.id" type="text" name="id" class="form-control" placeholder="Enter ID"> <small class="form-text text-muted">Enter your contact's ID</small> <label for="name">Contact Name</label> <input [(ngModel)]="contact.name" type="text" name="name" class="form-control" placeholder="Enter your name"> <small class="form-text text-muted">Enter your contact's name</small> <label for="email">Contact Email</label> <input [(ngModel)]="contact.email" type="text" name="email" class="form-control" placeholder="Enter your email"> <small class="form-text text-muted">Enter your contact's email</small> <label for="description">Contact Description</label> <textarea [(ngModel)]="contact.description" name="description" class="form-control"> </textarea> <small class="form-text text-muted">Enter your contact's description</small> </div> </form> <button class="btn btn-primary" (click)="createContact()">Create contact</button> </div> </div> </div> </div> 我们使用.form-group 、 .form-control类来创建引导样式的表单(查看“表单”以获取更多信息)。
我们使用ngModel指令将表单字段绑定到组件的变量。 为了使数据绑定正常工作,您需要为每个表单字段命名。
推荐阅读: Tamas Piros 使用 Angular 管理图像断点
运行 Angular 应用程序
在这一步,让我们运行应用程序,看看是否一切都按预期工作。 转到您的终端,确保您位于项目的根文件夹中,然后运行以下命令:
$ ng serve 实时重载开发服务器将从https://localhost:4200地址运行。 打开您的网络浏览器并导航到该地址。 您应该看到以下界面:
如果您导航到“联系人”页面,您应该会看到:
如果您导航到“创建联系人”页面,您应该会看到:
结论
在本教程中,我们看到了如何使用 Bootstrap 界面创建一个简单的 Angular 应用程序。 您可以在 GitHub 上找到完整的源代码,并在此处查看实时示例。