HTML5 SVG เติมแอนิเมชั่นด้วย CSS3 และ Vanilla JavaScript
เผยแพร่แล้ว: 2022-03-10SVG ย่อมาจาก S calable V ector G raphics และเป็นภาษามาร์กอัปแบบ XML มาตรฐานสำหรับกราฟิกแบบเวกเตอร์ ช่วยให้คุณสามารถวาดเส้นทาง เส้นโค้ง และรูปร่างโดยการกำหนดชุดของจุดในระนาบ 2 มิติ นอกจากนี้ คุณสามารถเพิ่มคุณสมบัติการกระตุกบนเส้นทางเหล่านั้นได้ (เช่น การลากเส้น สี ความหนา การเติม และอื่นๆ) เพื่อสร้างแอนิเมชั่น
ตั้งแต่เดือนเมษายน 2017 โมดูลการเติมและจังหวะ CSS ระดับ 3 อนุญาตให้ตั้งค่าสี SVG และรูปแบบการเติมจากสไตล์ชีตภายนอก แทนที่จะตั้งค่าแอตทริบิวต์ในแต่ละองค์ประกอบ ในบทช่วยสอนนี้ เราจะใช้สีฐานสิบหกธรรมดาธรรมดา แต่คุณสมบัติการเติมและเส้นขีดยังยอมรับรูปแบบ การไล่ระดับสี และรูปภาพเป็นค่าด้วย
หมายเหตุ : เมื่อเยี่ยมชมเว็บไซต์ Awwwards การแสดงบันทึกย่อแบบเคลื่อนไหวสามารถดูได้โดยตั้งค่าความกว้างของเบราว์เซอร์เป็น 1024px ขึ้นไปเท่านั้น
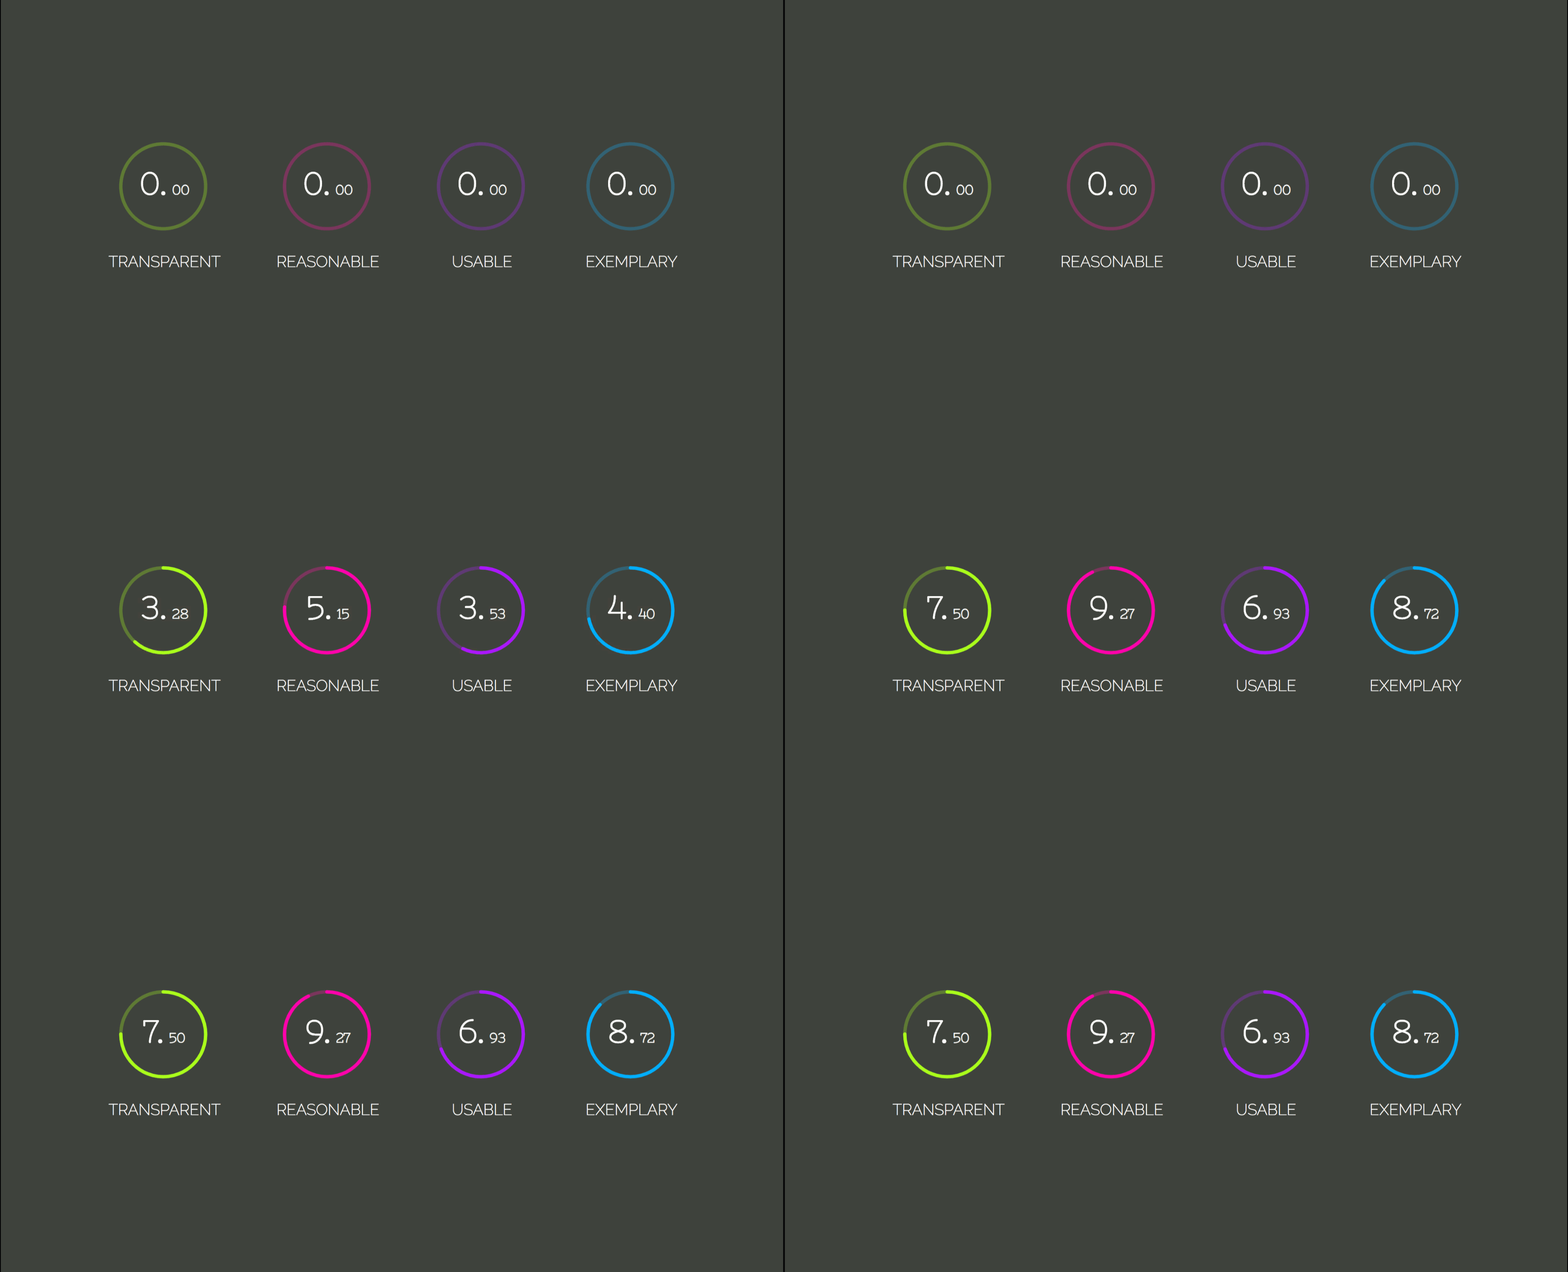
- การสาธิต: โครงการแสดงหมายเหตุ
- Repo: หมายเหตุแสดง Repo
โครงสร้างไฟล์
เริ่มต้นด้วยการสร้างไฟล์ในเทอร์มินัล:
mkdir note-display cd note-display touch index.html styles.css scripts.jsHTML
นี่คือเทมเพลตเริ่มต้นที่เชื่อมโยงทั้งไฟล์ css และ js :
<html lang="en"> <head> <meta charset="UTF-8"> <title>Note Display</title> <link rel="stylesheet" href="./styles.css"> </head> <body> <script src="./scripts.js"></script> </body> </html> องค์ประกอบโน้ตแต่ละรายการประกอบด้วยรายการ: li ที่เก็บ circle ค่า note และ label
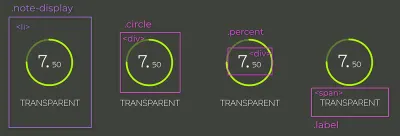
.circle , .percent และ . .label (ตัวอย่างขนาดใหญ่) .circle_svg เป็นองค์ประกอบ SVG ที่ล้อมรอบสององค์ประกอบ <circle> เส้นทางแรกคือเส้นทางที่จะเติมในขณะที่เส้นทางที่สองคือการเติมที่จะเคลื่อนไหว
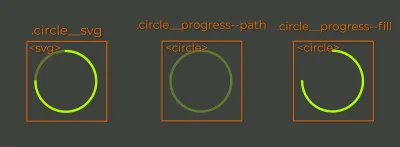
note ถูกแยกออกเป็นจำนวนเต็มและทศนิยมเพื่อให้สามารถใช้ขนาดแบบอักษรที่แตกต่างกันได้ label เป็นแบบง่ายๆ <span> ดังนั้นเมื่อนำทั้งหมดนี้มารวมกันจะมีลักษณะดังนี้:
<li class="note-display"> <div class="circle"> <svg width="84" height="84" class="circle__svg"> <circle cx="41" cy="41" r="38" class="circle__progress circle__progress--path"></circle> <circle cx="41" cy="41" r="38" class="circle__progress circle__progress--fill"></circle> </svg> <div class="percent"> <span class="percent__int">0.</span> <span class="percent__dec">00</span> </div> </div> <span class="label">Transparent</span> </li> แอตทริบิวต์ cx และ cy กำหนดจุดศูนย์กลางแกน x และแกน y ของวงกลม แอตทริบิวต์ r กำหนดรัศมีของมัน
คุณอาจสังเกตเห็นรูปแบบขีดล่าง/เส้นประในชื่อคลาส นั่นคือ BEM ซึ่งย่อมาจาก block , element และ modifier เป็นวิธีการที่ทำให้การตั้งชื่อองค์ประกอบของคุณมีโครงสร้าง เป็นระเบียบ และมีความหมายมากขึ้น
การอ่านที่แนะนำ : คำอธิบาย BEM และเหตุผลที่คุณต้องการ
ในการทำให้โครงสร้างเทมเพลตเสร็จสิ้น เรามารวมสี่รายการในองค์ประกอบรายการแบบไม่เรียงลำดับกัน:
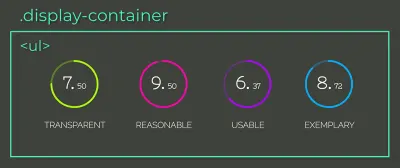
li (ตัวอย่างขนาดใหญ่) <ul class="display-container"> <li class="note-display"> <div class="circle"> <svg width="84" height="84" class="circle__svg"> <circle cx="41" cy="41" r="38" class="circle__progress circle__progress--path"></circle> <circle cx="41" cy="41" r="38" class="circle__progress circle__progress--fill"></circle> </svg> <div class="percent"> <span class="percent__int">0.</span> <span class="percent__dec">00</span> </div> </div> <span class="label">Transparent</span> </li> <li class="note-display"> <div class="circle"> <svg width="84" height="84" class="circle__svg"> <circle cx="41" cy="41" r="38" class="circle__progress circle__progress--path"></circle> <circle cx="41" cy="41" r="38" class="circle__progress circle__progress--fill"></circle> </svg> <div class="percent"> <span class="percent__int">0.</span> <span class="percent__dec">00</span> </div> </div> <span class="label">Reasonable</span> </li> <li class="note-display"> <div class="circle"> <svg width="84" height="84" class="circle__svg"> <circle cx="41" cy="41" r="38" class="circle__progress circle__progress--path"></circle> <circle cx="41" cy="41" r="38" class="circle__progress circle__progress--fill"></circle> </svg> <div class="percent"> <span class="percent__int">0.</span> <span class="percent__dec">00</span> </div> </div> <span class="label">Usable</span> </li> <li class="note-display"> <div class="circle"> <svg width="84" height="84" class="circle__svg"> <circle cx="41" cy="41" r="38" class="circle__progress circle__progress--path"></circle> <circle cx="41" cy="41" r="38" class="circle__progress circle__progress--fill"></circle> </svg> <div class="percent"> <span class="percent__int">0.</span> <span class="percent__dec">00</span> </div> </div> <span class="label">Exemplary</span> </li> </ul> คุณต้องถามตัวเองว่าป้ายกำกับ Transparent Reasonable Usable และ Exemplary ดีหมายความว่าอย่างไร ยิ่งคุณคุ้นเคยกับการเขียนโปรแกรมมากขึ้น คุณจะรู้ว่าการเขียนโค้ดไม่ได้เป็นเพียงการทำให้แอปพลิเคชันทำงานได้เท่านั้น แต่ยังช่วยให้มั่นใจว่าจะสามารถบำรุงรักษาและปรับขนาดได้ในระยะยาว สำเร็จได้ก็ต่อเมื่อรหัสของคุณเปลี่ยนได้ง่าย
“ตัวย่อ TRUE น่าจะช่วยในการตัดสินใจว่ารหัสที่คุณเขียนจะสามารถรองรับการเปลี่ยนแปลงในอนาคตได้หรือไม่”ครั้งหน้าลองถามตัวเองว่า
-
Transparent: โค้ดเปลี่ยนผลที่ตามมาชัดเจนหรือไม่? -
Reasonable: ผลประโยชน์ด้านต้นทุนคุ้มค่าหรือไม่ -
Usable: ฉันจะสามารถใช้ซ้ำในสถานการณ์ที่ไม่คาดคิดได้หรือไม่? -
Exemplary: มันนำเสนอคุณภาพสูงเป็นตัวอย่างสำหรับรหัสในอนาคตหรือไม่?
หมายเหตุ : “การออกแบบเชิงวัตถุเชิงปฏิบัติใน Ruby” โดย Sandi Metz อธิบาย TRUE พร้อมกับหลักการอื่นๆ และวิธีการบรรลุถึงสิ่งเหล่านั้นผ่านรูปแบบการออกแบบ หากคุณยังไม่ได้ใช้เวลาศึกษารูปแบบการออกแบบ ลองเพิ่มหนังสือเล่มนี้ในการอ่านหนังสือก่อนนอน
CSS
มานำเข้าแบบอักษรและใช้การรีเซ็ตกับรายการทั้งหมด:
@import url('https://fonts.googleapis.com/css?family=Nixie+One|Raleway:200'); * { padding: 0; margin: 0; box-sizing: border-box; } คุณสมบัติ box-sizing: border-box รวมค่า padding และ border ลงในความกว้างและความสูงทั้งหมดขององค์ประกอบ ดังนั้นจึงคำนวณขนาดได้ง่ายขึ้น
หมายเหตุ : สำหรับคำอธิบายภาพเกี่ยวกับ box-sizing โปรดอ่าน “ทำให้ชีวิตของคุณง่ายขึ้นด้วย CSS Box Sizing”
body { height: 100vh; color: #fff; display: flex; background: #3E423A; font-family: 'Nixie One', cursive; } .display-container { margin: auto; display: flex; } ด้วยการรวมการ display: flex in the body และ margin-auto ใน . .display-container เป็นไปได้ที่จะจัดองค์ประกอบย่อยให้อยู่ตรงกลางทั้งในแนวตั้งและแนวนอน องค์ประกอบ . .display-container จะเป็น flex-container เช่นกัน ด้วยวิธีนี้ ลูกๆ ของมันจะถูกวางในแถวเดียวกันตามแนวแกนหลัก
รายการ . .note-display จะเป็น flex-container ด้วย เนื่องจากมีกลุ่มย่อยจำนวนมากสำหรับการจัดตำแหน่งกึ่งกลาง เรามาดำเนินการผ่านคุณสมบัติ justify-content และ align-items flex-items ทั้งหมดจะถูกจัดกึ่งกลางตามแนว cross และแกน main หากคุณไม่แน่ใจว่าสิ่งเหล่านั้นคืออะไร โปรดดูส่วนการจัดตำแหน่งที่ “คู่มือภาพ CSS Flexbox Fundamentals”
.note-display { display: flex; flex-direction: column; align-items: center; margin: 0 25px; } ลองใช้สโตรกกับวงกลมโดยกำหนดกฎ stroke-width , ส stroke-opacity และ stroke-linecap ที่รวมสไตล์การสิ้นสุดของสโตรก ต่อไป มาเพิ่มสีให้กับแต่ละวงกลมกัน:
.circle__progress { fill: none; stroke-width: 3; stroke-opacity: 0.3; stroke-linecap: round; } .note-display:nth-child(1) .circle__progress { stroke: #AAFF00; } .note-display:nth-child(2) .circle__progress { stroke: #FF00AA; } .note-display:nth-child(3) .circle__progress { stroke: #AA00FF; } .note-display:nth-child(4) .circle__progress { stroke: #00AAFF; } ในการที่จะวางตำแหน่งองค์ประกอบ percent ได้อย่างสมบูรณ์ จำเป็นต้องรู้อย่างถ่องแท้ถึงอะไร องค์ประกอบ .circle ควรเป็นข้อมูลอ้างอิง ดังนั้น ให้เพิ่ม position: relative กับมัน
หมายเหตุ : สำหรับคำอธิบายที่ลึกซึ้งยิ่งขึ้นเกี่ยวกับการวางตำแหน่งที่แน่นอน โปรดอ่าน “วิธีทำความเข้าใจตำแหน่ง CSS แบบสัมบูรณ์ครั้งแล้วครั้งเล่า”
อีกวิธีในการจัดองค์ประกอบที่อยู่ตรงกลางคือการรวม top: 50% , left: 50% และ transform: translate(-50%, -50%); ซึ่งจัดตำแหน่งศูนย์กลางขององค์ประกอบที่ศูนย์กลางขององค์ประกอบหลัก
.circle { position: relative; } .percent { width: 100%; top: 50%; left: 50%; position: absolute; font-weight: bold; text-align: center; line-height: 28px; transform: translate(-50%, -50%); } .percent__int { font-size: 28px; } .percent__dec { font-size: 12px; } .label { font-family: 'Raleway', serif; font-size: 14px; text-transform: uppercase; margin-top: 15px; }ถึงตอนนี้ เทมเพลตควรมีลักษณะดังนี้:

เติมการเปลี่ยน
แอนิเมชั่นวงกลมสามารถสร้างขึ้นได้ด้วยความช่วยเหลือของคุณสมบัติ SVG สองวงกลม: stroke-dasharray และ stroke-dashoffset

“ stroke-dasharray กำหนดรูปแบบ dash-gap ในจังหวะ”อาจใช้ค่าได้ถึงสี่ค่า:
- เมื่อตั้งค่าเป็นจำนวนเต็มเท่านั้น (
stroke-dasharray: 10) ขีดกลางและช่องว่างจะมีขนาดเท่ากัน - สำหรับสองค่า (
stroke-dasharray: 10 5) ค่าแรกใช้กับเส้นประ ค่าที่สองสำหรับช่องว่าง - รูปแบบที่สามและที่ตามมา (
stroke-dasharray: 10 5 2และstroke-dasharray: 10 5 2 3) จะสร้างเส้นประและช่องว่างในขนาดต่างๆ
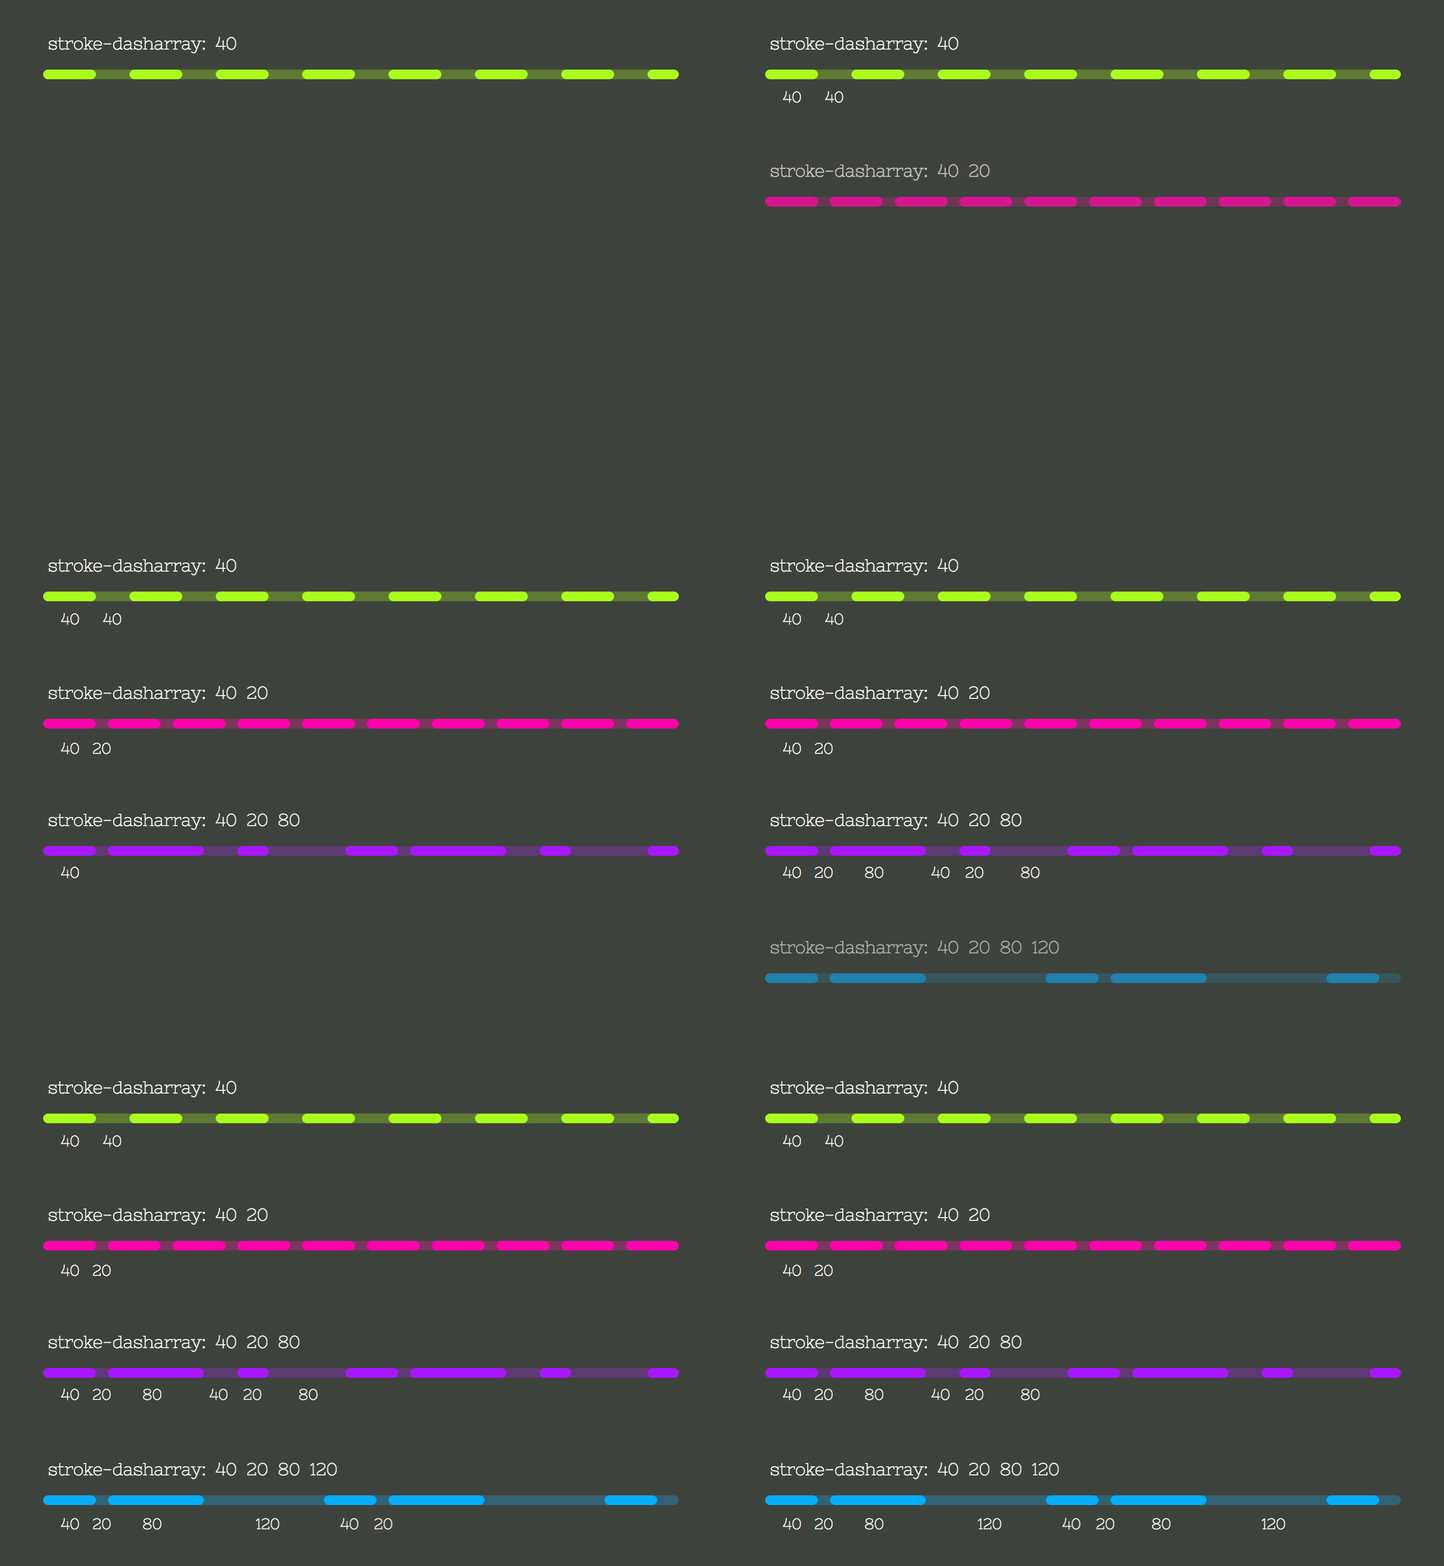
stroke-dasharray (ตัวอย่างขนาดใหญ่) รูปภาพทางด้านซ้ายแสดงคุณสมบัติ stroke-dasharray ที่ตั้งค่าจาก 0 ถึง 238px ซึ่งเป็นความยาวเส้นรอบวงของวงกลม
รูปภาพที่สองแสดงถึงคุณสมบัติการ stroke-dashoffset เส้นประที่ชดเชยจุดเริ่มต้นของอาร์เรย์เส้นประ นอกจากนี้ยังตั้งค่าจาก 0 ถึงความยาวเส้นรอบวงของวงกลม
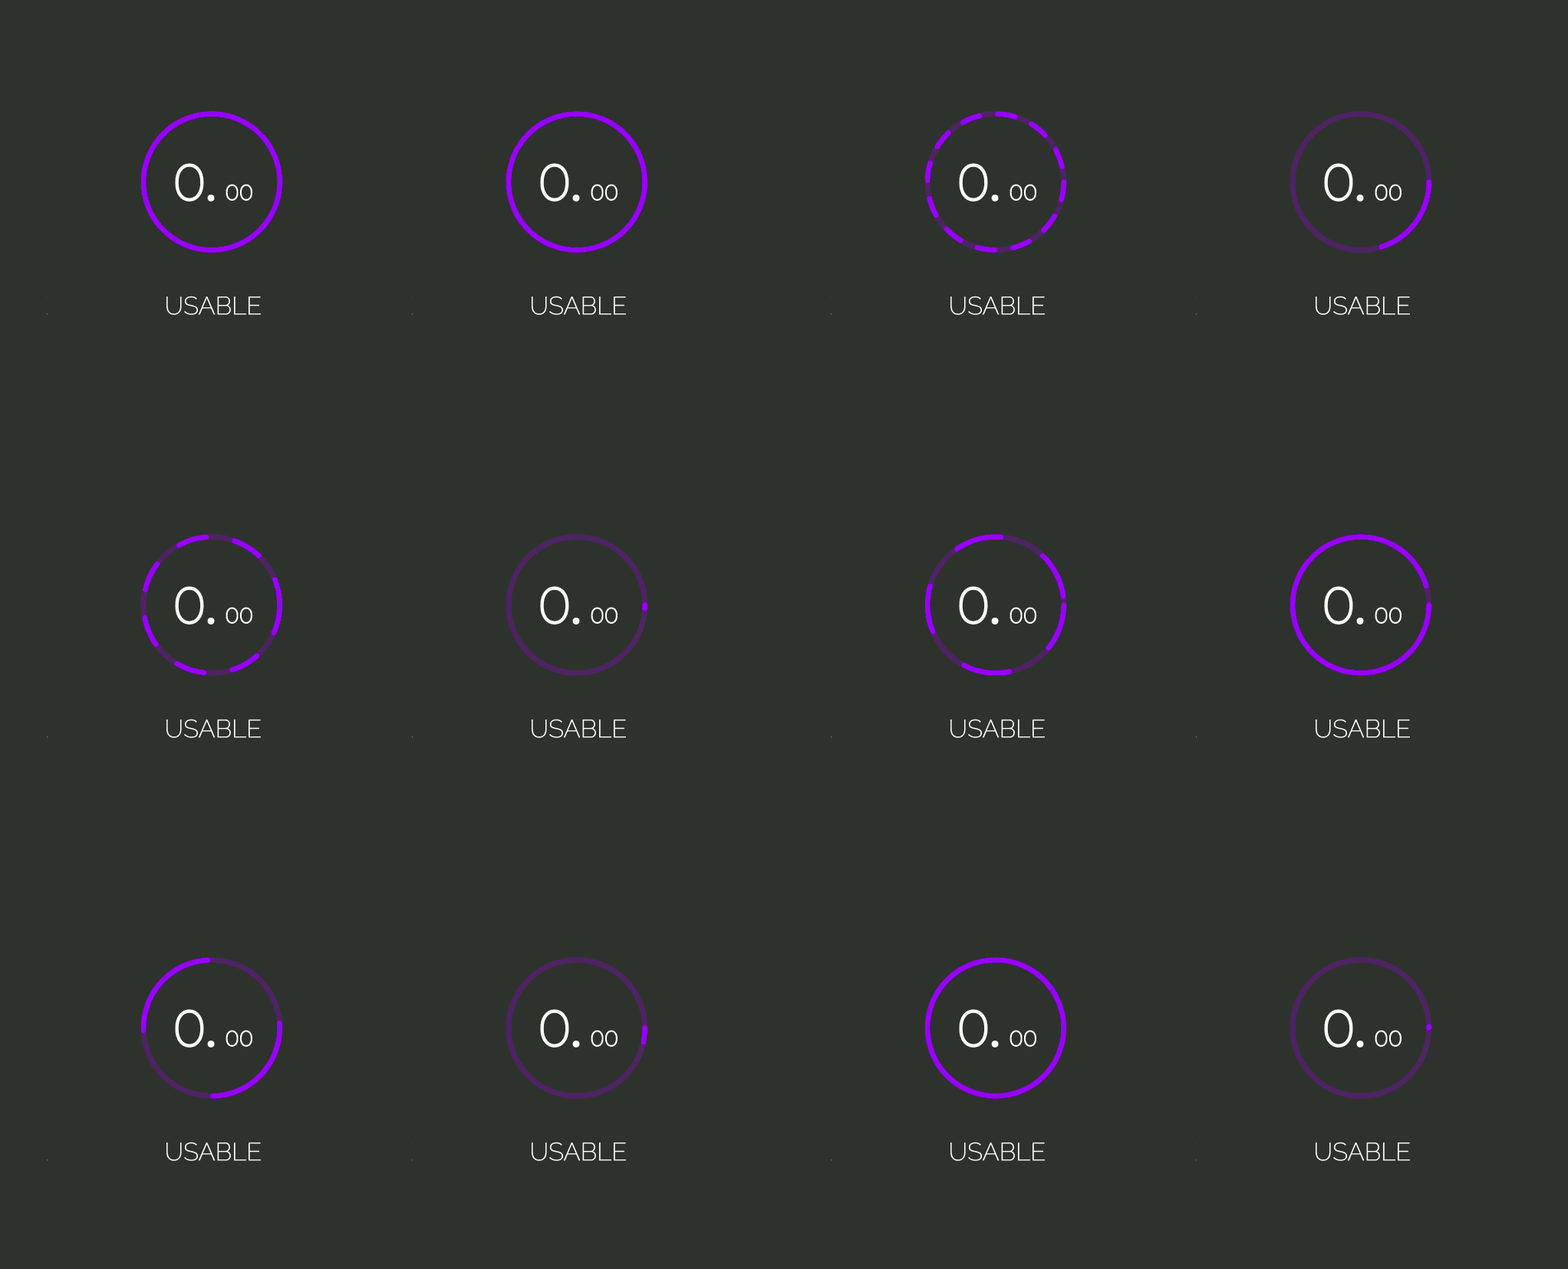
stroke-dasharray และ ในการสร้างเอฟเฟกต์การเติม เราจะตั้งค่า stroke-dasharray ประ-เส้นประเป็นความยาวเส้นรอบวง เพื่อให้ความยาวทั้งหมดเต็มไปด้วยเส้นประขนาดใหญ่และไม่มีช่องว่าง นอกจากนี้เรายังจะชดเชยด้วยค่าเดียวกัน ดังนั้นมันจึงถูก "ซ่อน" จากนั้น stroke-dashoffset จะได้รับการอัปเดตเป็นค่าบันทึกที่เกี่ยวข้อง โดยจะเติมจังหวะตามระยะเวลาการเปลี่ยนแปลง
การอัปเดตคุณสมบัติจะทำในสคริปต์ผ่านตัวแปร CSS มาประกาศตัวแปรและตั้งค่าคุณสมบัติกัน:
.circle__progress--fill { --initialStroke: 0; --transitionDuration: 0; stroke-opacity: 1; stroke-dasharray: var(--initialStroke); stroke-dashoffset: var(--initialStroke); transition: stroke-dashoffset var(--transitionDuration) ease; } ในการตั้งค่าเริ่มต้นและอัปเดตตัวแปร ให้เริ่มต้นด้วยการเลือกองค์ประกอบ . .note-display ทั้งหมดที่มี document.querySelectorAll transitionDuration จะถูกตั้งค่าเป็น 900 มิลลิวินาที
จากนั้น เราวนซ้ำผ่านอาร์เรย์ display เลือก .circle__progress.circle__progress--fill และแยกแอตทริบิวต์ r ที่ตั้งค่าไว้ใน HTML เพื่อคำนวณความยาวเส้นรอบวง ด้วยเหตุนี้ เราสามารถตั้งค่าเริ่มต้น --dasharray และ --dashoffset
ภาพเคลื่อนไหวจะเกิดขึ้นเมื่อตัวแปร --dashoffset ได้รับการอัปเดตโดย setTimeout 100ms:
const displays = document.querySelectorAll('.note-display'); const transitionDuration = 900; displays.forEach(display => { let progress = display.querySelector('.circle__progress--fill'); let radius = progress.r.baseVal.value; let circumference = 2 * Math.PI * radius; progress.style.setProperty('--transitionDuration', `${transitionDuration}ms`); progress.style.setProperty('--initialStroke', circumference); setTimeout(() => progress.style.strokeDashoffset = 50, 100); }); หากต้องการให้การเปลี่ยนแปลงเริ่มต้นจากด้านบนสุด จะต้องหมุนองค์ประกอบ .circle__svg :
.circle__svg { transform: rotate(-90deg); } 
ตอนนี้ มาคำนวณค่า dashoffset — เทียบกับบันทึกย่อ ค่าบันทึกจะถูกแทรกลงในแต่ละรายการ li ผ่านแอตทริบิวต์ data-* * สามารถสลับเป็นชื่อใดก็ได้ที่เหมาะกับความต้องการของคุณ จากนั้นจึงดึงข้อมูลใน JavaScript ผ่านชุดข้อมูลขององค์ประกอบ: element.dataset.*
หมายเหตุ : คุณสามารถอ่านเพิ่มเติมเกี่ยวกับแอตทริบิวต์ data-* ใน MDN Web Docs
คุณลักษณะของเราจะถูกเรียกว่า “ data-note ”:
<ul class="display-container"> + <li class="note-display" data-note="7.50"> <div class="circle"> <svg width="84" height="84" class="circle__svg"> <circle cx="41" cy="41" r="38" class="circle__progress circle__progress--path"></circle> <circle cx="41" cy="41" r="38" class="circle__progress circle__progress--fill"></circle> </svg> <div class="percent"> <span class="percent__int">0.</span> <span class="percent__dec">00</span> </div> </div> <span class="label">Transparent</span> </li> + <li class="note-display" data-note="9.27"> <div class="circle"> <svg width="84" height="84" class="circle__svg"> <circle cx="41" cy="41" r="38" class="circle__progress circle__progress--path"></circle> <circle cx="41" cy="41" r="38" class="circle__progress circle__progress--fill"></circle> </svg> <div class="percent"> <span class="percent__int">0.</span> <span class="percent__dec">00</span> </div> </div> <span class="label">Reasonable</span> </li> + <li class="note-display" data-note="6.93"> <div class="circle"> <svg width="84" height="84" class="circle__svg"> <circle cx="41" cy="41" r="38" class="circle__progress circle__progress--path"></circle> <circle cx="41" cy="41" r="38" class="circle__progress circle__progress--fill"></circle> </svg> <div class="percent"> <span class="percent__int">0.</span> <span class="percent__dec">00</span> </div> </div> <span class="label">Usable</span> </li> + <li class="note-display" data-note="8.72"> <div class="circle"> <svg width="84" height="84" class="circle__svg"> <circle cx="41" cy="41" r="38" class="circle__progress circle__progress--path"></circle> <circle cx="41" cy="41" r="38" class="circle__progress circle__progress--fill"></circle> </svg> <div class="percent"> <span class="percent__int">0.</span> <span class="percent__dec">00</span> </div> </div> <span class="label">Exemplary</span> </li> </ul> วิธี parseFloat จะแปลงสตริงที่ส่งคืนโดย display.dataset.note เป็นตัวเลขทศนิยม offset แสดงถึงเปอร์เซ็นต์ที่ขาดหายไปเพื่อให้ได้คะแนนสูงสุด ดังนั้น สำหรับโน้ต 7.50 เราจะมี (10 - 7.50) / 10 = 0.25 ซึ่งหมายความว่าความยาว circumference ควรถูกชดเชยด้วย 25% ของมูลค่า:
let note = parseFloat(display.dataset.note); let offset = circumference * (10 - note) / 10; กำลังอัปเดต scripts.js :
const displays = document.querySelectorAll('.note-display'); const transitionDuration = 900; displays.forEach(display => { let progress = display.querySelector('.circle__progress--fill'); let radius = progress.r.baseVal.value; let circumference = 2 * Math.PI * radius; + let note = parseFloat(display.dataset.note); + let offset = circumference * (10 - note) / 10; progress.style.setProperty('--initialStroke', circumference); progress.style.setProperty('--transitionDuration', `${transitionDuration}ms`); + setTimeout(() => progress.style.strokeDashoffset = offset, 100); }); 
ก่อนที่เราจะดำเนินการต่อ เรามาแยกการเปลี่ยนแปลงของสโต๊คเป็นวิธีการของตัวเองก่อน:
const displays = document.querySelectorAll('.note-display'); const transitionDuration = 900; displays.forEach(display => { - let progress = display.querySelector('.circle__progress--fill'); - let radius = progress.r.baseVal.value; - let circumference = 2 * Math.PI * radius; let note = parseFloat(display.dataset.note); - let offset = circumference * (10 - note) / 10; - progress.style.setProperty('--initialStroke', circumference); - progress.style.setProperty('--transitionDuration', `${transitionDuration}ms`); - setTimeout(() => progress.style.strokeDashoffset = offset, 100); + strokeTransition(display, note); }); + function strokeTransition(display, note) { + let progress = display.querySelector('.circle__progress--fill'); + let radius = progress.r.baseVal.value; + let circumference = 2 * Math.PI * radius; + let offset = circumference * (10 - note) / 10; + progress.style.setProperty('--initialStroke', circumference); + progress.style.setProperty('--transitionDuration', `${transitionDuration}ms`); + setTimeout(() => progress.style.strokeDashoffset = offset, 100); + }หมายเหตุ มูลค่าเพิ่ม
ยังคงมีการเปลี่ยนบันทึกย่อจาก 0.00 เป็นค่าบันทึกที่จะสร้าง สิ่งแรกที่ต้องทำคือการแยกค่าจำนวนเต็มและทศนิยม เราจะใช้วิธีสตริง split() (ใช้อาร์กิวเมนต์ที่กำหนดตำแหน่งที่สตริงจะถูกทำลายและส่งคืนอาร์เรย์ที่มีสตริงที่เสียหายทั้งสอง) สิ่งเหล่านี้จะถูกแปลงเป็นตัวเลขและส่งผ่านเป็นอาร์กิวเมนต์ไปยังฟังก์ชัน addedNumber increaseNumber() พร้อมกับองค์ประกอบการ display และแฟล็กที่ระบุว่าเป็นจำนวนเต็มหรือทศนิยม
const displays = document.querySelectorAll('.note-display'); const transitionDuration = 900; displays.forEach(display => { let note = parseFloat(display.dataset.note); + let [int, dec] = display.dataset.note.split('.'); + [int, dec] = [Number(int), Number(dec)]; strokeTransition(display, note); + increaseNumber(display, int, 'int'); + increaseNumber(display, dec, 'dec'); }); ในฟังก์ชัน addedNumber increaseNumber() เราเลือกองค์ประกอบ .percent__dec .percent__int หรือ .percent__dec ขึ้นอยู่กับ className และในกรณีที่ผลลัพธ์ควรมีจุดทศนิยมหรือไม่ เราได้ตั้งค่า transitionDuration เป็น 900ms ในการทำให้ตัวเลขเคลื่อนไหวตั้งแต่ 0 ถึง 7 เช่น ระยะเวลาจะต้องหารด้วยโน้ต 900 / 7 = 128.57ms ผลลัพธ์แสดงให้เห็นว่าการวนซ้ำแต่ละครั้งใช้เวลานานเท่าใด ซึ่งหมายความว่า setInterval ของเราจะเริ่มทำงานทุกๆ 128.57ms
ด้วยตัวแปรที่ตั้งไว้ มากำหนด setInterval ตัวแปรตัว counter จะถูกผนวกเข้ากับองค์ประกอบเป็นข้อความและเพิ่มขึ้นในการวนซ้ำแต่ละครั้ง:
function increaseNumber(display, number, className) { let element = display.querySelector(`.percent__${className}`), decPoint = className === 'int' ? '.' : '', interval = transitionDuration / number, counter = 0; let increaseInterval = setInterval(() => { element.textContent = counter + decPoint; counter++; }, interval); } 
เย็น! มันเพิ่มค่านิยม แต่มันก็ทำตลอดไป เราจำเป็นต้องล้าง setInterval เมื่อบันทึกย่อบรรลุค่าที่เราต้องการ ที่ทำด้วยฟังก์ชัน clearInterval :
function increaseNumber(display, number, className) { let element = display.querySelector(`.percent__${className}`), decPoint = className === 'int' ? '.' : '', interval = transitionDuration / number, counter = 0; let increaseInterval = setInterval(() => { + if (counter === number) { window.clearInterval(increaseInterval); } element.textContent = counter + decPoint; counter++; }, interval); } 
ตอนนี้ตัวเลขได้รับการอัพเดตจนถึงค่าบันทึกย่อและล้างด้วย clearInterval()
ที่สวยมากสำหรับบทช่วยสอนนี้ ฉันหวังว่าคุณจะสนุกกับมัน!
หากคุณรู้สึกอยากสร้างบางสิ่งที่โต้ตอบได้มากกว่านี้ ให้ลองดู Memory Game Tutorial ของฉันที่สร้างด้วย Vanilla JavaScript ครอบคลุมแนวคิดพื้นฐานของ HTML5, CSS3 และ JavaScript เช่น การวางตำแหน่ง มุมมอง การเปลี่ยน Flexbox การจัดการเหตุการณ์ ระยะหมดเวลา และ ternaries
มีความสุขในการเข้ารหัส!
