
การจัดรูปแบบแอปพลิเคชันเชิงมุมด้วย Bootstrap
เผยแพร่แล้ว: 2022-03-10ในกรณีที่คุณได้ลองสร้างเว็บแอปพลิเคชันด้วย Angular 7 แล้ว ถึงเวลาต้องปรับปรุง มาดูกันว่าเราจะผสานรวมสไตล์ Bootstrap CSS และไฟล์ JavaScript กับโปรเจ็กต์ Angular ที่สร้างโดยใช้ Angular CLI ได้อย่างไร และวิธีใช้การควบคุมฟอร์มและคลาสเพื่อสร้างฟอร์มที่สวยงามและวิธีจัดสไตล์ตาราง HTML โดยใช้สไตล์ตาราง
สำหรับส่วน Angular เราจะสร้างแอปพลิเคชันฝั่งไคลเอ็นต์อย่างง่ายสำหรับการสร้างและแสดงรายการผู้ติดต่อ ผู้ติดต่อแต่ละคนมี ID ชื่อ อีเมล และคำอธิบาย และเราจะใช้บริการข้อมูลอย่างง่ายที่เก็บผู้ติดต่อในอาร์เรย์ TypeScript คุณสามารถใช้ API ในหน่วยความจำขั้นสูงแทนได้ (ดู “คู่มือฉบับสมบูรณ์สำหรับการกำหนดเส้นทางในเชิงมุม”)
หมายเหตุ : คุณสามารถรับซอร์สโค้ดของบทช่วยสอนนี้จากที่เก็บ GitHub และดูตัวอย่างสดได้ที่นี่
ความต้องการ
ก่อนที่เราจะเริ่มสร้างแอปพลิเคชันสาธิต มาดูข้อกำหนดที่จำเป็นสำหรับบทช่วยสอนนี้กัน
โดยทั่วไป คุณจะต้องมีสิ่งต่อไปนี้:
- ติดตั้ง Node.js และ NPM แล้ว (คุณสามารถตรงไปที่เว็บไซต์ทางการและดาวน์โหลดไบนารีสำหรับระบบของคุณ)
- คุ้นเคยกับ TypeScript,
- ประสบการณ์การทำงานของ Angular,
- ความรู้พื้นฐานเกี่ยวกับ CSS และ HTML
การติดตั้ง Angular CLI
เริ่มต้นด้วยการติดตั้ง Angular CLI เวอร์ชันล่าสุด ในเทอร์มินัลของคุณ ให้รันคำสั่งต่อไปนี้:
$ npm install -g @angular/cliในขณะที่เขียน มีการติดตั้ง v7.0.3 ของ Angular CLI หากคุณติดตั้ง CLI แล้ว คุณสามารถตรวจสอบให้แน่ใจว่าคุณมีเวอร์ชันล่าสุดโดยใช้คำสั่งนี้:
$ ng --versionการสร้างโครงการ
เมื่อคุณติดตั้ง Angular CLI แล้ว ลองใช้มันเพื่อสร้างโปรเจ็กต์ Angular 7 โดยรันคำสั่งต่อไปนี้:
$ ng new angular-bootstrap-demoCLI จะถามคุณว่า:
คุณต้องการเพิ่มการกำหนดเส้นทางเชิงมุมหรือไม่
กด Y ต่อไปจะถามคุณว่า
คุณต้องการใช้สไตล์ชีตรูปแบบใด
เลือก "CSS"
กำลังเพิ่ม Bootstrap
หลังจากสร้างโปรเจ็กต์แล้ว คุณต้องติดตั้ง Bootstrap 4 และรวมเข้ากับโปรเจ็กต์ Angular ของคุณ
ขั้นแรก นำทางภายในโฟลเดอร์รูทของโปรเจ็กต์ของคุณ:
$ cd angular-bootstrap-demoถัดไป ติดตั้ง Bootstrap 4 และ jQuery จาก npm:
$ npm install --save bootstrap jquery(ในกรณีนี้ จะติดตั้ง bootstrap v4.2.1 และ jquery v3.3.1 )
สุดท้าย เปิดไฟล์ angular.json และเพิ่มเส้นทางไฟล์ของไฟล์ Bootstrap CSS และ JS รวมถึง jQuery ไปยังอาร์เรย์ styles และ scripts ภายใต้เป้าหมายการ build :
"architect": { "build": { [...], "styles": [ "src/styles.css", "node_modules/bootstrap/dist/css/bootstrap.min.css" ], "scripts": [ "node_modules/jquery/dist/jquery.min.js", "node_modules/bootstrap/dist/js/bootstrap.min.js" ] },ดูวิธีเพิ่ม Bootstrap ให้กับโปรเจ็กต์ Angular 6 สำหรับตัวเลือกในการรวม Bootstrap กับ Angular
การเพิ่มบริการข้อมูล
หลังจากสร้างโปรเจ็กต์และเพิ่ม Bootstrap 4 แล้ว เราจะสร้างบริการเชิงมุมที่จะใช้เพื่อให้ข้อมูลสาธิตบางส่วนแสดงในแอปพลิเคชันของเรา
ในเทอร์มินัลของคุณ ให้รันคำสั่งต่อไปนี้เพื่อสร้างบริการ:
$ ng generate service data สิ่งนี้จะสร้างไฟล์ src/app/data.service.spec.ts และ src/app/data.service.ts ไฟล์
เปิด src/app/data.service.ts และแทนที่เนื้อหาดังต่อไปนี้:
import { Injectable } from '@angular/core'; @Injectable({ providedIn: 'root' }) export class DataService { contacts = [ {id: 1, name: "Contact 001", description: "Contact 001 des", email: "[email protected]"}, {id: 2, name: "Contact 002", description: "Contact 002 des", email: "[email protected]"}, {id: 3, name: "Contact 003", description: "Contact 003 des", email: "[email protected]"}, {id: 4, name: "Contact 004", description: "Contact 004 des", email: "[email protected]"} ]; constructor() { } public getContacts():Array<{id, name, description, email}>{ return this.contacts; } public createContact(contact: {id, name, description, email}){ this.contacts.push(contact); } } เราเพิ่มอาร์เรย์ผู้ contacts ด้วยผู้ติดต่อสาธิตบางส่วน getContacts() ซึ่งส่งคืนผู้ติดต่อ และ createContact() ซึ่งจะผนวกผู้ติดต่อใหม่เข้ากับอาร์เรย์ผู้ contacts
การเพิ่มส่วนประกอบ
หลังจากสร้างบริการข้อมูลแล้ว ต่อไปเราต้องสร้างองค์ประกอบบางอย่างสำหรับแอปพลิเคชันของเรา ในเทอร์มินัลของคุณ ให้รัน:
$ ng generate component home $ ng generate component contact-create $ ng generate component contact-list ต่อไป เราจะเพิ่มส่วนประกอบเหล่านี้ในโมดูลการกำหนดเส้นทางเพื่อเปิดใช้งานการนำทางในแอปพลิเคชันของเรา เปิดไฟล์ src/app/app-routing.module.ts และแทนที่เนื้อหาด้วยสิ่งต่อไปนี้:
import { NgModule } from '@angular/core'; import { Routes, RouterModule } from '@angular/router'; import { ContactListComponent } from './contact-list/contact-list.component'; import { ContactCreateComponent } from './contact-create/contact-create.component'; import { HomeComponent } from './home/home.component'; const routes: Routes = [ {path: "", pathMatch: "full",redirectTo: "home"}, {path: "home", component: HomeComponent}, {path: "contact-create", component: ContactCreateComponent}, {path: "contact-list", component: ContactListComponent} ]; @NgModule({ imports: [RouterModule.forRoot(routes)], exports: [RouterModule] }) export class AppRoutingModule { } เราใช้คุณสมบัติ redirectTo ของพาธของเราเตอร์เพื่อเปลี่ยนเส้นทางผู้ใช้ไปยังโฮมเพจเมื่อพวกเขาเยี่ยมชมแอปพลิเคชันของเรา
การเพิ่มส่วนประกอบส่วนหัวและส่วนท้าย
ต่อไป มาสร้างส่วนประกอบส่วนหัวและส่วนท้ายกัน:
$ ng generate component header $ ng generate component footer เปิดไฟล์ src/app/header/header.component.html และเพิ่มรหัสต่อไปนี้:
<nav class="navbar navbar-expand-md bg-dark navbar-dark fixed-top"> <a class="navbar-brand" href="#">Angular Bootstrap Demo</a> <button class="navbar-toggler" type="button" data-toggle="collapse" data-target="#navbarCollapse" aria-controls="navbarCollapse" aria-expanded="false" aria-label="Toggle navigation"> <span class="navbar-toggler-icon"></span> </button> <div class="collapse navbar-collapse"> <ul class="navbar-nav mr-auto"> <li class="nav-item"> <a class="nav-link" routerLink="/home">Home</a> </li> <li class="nav-item"> <a class="nav-link" routerLink="/contact-list">Contacts</a> </li> <li class="nav-item"> <a class="nav-link" routerLink="/contact-create">Create</a> </li> </ul> </div> </nav> แถบนำทางจะถูกสร้างขึ้นด้วย Bootstrap 4 และเราจะใช้คำสั่ง routerLink เพื่อเชื่อมโยงไปยังส่วนประกอบต่างๆ
ใช้คลาส .navbar , .navbar .navbar-expand{-sm|-md|-lg|-xl} และ .navbar-dark เพื่อสร้างแถบนำทาง Bootstrap (สำหรับข้อมูลเพิ่มเติมเกี่ยวกับแถบนำทาง โปรดดูเอกสารประกอบของ Bootstrap ใน “Navbar”
ถัดไป เปิดไฟล์ src/app/header/header.component.css และเพิ่ม:
.nav-item{ padding:2px; margin-left: 7px; } ถัดไป เปิดไฟล์ src/app/footer/footer.component.html และเพิ่ม:
<footer> <p class="text-xs-center">© Copyright 2019. All rights reserved.</p> </footer> เปิดไฟล์ src/app/footer/footer.component.css และเพิ่ม:
footer { position: absolute; right: 0; bottom: 0; left: 0; padding: 1rem; text-align: center; } ถัดไป เปิดไฟล์ src/app/app.component.html และแทนที่เนื้อหาด้วยสิ่งต่อไปนี้:
<app-header></app-header> <router-outlet></router-outlet> <app-footer></app-footer>เรากำลังสร้างเปลือกแอปพลิเคชันโดยใช้ส่วนประกอบส่วนหัวและส่วนท้าย ซึ่งหมายความว่าจะมีอยู่ในทุกหน้าของแอปพลิเคชันของเรา ส่วนเดียวที่จะเปลี่ยนแปลงคือสิ่งที่จะถูกแทรกในเต้ารับเราเตอร์ (ตรวจสอบ "The Application Shell" บนเว็บไซต์ Angular สำหรับข้อมูลเพิ่มเติม)

การเพิ่ม Bootstrap Jumbotron
ตามเอกสาร Bootstrap:
“Jumbotron เป็นส่วนประกอบที่เบาและยืดหยุ่น ซึ่งสามารถเลือกที่จะขยายวิวพอร์ตทั้งหมดเพื่อแสดงข้อความทางการตลาดที่สำคัญบนไซต์ของคุณ”
มาเพิ่มส่วนประกอบ Jumbotron ในโฮมเพจของเรากันเถอะ เปิดไฟล์ src/app/home/home.component.html และเพิ่ม:
<div class="jumbotron"> <h1>Angular Bootstrap Demo</h1> <p class="lead"> This demo shows how to integrate Bootstrap 4 with Angular 7 </p> <a class="btn btn-lg btn-primary" href="" role="button">View tutorial</a> </div> คลาส .jumbotron ใช้เพื่อสร้าง Bootstrap Jumbotron
การเพิ่มองค์ประกอบรายการ: การใช้ Bootstrap Table
ตอนนี้ มาสร้างข้อมูลส่วนประกอบสู่รายการจากบริการข้อมูล และใช้ตาราง Bootstrap 4 เพื่อแสดงข้อมูลแบบตาราง
ขั้นแรก เปิดไฟล์ src/app/contact-list/contact-list.component.ts และฉีดบริการข้อมูล จากนั้นเรียกใช้ getContacts() เพื่อรับข้อมูลเมื่อคอมโพเนนต์เริ่มต้น:
import { Component, OnInit } from '@angular/core'; import { DataService } from '../data.service'; @Component({ selector: 'app-contact-list', templateUrl: './contact-list.component.html', styleUrls: ['./contact-list.component.css'] }) export class ContactListComponent implements OnInit { contacts; selectedContact; constructor(public dataService: DataService) { } ngOnInit() { this.contacts = this.dataService.getContacts(); } public selectContact(contact){ this.selectedContact = contact; } } เราได้เพิ่มผู้ contacts สองตัวแปรและ selectedContact ผู้ติดต่อซึ่งมีชุดผู้ติดต่อและผู้ติดต่อที่เลือก และ selectContact() ซึ่งกำหนดผู้ติดต่อที่ selectedContact ให้กับตัวแปร SelectContact
เปิดไฟล์ src/app/contact-list/contact-list.component.html และเพิ่ม:
<div class="container"> <table class="table table-hover"> <thead> <tr> <th>#</th> <th>Name</th> <th>Email</th> <th>Actions</th> </tr> </thead> <tbody> <tr *ngFor="let contact of contacts"> <td>{{ contact.id }}</td> <td> {{ contact.name }}</td> <td> {{ contact.email }}</td> <td> <button class="btn btn-primary" (click)="selectContact(contact)"> Show details</button> </td> </tr> </tbody> </table> <div class="card text-center" *ngIf="selectedContact"> <div class="card-header"> # {{selectedContact.id}} </div> <div class="card-block"> <h4 class="card-title">{{selectedContact.name}}</h4> <p class="card-text"> {{selectedContact.description}} </p> </div> </div> </div> เราเพียงแค่วนผ่านอาร์เรย์ผู้ contacts และแสดงรายละเอียดผู้ติดต่อแต่ละรายการและปุ่มเพื่อเลือกผู้ติดต่อ หากเลือกผู้ติดต่อ การ์ด Bootstrap 4 พร้อมข้อมูลเพิ่มเติมจะปรากฏขึ้น
นี่คือคำจำกัดความของการ์ดจากเอกสาร Bootstrap 4 :
“ การ์ด เป็นคอนเทนเนอร์เนื้อหาที่ยืดหยุ่นและขยายได้ ประกอบด้วยตัวเลือกสำหรับส่วนหัวและส่วนท้าย เนื้อหาที่หลากหลาย สีพื้นหลังตามบริบท และตัวเลือกการแสดงผลที่มีประสิทธิภาพ หากคุณคุ้นเคยกับ Bootstrap 3 การ์ดจะเข้ามาแทนที่แผง บ่อน้ำ และภาพขนาดย่อแบบเก่าของเรา ฟังก์ชันที่คล้ายคลึงกันกับส่วนประกอบเหล่านั้นมีให้เป็นคลาสตัวปรับแต่งสำหรับการ์ด”
เราใช้คลาส .table และ .table .table-hover เพื่อสร้างตารางสไตล์ Bootstrap, คลาส .card , .card .card-block , .table .card-title และ .card-text เพื่อสร้างการ์ด (สำหรับข้อมูลเพิ่มเติม โปรดดูที่ ตารางและการ์ด)
การเพิ่ม Create Component: การใช้ Bootstrap Form Controls and Classes
มาเพิ่มแบบฟอร์มในองค์ประกอบ contact-create ของเรากัน อันดับแรก เราต้องนำเข้า FormsModule ในโมดูลแอปพลิเคชันหลักของเรา เปิดไฟล์ src/app/app.module.ts นำเข้า FormsModule จาก @angular/forms และเพิ่มลงในอาร์เรย์ imports :
import { BrowserModule } from '@angular/platform-browser'; import { NgModule } from '@angular/core'; import { AppRoutingModule } from './app-routing.module'; import { FormsModule } from '@angular/forms'; /* ... */ @NgModule({ declarations: [ /* ... */ ], imports: [ BrowserModule, AppRoutingModule, FormsModule ], providers: [], bootstrap: [AppComponent] }) export class AppModule { } ถัดไป เปิดไฟล์ src/app/contact-create/contact-create.component.ts และแทนที่เนื้อหาด้วยสิ่งต่อไปนี้:
import { Component, OnInit } from '@angular/core'; import { DataService } from '../data.service'; @Component({ selector: 'app-contact-create', templateUrl: './contact-create.component.html', styleUrls: ['./contact-create.component.css'] }) export class ContactCreateComponent implements OnInit { contact : {id, name, description, email} = {id: null, name: "", description: "", email: ""}; constructor(public dataService: DataService) { } ngOnInit() { } createContact(){ console.log(this.contact); this.dataService.createContact(this.contact); this.contact = {id: null, name: "", description: "", email: ""}; } } ถัดไป เปิดไฟล์ src/app/contact-create/contact-create.component.html และเพิ่มรหัสต่อไปนี้:
<div class="container"> <div class="row"> <div class="col-sm-8 offset-sm-2"> <div> <form> <div class="form-group"> <label for="id">ID</label> <input [(ngModel)]="contact.id" type="text" name="id" class="form-control" placeholder="Enter ID"> <small class="form-text text-muted">Enter your contact's ID</small> <label for="name">Contact Name</label> <input [(ngModel)]="contact.name" type="text" name="name" class="form-control" placeholder="Enter your name"> <small class="form-text text-muted">Enter your contact's name</small> <label for="email">Contact Email</label> <input [(ngModel)]="contact.email" type="text" name="email" class="form-control" placeholder="Enter your email"> <small class="form-text text-muted">Enter your contact's email</small> <label for="description">Contact Description</label> <textarea [(ngModel)]="contact.description" name="description" class="form-control"> </textarea> <small class="form-text text-muted">Enter your contact's description</small> </div> </form> <button class="btn btn-primary" (click)="createContact()">Create contact</button> </div> </div> </div> </div> เราใช้ .form-group , .form-control เพื่อสร้างฟอร์มสไตล์ Bootstrap (ดูข้อมูลเพิ่มเติมใน “ฟอร์ม”)
เราใช้คำสั่ง ngModel เพื่อผูกฟิลด์ของแบบฟอร์มกับตัวแปรของส่วนประกอบ เพื่อให้การโยงข้อมูลทำงานได้อย่างถูกต้อง คุณต้องตั้งชื่อฟิลด์ของฟอร์มแต่ละฟิลด์
การอ่านที่แนะนำ : การ จัดการจุดพักของรูปภาพด้วย Angular โดย Tamas Piros
การเรียกใช้แอปพลิเคชันเชิงมุม
ในขั้นตอนนี้ ให้เรียกใช้แอปพลิเคชันและดูว่าทุกอย่างทำงานตามที่คาดไว้หรือไม่ ตรงไปที่เทอร์มินัลของคุณ ตรวจสอบให้แน่ใจว่าคุณอยู่ในโฟลเดอร์รูทของโปรเจ็กต์ของคุณ จากนั้นรันคำสั่งต่อไปนี้:
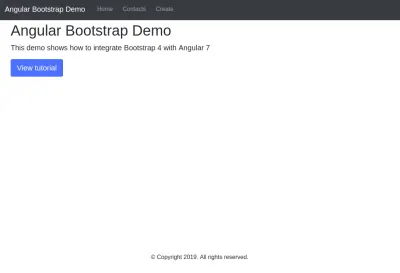
$ ng serve เซิร์ฟเวอร์การพัฒนารีโหลดแบบสดจะทำงานจากที่อยู่ https://localhost:4200 เปิดเว็บเบราว์เซอร์ของคุณและไปที่ที่อยู่นั้น คุณควรเห็นอินเทอร์เฟซต่อไปนี้:
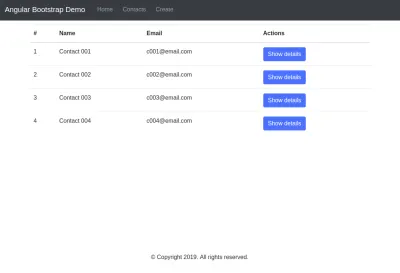
หากคุณไปที่หน้ารายชื่อติดต่อ คุณจะเห็น:
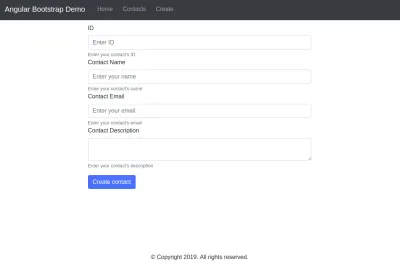
หากคุณไปที่หน้า "สร้างผู้ติดต่อ" คุณจะเห็น:
บทสรุป
ในบทช่วยสอนนี้ เราได้เห็นวิธีสร้างแอปพลิเคชันเชิงมุมอย่างง่ายด้วยอินเทอร์เฟซ Bootstrap คุณสามารถค้นหาซอร์สโค้ดที่สมบูรณ์บน GitHub และดูตัวอย่างสดได้ที่นี่