부트스트랩으로 Angular 애플리케이션 스타일링하기
게시 됨: 2022-03-10이미 Angular 7로 웹 애플리케이션을 구축하려고 시도했다면 이제 한 단계 업그레이드할 때입니다. Bootstrap CSS 스타일과 JavaScript 파일을 Angular CLI를 사용하여 생성된 Angular 프로젝트와 통합하는 방법과 양식 컨트롤과 클래스를 사용하여 아름다운 양식을 만드는 방법과 Table 스타일을 사용하여 HTML 테이블의 스타일을 지정하는 방법을 살펴보겠습니다.
Angular 부분의 경우 연락처를 만들고 나열하기 위한 간단한 클라이언트 측 응용 프로그램을 만들 것입니다. 각 연락처에는 ID, 이름, 이메일 및 설명이 있으며 연락처를 TypeScript 배열에 저장하는 간단한 데이터 서비스를 사용할 것입니다. 대신 고급 인메모리 API를 사용할 수 있습니다. ("앵귤러 라우팅에 대한 완전한 가이드"를 확인하십시오.)
참고 : 이 GitHub 리포지토리에서 이 자습서의 소스 코드를 가져오고 여기에서 라이브 예제를 볼 수 있습니다.
요구 사항
데모 애플리케이션 생성을 시작하기 전에 이 자습서에 필요한 요구 사항을 살펴보겠습니다.
기본적으로 다음이 필요합니다.
- Node.js 및 NPM 설치(공식 웹사이트로 이동하여 시스템용 바이너리를 다운로드할 수 있습니다),
- TypeScript에 대한 이해,
- Angular 근무 경험,
- CSS 및 HTML에 대한 기본 지식.
Angular CLI 설치
최신 버전의 Angular CLI를 설치하여 시작하겠습니다. 터미널에서 다음 명령을 실행합니다.
$ npm install -g @angular/cli작성 시점에는 Angular CLI v7.0.3 이 설치되어 있습니다. CLI가 이미 설치되어 있는 경우 다음 명령을 사용하여 최신 버전인지 확인할 수 있습니다.
$ ng --version프로젝트 만들기
Angular CLI를 설치했으면 다음 명령을 실행하여 Angular 7 프로젝트를 생성해 보겠습니다.
$ ng new angular-bootstrap-demo그러면 CLI에서 다음을 묻습니다.
Angular 라우팅을 추가하시겠습니까?
Y 를 누릅니다. 다음으로 다음과 같이 묻습니다.
어떤 스타일시트 형식을 사용하시겠습니까?
"CSS"를 선택합니다.
부트스트랩 추가
프로젝트를 생성한 후에는 Bootstrap 4를 설치하고 Angular 프로젝트와 통합해야 합니다.
먼저 프로젝트의 루트 폴더 내부로 이동합니다.
$ cd angular-bootstrap-demo다음으로 npm에서 Bootstrap 4 및 jQuery를 설치합니다.
$ npm install --save bootstrap jquery(이 경우 bootstrap v4.2.1 , jquery v3.3.1 이 설치되어 있습니다.)
마지막으로 angular.json 파일을 열고 build 대상 아래의 styles 및 scripts 배열에 jQuery는 물론 Bootstrap CSS 및 JS 파일의 파일 경로를 추가합니다.
"architect": { "build": { [...], "styles": [ "src/styles.css", "node_modules/bootstrap/dist/css/bootstrap.min.css" ], "scripts": [ "node_modules/jquery/dist/jquery.min.js", "node_modules/bootstrap/dist/js/bootstrap.min.js" ] },Bootstrap을 Angular와 통합하는 방법에 대한 옵션은 Angular 6 프로젝트에 Bootstrap을 추가하는 방법을 확인하세요.
데이터 서비스 추가
프로젝트를 만들고 Bootstrap 4를 추가한 후에는 애플리케이션에 표시할 일부 데모 데이터를 제공하는 데 사용할 Angular 서비스를 만듭니다.
터미널에서 다음 명령을 실행하여 서비스를 생성합니다.
$ ng generate service data 이렇게 하면 두 개의 src/app/data.service.spec.ts 및 src/app/data.service.ts 파일이 생성됩니다.
src/app/data.service.ts 를 열고 내용을 다음으로 바꿉니다.
import { Injectable } from '@angular/core'; @Injectable({ providedIn: 'root' }) export class DataService { contacts = [ {id: 1, name: "Contact 001", description: "Contact 001 des", email: "[email protected]"}, {id: 2, name: "Contact 002", description: "Contact 002 des", email: "[email protected]"}, {id: 3, name: "Contact 003", description: "Contact 003 des", email: "[email protected]"}, {id: 4, name: "Contact 004", description: "Contact 004 des", email: "[email protected]"} ]; constructor() { } public getContacts():Array<{id, name, description, email}>{ return this.contacts; } public createContact(contact: {id, name, description, email}){ this.contacts.push(contact); } } 일부 데모 연락처가 있는 contacts 배열, 연락처를 반환하는 getContacts() 메서드 및 contacts 배열에 새 연락처를 추가하는 createContact() 를 추가합니다.
구성 요소 추가
데이터 서비스를 생성한 후에는 애플리케이션을 위한 몇 가지 구성 요소를 생성해야 합니다. 터미널에서 다음을 실행합니다.
$ ng generate component home $ ng generate component contact-create $ ng generate component contact-list 다음으로 이러한 구성 요소를 라우팅 모듈에 추가하여 애플리케이션에서 탐색을 활성화합니다. src/app/app-routing.module.ts 파일을 열고 내용을 다음으로 바꿉니다.
import { NgModule } from '@angular/core'; import { Routes, RouterModule } from '@angular/router'; import { ContactListComponent } from './contact-list/contact-list.component'; import { ContactCreateComponent } from './contact-create/contact-create.component'; import { HomeComponent } from './home/home.component'; const routes: Routes = [ {path: "", pathMatch: "full",redirectTo: "home"}, {path: "home", component: HomeComponent}, {path: "contact-create", component: ContactCreateComponent}, {path: "contact-list", component: ContactListComponent} ]; @NgModule({ imports: [RouterModule.forRoot(routes)], exports: [RouterModule] }) export class AppRoutingModule { } 라우터 경로의 redirectTo 속성을 사용하여 사용자가 애플리케이션을 방문할 때 홈 페이지로 리디렉션합니다.
머리글 및 바닥글 구성 요소 추가
다음으로 머리글 및 바닥글 구성 요소를 생성해 보겠습니다.
$ ng generate component header $ ng generate component footer src/app/header/header.component.html 파일을 열고 다음 코드를 추가합니다.
<nav class="navbar navbar-expand-md bg-dark navbar-dark fixed-top"> <a class="navbar-brand" href="#">Angular Bootstrap Demo</a> <button class="navbar-toggler" type="button" data-toggle="collapse" data-target="#navbarCollapse" aria-controls="navbarCollapse" aria-expanded="false" aria-label="Toggle navigation"> <span class="navbar-toggler-icon"></span> </button> <div class="collapse navbar-collapse"> <ul class="navbar-nav mr-auto"> <li class="nav-item"> <a class="nav-link" routerLink="/home">Home</a> </li> <li class="nav-item"> <a class="nav-link" routerLink="/contact-list">Contacts</a> </li> <li class="nav-item"> <a class="nav-link" routerLink="/contact-create">Create</a> </li> </ul> </div> </nav> Bootstrap 4를 사용하여 탐색 모음이 생성되고 routerLink 지시문을 사용하여 다른 구성 요소에 연결합니다.
.navbar , .navbar-expand{-sm|-md|-lg|-xl} 및 .navbar-dark 클래스를 사용하여 부트스트랩 탐색 모음을 만듭니다. (네비 바에 대한 자세한 내용은 "Navbar"에 대한 Bootstrap 설명서를 확인하십시오.
다음으로 src/app/header/header.component.css 파일을 열고 다음을 추가합니다.
.nav-item{ padding:2px; margin-left: 7px; } 다음으로 src/app/footer/footer.component.html 파일을 열고 다음을 추가합니다.
<footer> <p class="text-xs-center">© Copyright 2019. All rights reserved.</p> </footer> src/app/footer/footer.component.css 파일을 열고 다음을 추가합니다.
footer { position: absolute; right: 0; bottom: 0; left: 0; padding: 1rem; text-align: center; } 그런 다음 src/app/app.component.html 파일을 열고 해당 내용을 다음으로 바꿉니다.
<app-header></app-header> <router-outlet></router-outlet> <app-footer></app-footer>머리글과 바닥글 구성 요소를 사용하여 응용 프로그램 셸을 만들고 있습니다. 즉, 응용 프로그램의 모든 페이지에 표시됩니다. 변경될 유일한 부분은 라우터 콘센트에 삽입될 것입니다(자세한 내용은 Angular 웹사이트에서 "응용 프로그램 셸"을 확인하십시오).

부트스트랩 점보트론 추가
Bootstrap 문서에 따르면:
"점보트론은 선택적으로 전체 뷰포트를 확장하여 사이트의 주요 마케팅 메시지를 표시할 수 있는 가볍고 유연한 구성 요소입니다."
홈 페이지에 Jumbotron 구성 요소를 추가해 보겠습니다. src/app/home/home.component.html 파일을 열고 다음을 추가합니다.
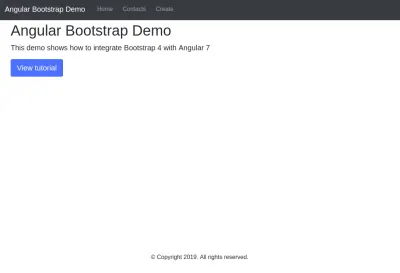
<div class="jumbotron"> <h1>Angular Bootstrap Demo</h1> <p class="lead"> This demo shows how to integrate Bootstrap 4 with Angular 7 </p> <a class="btn btn-lg btn-primary" href="" role="button">View tutorial</a> </div> .jumbotron 클래스는 Bootstrap Jumbotron을 만드는 데 사용됩니다.
목록 구성 요소 추가: 부트스트랩 테이블 사용
이제 데이터 서비스에서 component-to-list 데이터를 만들고 Bootstrap 4 테이블을 사용하여 테이블 형식 데이터를 표시해 보겠습니다.
먼저 src/app/contact-list/contact-list.component.ts 파일을 열고 데이터 서비스를 삽입한 다음 getContacts() 메서드를 호출하여 구성 요소가 초기화될 때 데이터를 가져옵니다.
import { Component, OnInit } from '@angular/core'; import { DataService } from '../data.service'; @Component({ selector: 'app-contact-list', templateUrl: './contact-list.component.html', styleUrls: ['./contact-list.component.css'] }) export class ContactListComponent implements OnInit { contacts; selectedContact; constructor(public dataService: DataService) { } ngOnInit() { this.contacts = this.dataService.getContacts(); } public selectContact(contact){ this.selectedContact = contact; } } 연락처 집합과 선택한 연락처를 보유하는 두 개의 변수 contacts 와 selectedContact 를 추가했습니다. 그리고 선택된 연락처를 selectedContact 변수에 할당하는 selectContact() 메소드.
src/app/contact-list/contact-list.component.html 파일을 열고 다음을 추가합니다.
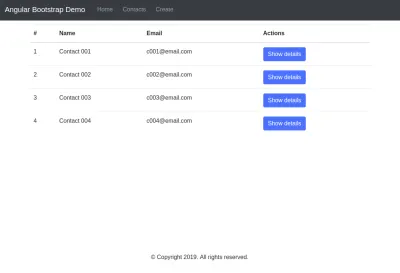
<div class="container"> <table class="table table-hover"> <thead> <tr> <th>#</th> <th>Name</th> <th>Email</th> <th>Actions</th> </tr> </thead> <tbody> <tr *ngFor="let contact of contacts"> <td>{{ contact.id }}</td> <td> {{ contact.name }}</td> <td> {{ contact.email }}</td> <td> <button class="btn btn-primary" (click)="selectContact(contact)"> Show details</button> </td> </tr> </tbody> </table> <div class="card text-center" *ngIf="selectedContact"> <div class="card-header"> # {{selectedContact.id}} </div> <div class="card-block"> <h4 class="card-title">{{selectedContact.name}}</h4> <p class="card-text"> {{selectedContact.description}} </p> </div> </div> </div> contacts 배열을 반복하고 각 연락처 세부 정보와 연락처를 선택하는 버튼을 표시하기만 하면 됩니다. 연락처를 선택하면 추가 정보가 있는 Bootstrap 4 카드가 표시됩니다.
이것은 Bootstrap 4 문서의 카드 정의입니다.
“ 카드 는 유연하고 확장 가능한 콘텐츠 컨테이너입니다. 여기에는 머리글 및 바닥글, 다양한 콘텐츠, 상황에 맞는 배경색 및 강력한 표시 옵션에 대한 옵션이 포함됩니다. Bootstrap 3에 익숙하다면 카드가 기존 패널, 우물 및 축소판을 대체합니다. 이러한 구성 요소와 유사한 기능을 카드의 수정자 클래스로 사용할 수 있습니다."
.table 및 .table-hover 클래스를 사용하여 부트스트랩 스타일 테이블, .card , .card-block , .card-title 및 .card-text 클래스를 사용하여 카드를 만듭니다. (자세한 내용은 테이블 및 카드에서 확인하세요.)
생성 구성 요소 추가: 부트스트랩 양식 컨트롤 및 클래스 사용
이제 contact-create 구성 요소에 양식을 추가해 보겠습니다. 먼저 기본 애플리케이션 모듈에서 FormsModule 을 가져와야 합니다. src/app/app.module.ts 파일을 열고 @angular/forms 에서 FormsModule 을 가져와 imports 배열에 추가합니다.
import { BrowserModule } from '@angular/platform-browser'; import { NgModule } from '@angular/core'; import { AppRoutingModule } from './app-routing.module'; import { FormsModule } from '@angular/forms'; /* ... */ @NgModule({ declarations: [ /* ... */ ], imports: [ BrowserModule, AppRoutingModule, FormsModule ], providers: [], bootstrap: [AppComponent] }) export class AppModule { } 그런 다음 src/app/contact-create/contact-create.component.ts 파일을 열고 해당 내용을 다음으로 바꿉니다.
import { Component, OnInit } from '@angular/core'; import { DataService } from '../data.service'; @Component({ selector: 'app-contact-create', templateUrl: './contact-create.component.html', styleUrls: ['./contact-create.component.css'] }) export class ContactCreateComponent implements OnInit { contact : {id, name, description, email} = {id: null, name: "", description: "", email: ""}; constructor(public dataService: DataService) { } ngOnInit() { } createContact(){ console.log(this.contact); this.dataService.createContact(this.contact); this.contact = {id: null, name: "", description: "", email: ""}; } } 그런 다음 src/app/contact-create/contact-create.component.html 파일을 열고 다음 코드를 추가합니다.
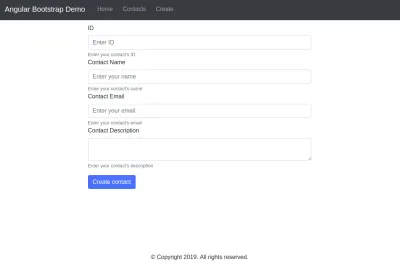
<div class="container"> <div class="row"> <div class="col-sm-8 offset-sm-2"> <div> <form> <div class="form-group"> <label for="id">ID</label> <input [(ngModel)]="contact.id" type="text" name="id" class="form-control" placeholder="Enter ID"> <small class="form-text text-muted">Enter your contact's ID</small> <label for="name">Contact Name</label> <input [(ngModel)]="contact.name" type="text" name="name" class="form-control" placeholder="Enter your name"> <small class="form-text text-muted">Enter your contact's name</small> <label for="email">Contact Email</label> <input [(ngModel)]="contact.email" type="text" name="email" class="form-control" placeholder="Enter your email"> <small class="form-text text-muted">Enter your contact's email</small> <label for="description">Contact Description</label> <textarea [(ngModel)]="contact.description" name="description" class="form-control"> </textarea> <small class="form-text text-muted">Enter your contact's description</small> </div> </form> <button class="btn btn-primary" (click)="createContact()">Create contact</button> </div> </div> </div> </div> .form-group , .form-control 클래스를 사용하여 부트스트랩 스타일 양식을 만듭니다(자세한 내용은 "양식" 참조).
ngModel 지시문을 사용하여 양식 필드를 구성 요소의 변수에 바인딩합니다. 데이터 바인딩이 제대로 작동하려면 각 양식 필드에 이름을 지정해야 합니다.
추천 자료 : Tamas Piros의 Angular로 이미지 중단점 관리하기
Angular 애플리케이션 실행
이 단계에서 애플리케이션을 실행하고 모든 것이 예상대로 작동하는지 확인합니다. 터미널로 이동하여 프로젝트의 루트 폴더에 있는지 확인한 후 다음 명령을 실행합니다.
$ ng serve 라이브 다시 로드 개발 서버는 https://localhost:4200 주소에서 실행됩니다. 웹 브라우저를 열고 해당 주소로 이동합니다. 다음 인터페이스가 표시되어야 합니다.

연락처 페이지로 이동하면 다음이 표시되어야 합니다.

"연락처 만들기" 페이지로 이동하면 다음이 표시되어야 합니다.

결론
이 튜토리얼에서는 부트스트랩 인터페이스를 사용하여 간단한 Angular 애플리케이션을 만드는 방법을 살펴보았습니다. GitHub에서 전체 소스 코드를 찾고 여기에서 라이브 예제를 볼 수 있습니다.
